Hello and welcome to Heartfelt Wednesday
Sorry I have been MIA (again) but last few weeks were going on here so blogging took a back seat but now I will try to be more regular in posting...
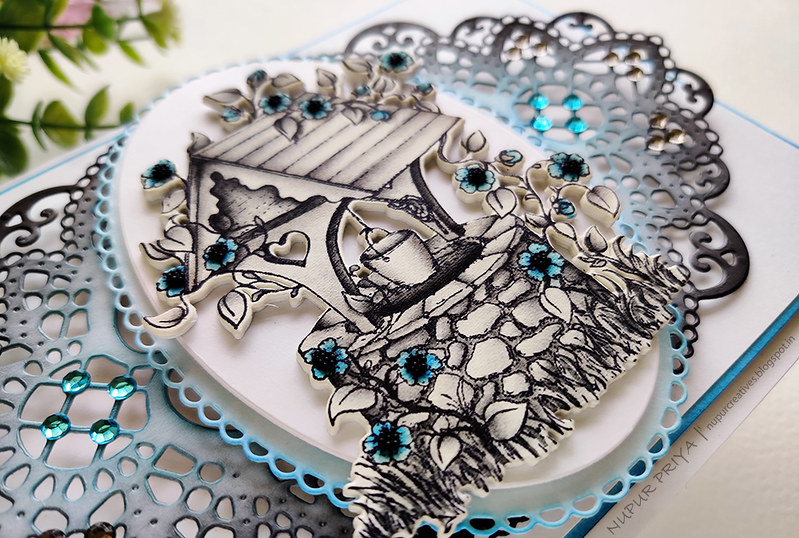
So I did a black and white coloring with a pop of blue and I loved how it turned out...
You can find the full supply list and instructions for this card at the end...


Heartfelt Creations Products: HCPC-3868 Wishing Well Oasis Cling Stamp Set
HCD1-7156 Eyelet Oval and Basics Small Dies
HCD1-7157 Eyelet Oval and Basics Large Dies
HCD1-7232 Wishing Well Oasis Die
HCD1-7233 Daydreams Bridge Die
HCPP1-438-2 Paper Pack of 10 - White
RACP468 Ranger Archival Ink Pad - Jet Black
HCDA2-450 Stack and Store Daubers-Pack of 30
352854 Metal Tip for Adhesive Bottles
159723 Designer Dries Clear Adhesive
DDOTS Double Dots 100pc. -3D Foam Circles
D120601 Darice Adhesive Foam Strips
Other Products: Salty Ocean, Black Soot and Hickory Smoke Distress inks, rhinestones, paint brushes, watercolor cardstock and black micro beads.
Instructions: Take a 4 1/2" x 6 1/2" piece of white cardstock and adhere it on a slightly bigger pieces of white cardstock inked with Salty Ocean Distress ink. Adhere this piece on a 5" x 7" white cardbase using Darice Adhesive Foam Strips.
Die cut 2 pieces of white cardstock using the decorative die from Daydreams Bridge Die and ink them using Salty Ocean and Black Soot Distress inks. Adhere them together as shown so that the resulting piece is 7" wide. Die cut a piece of white cardstock using the eyelet die from Eyelet Oval and Basics Small Dies, ink it lightly with Salty Ocean Distress ink and adhere it on the Daydreams Bridge Die die cut using Darice Adhesive Foam Strips as shown. Die cut a piece of white cardstock using the 2nd largest die from Eyelet Oval and Basics Large Dies and adhere it on the blue eyelet oval die cut using Darice Adhesive Foam Strips.
Stamp the image from Wishing Well Oasis Cling Stamp Set on a piece of watercolor cardstock using Jet Black Archival Ink and color it using Salty Ocean, Black Soot and Hickory Smoke Distress inks. Die cut the colored image using the matching die from Wishing Well Oasis Die. Die cut 4 more pieces of white cardstock using the same die. Stack and adhere all the dies to make a thicker piece. Glue black miro beads to the flower centers using little drops of glue. Adhere this piece on the oval die cut as shown. Add few grey and blue rhinestones on the die cuts to add finishing touch.
Hope you like it...
Sorry I have been MIA (again) but last few weeks were going on here so blogging took a back seat but now I will try to be more regular in posting...
So I did a black and white coloring with a pop of blue and I loved how it turned out...
You can find the full supply list and instructions for this card at the end...


Heartfelt Creations Products: HCPC-3868 Wishing Well Oasis Cling Stamp Set
HCD1-7156 Eyelet Oval and Basics Small Dies
HCD1-7157 Eyelet Oval and Basics Large Dies
HCD1-7232 Wishing Well Oasis Die
HCD1-7233 Daydreams Bridge Die
HCPP1-438-2 Paper Pack of 10 - White
RACP468 Ranger Archival Ink Pad - Jet Black
HCDA2-450 Stack and Store Daubers-Pack of 30
352854 Metal Tip for Adhesive Bottles
159723 Designer Dries Clear Adhesive
DDOTS Double Dots 100pc. -3D Foam Circles
D120601 Darice Adhesive Foam Strips
Other Products: Salty Ocean, Black Soot and Hickory Smoke Distress inks, rhinestones, paint brushes, watercolor cardstock and black micro beads.
Instructions: Take a 4 1/2" x 6 1/2" piece of white cardstock and adhere it on a slightly bigger pieces of white cardstock inked with Salty Ocean Distress ink. Adhere this piece on a 5" x 7" white cardbase using Darice Adhesive Foam Strips.
Die cut 2 pieces of white cardstock using the decorative die from Daydreams Bridge Die and ink them using Salty Ocean and Black Soot Distress inks. Adhere them together as shown so that the resulting piece is 7" wide. Die cut a piece of white cardstock using the eyelet die from Eyelet Oval and Basics Small Dies, ink it lightly with Salty Ocean Distress ink and adhere it on the Daydreams Bridge Die die cut using Darice Adhesive Foam Strips as shown. Die cut a piece of white cardstock using the 2nd largest die from Eyelet Oval and Basics Large Dies and adhere it on the blue eyelet oval die cut using Darice Adhesive Foam Strips.
Stamp the image from Wishing Well Oasis Cling Stamp Set on a piece of watercolor cardstock using Jet Black Archival Ink and color it using Salty Ocean, Black Soot and Hickory Smoke Distress inks. Die cut the colored image using the matching die from Wishing Well Oasis Die. Die cut 4 more pieces of white cardstock using the same die. Stack and adhere all the dies to make a thicker piece. Glue black miro beads to the flower centers using little drops of glue. Adhere this piece on the oval die cut as shown. Add few grey and blue rhinestones on the die cuts to add finishing touch.
Hope you like it...
Thank you for visiting today... :)


ReplyDeleteشركة تسليك مجارى بالقطيف
شركة تسليك مجارى بالدمام
شركة تسليك مجارى بالاحساء
شركة تسليك مجارى بالقطيف
شركة تسليك مجارى بالخبر