Friday 30 April 2021

Welcome Baby

Hello Everyone! 

I am back with another inspiration for Papericious.

Papericious has released a beautiful collection this month and for today's project I choose Peekaboo paper pack and Peekaboo Motif Sheet

This is a cute Baby Collection. It has a neutral color palette, cute images and baby milestone cards. I have used elements form the motif sheet along with a strip of pattern paper and embossed cardstock to create this cute card. 

IMG_20210428_131540 
IMG_20210428_132821 
Supplies Used:


Hope you like it...
Thank you for visiting today... :)
Nupur
Disclosure : Compensated affiliate links used when possible  at NO additional cost to you.. Thank you! 

Wednesday 28 April 2021

So Grateful

Hello friends and welcome to my blog.
Today I am sharing a watercolored card with stenciled background and Magnolia buds image.
So Grateful for You_Nupur Priya_01 
So Grateful for You_Nupur Priya_02

Heartfelt Creations Products:

Other Products:
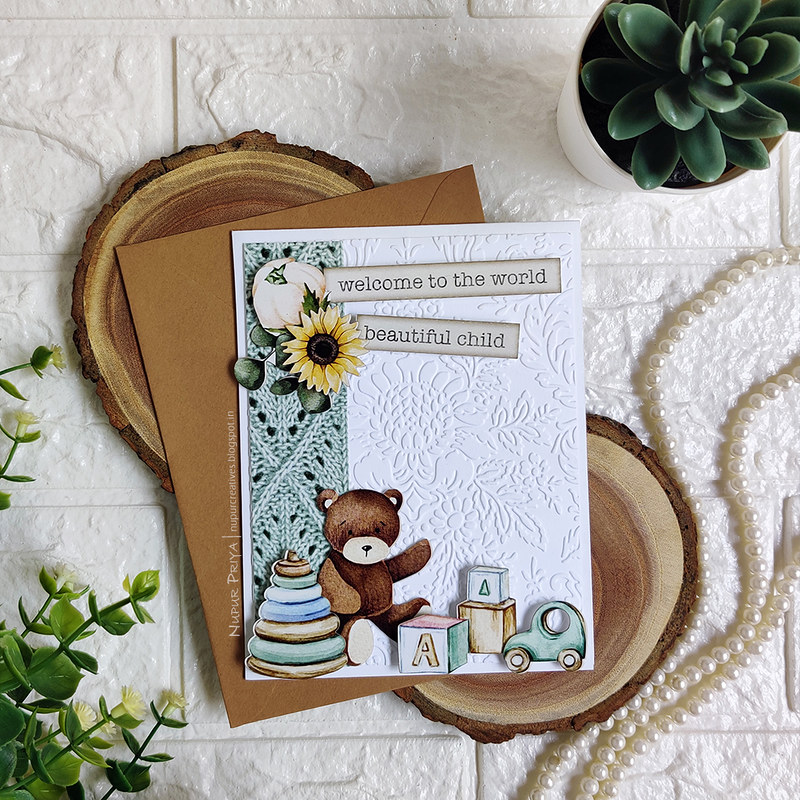
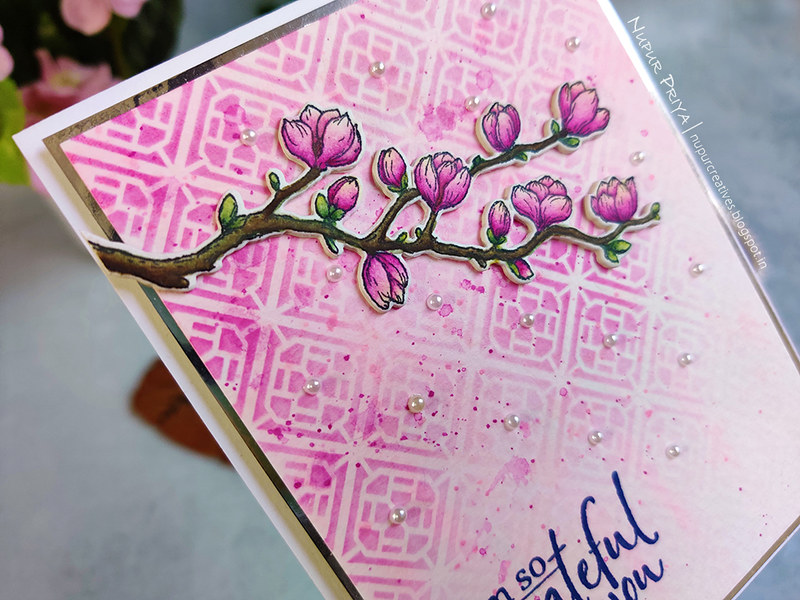
Picked Raspberry Distress ink, Altenew Watercolors,  Mudra Asian Tile Pattern Stencil, Brustro Watercolor cardstock, Brustro Green gold brushes, oval makeup brushes, double sided foam adhesive and pearls.

Instructions:
Take a 4" x 5 1/4" piece of watercolor cardstock and loosely paint it with Pink Diamond and Purple Wine colors from Altenew watercolor palette, let it dry and splatter some of these colors on top. Once it dries apply Picked Raspberry Distress ink on it using  Mudra Asian Tile Pattern Stencil and big oval makeup brush using varied pressure and ink to get a air brushed look. Trim down this panel slightly and adhere it on a 4" x 5 1/4" piece of Luxe Silver Cardstock.

Stamp the sentiment from For My Friend Sentiments Cling Stamp Set on the bottom left corner using Paris Dusk Memento Dye Ink. Adhere this panel on a 4 1/4" x 5 1/2" white card base using double sided foam adhesive.

Stamp the image from Sweet Magnolia Buds Cling Stamp Set on a piece of watercolor cardstock with Jet Black Archival Ink and die cut using the matching die from Sweet Magnolia Buds Die. Cut 3 more pieces of white cardstock using the same die and adhere them behind the stamped piece. Color the image with Altenew Watercolors and adhere it on the card front as shown. Add some pearls to the background for finishing touch.


Hope you like it...
Thank you for visiting today... :)
Nupur
Disclosure : Compensated affiliate links used when possible  at NO additional cost to you.. Thank you! 

Friday 23 April 2021

A Great Joy is Coming

Hello Everyone! 
How are you all?
I am happy to be Guest Designing for Papericious this month. Thank you Aastha and Papericious for giving me this opportunity.

Papericious has released a beautiful collection this month and for today's project I choose Mama in the Making Motif Sheet and Mom to be Laser Cut Theme Chipboard.
As the name suggests this is a pregnancy related Collection and it has gorgeous images, lovely colors and even the pregnancy milestone cards. The die cut sheet is great for those who cannot fussy cut the images or don't have the time to do it. The beautiful images are already cut. You just have to pop it out and use on your projects. The chipboard sentiments compliment this this set perfectly.
This card came together quickly using the elements from this collection.  

I also have a video on my YouTube Channel for this card. 
All the supplies are listed down below.
 
A Great Joy is Coming_Nupur Priya_01       A Great Joy is Coming_Nupur Priya_02       A Great Joy is Coming_Nupur Priya_03


Supplies Used:


Hope you like it...
Thank you for visiting today... :)
Nupur
Disclosure : Compensated affiliate links used when possible  at NO additional cost to you.. Thank you! 

Wednesday 14 April 2021

Sweet Magnolia Card

Hello everyone and welcome to my blog
Have you seen the beautiful new collection by Heartfelt Creations

Sweet Magnolia Collection

I love this collection and I have made a beautiful floral card using this collection....
Andddddd I also have a Video Tutorial for these flowers below and a Discount Code for Heartfelt Creations store... Whoohooo
Plus I have a video too for these beautiful Magnolias...
So read till the end!
Sweet Magnolia Card_Nupur Priya_01

Sweet Magnolia Card_Nupur Priya_02


Heartfelt Creations Products:
HCD1-7247 Regal Pocket Accents Die

Other Products:
 Sizzix Tim Holtz Bricked Embossing Folder, Altenew Watercolors, Brustro Watercolor cardstock, Brustro Green gold brushes, double sided foam adhesive and pearls.

Instructions:
Card Base: Cut a 4 1/4" x 5 1/2" piece of pattern paper from Sweet Magnolia Paper Collection and adhere it on a same sized white card front. Die cut 2 pieces of white cardstock using the die from  Regal Pocket Accents Die and adhere them on the card front as shown using double sided foam adhesive. Emboss a 2 3/4" x 5 1/2" piece of white cardstock using Sizzix Tim Holtz Bricked Embossing Folder. Adhere it on a slightly wider piece of white cardstock and add thin strips of Luxe Silver Cardstock on both sides of the embossed piece. Adhere this piece on the card front as shown using double sided foam adhesive.

Magnolia Flowers: Stamp the flowers from Sweet Magnolia Blooms Cling Stamp Set on Deluxe Flower Shaping Paper with Vibrant Fuchsia Archival Ink. Ink the petals with the same ink and die cut them using the matching dies from Sweet Magnolia Blooms Die.

Magnolia Leaves: Stamp the leaves from Sweet Magnolia Blooms Cling Stamp Set on Deluxe Flower Shaping Paper with Leaf Green Archival Ink. Ink the leaves with the same ink and die cut them using the matching dies from Sweet Magnolia Blooms Die.

Shape the flowers and leaves using 3D Magnolia Shaping Mold and Deluxe Flower Shaping Kit. Add few cream stamens from Rock Candy Stamens to the flower centers. Arrange and adhere all the flowers and leaves on the card front as shown. Apply a little Designer Dries Clear Adhesive on the flowers and leaves using Hydra Sponges, sprinkle Crystal Ultrafine Transparent Glitter and tap off the excess.

Stamp the image from Sweet Magnolia Buds Cling Stamp Set on a piece of watercolor cardstock with Jet Black Archival Ink and die cut using the matching die from Sweet Magnolia Buds Die. Color the image with Altenew Watercolors. Snip this piece into smaller pieces and tuck them behind the flower arrangement as shown. Add few ladybugs made with Ebony Black and Red Berry Nuvo Crystal Drops to the flower arrangement and some pearls to the die cuts for finishing touch.


----- DISCOUNT CODE ALERT -----

Click below to avail a discount of $20 off your first order of $40+ from Heartfelt Creations website. You can thank me later :) http://fbuy.me/v/nupur_38


Hope you like it...
Thank you for visiting today... :)
Nupur
Disclosure : Compensated affiliate links used when possible  at NO additional cost to you.. Thank you! 

Wednesday 31 March 2021

Green & Pink Wreath Card

Hello and welcome to my blog.
Today I am sharing one more card made with the new Spring Garden Collection and one of the older die used in an unusual way. Scroll down for detailed instructions and supply list.
floral wreath card_Nupur Priya_01


Other products:
Couture Creations Dandiya Embossing folder, double sided foam tape, rhinestones and pearls.

Instructions:
Emboss a 4" x 5 1/4" piece of white cardstock using the Couture Creations Dandiya Embossing folder. Adhere it on a 4 1/4" x 5 1/2" white cardbase.

Die cut 2 pieces of white cardstock using the dies from Decorative Circle Frames Die and Sweetheart Borders Die. Cut the  Sweetheart Borders Diecut so that the center part fits inside the eyelet circle diecut and adhere them together. Ink all the 3 pieces lightly with Leaf Green Archival Ink. Arrange and adhere them as shown on the cardbase using double sided foam tape for the circle piece.

Stamp the flowers from Fragrant Hyacinth Cling Stamp Set on a piece of Deluxe Flower Shaping Paper using Vibrant Fuchsia and Cactus Flower Archival Inks. Ink them with same inks and die cut using matching die from Fragrant Hyacinth Die. Shape them using 3D Hyacinth Shaping Mold and  Deluxe Flower Shaping Kit. Add few white stamens from Assorted Pearl Stamens to the flower centers.

Stamp the leaves from Cottage Tree 'scapes Cling Stamp Set on a piece of Deluxe Flower Shaping Paper using Leaf Green Archival Ink. Ink it with same ink and die cut using matching die from Cottage Tree 'scapes Die. Shape it using  Deluxe Flower Shaping Kit.

Arrange and adhere all the flowers and leaves on the card as shown. Add few pearls and rhinestones to add finishing touch.


Hope you like it...
Thank you for visiting today... :)
Nupur
Disclosure : Compensated affiliate links used when possible  at NO additional cost to you.. Thank you! 

Wednesday 24 March 2021

So Grateful Floral Card

Hello and welcome to my blog 
Today I am sharing a feminine floral card and I love how it turned out.
As usual all the supply list and instructions and down below.
Grateful for you Card__Nupur Priya_01     Grateful for you Card__Nupur Priya_02

Grateful for you Card__Nupur Priya_03
Heartfelt Creations Products: 
HCPC-3947 Fragrant Hyacinth Cling Stamp Set
HCD1-7345 Fragrant Hyacinth Die
HCFB1-497 3D Hyacinth Shaping Mold
HCPC-3939 Cottage Tree 'scapes Cling Stamp Set
HCD1-7333 Cottage Tree 'scapes Die
HCDP1-2124 Delightful Daffodil Paper Collection
18002 Rajni Chawla's Vellum Flowerite
EP100 Opaque Embossing Powder - White
RACP985 Ranger Archival Ink Pad - Cactus Flower
DMCT4185 Groove Golf Tool Set
RAHT Heat It Craft Tool
359848 Spellbinders Tool N' One
SUAH05 5pc. Acrylic Block Set
352854 Metal Tip for Adhesive Bottles
159723 Designer Dries Clear Adhesive
3D1844 3-D Crystal Lacquer

Other products:
Worn Lipstick Distress ink, Worn Lipstick Distress Oxide ink, Hero Arts unicorn White pigment ink,  double sided foam tape, DMC corner rounder punch, pearls and rhinestones.

Instructions:
Cut a piece of 5 3/4" x 5 3/4" piece of pattern paper from  Delightful Daffodil Paper Collection and adhere it on a 6" x 6" white card base lightly inked with Worn Lipstick Distress ink. Die cut a piece of white cardstock with the die from Ornate Pocket Accents Die twice to make a big triangle doily shape. Ink it lightly with Worn Lipstick Distress ink and adhere it on the bottom left corner of the card as shown using double sided foam tape.


Cut a 3 1/2" x 4" pattern paper from the Delightful Daffodil Paper Collection and adhere it on a same sized cardstock. Round the corners using the DMC corner rounder punch. Die cut 2 pieces of white cardstock using the die from Decorative Pocket Accents Die and a piece using the die from Eyelet Rectangle & Basics Die. ink all 3 pieces lightly with Worn Lipstick Distress ink. Cut 2 slightly smaller pieces of pattern papers from the same paper collection and adhere it on the eyelet rectangle die cut as shown. Stamp the sentiment from For My Friend Sentiments Cling Stamp Set on this using Jet Black Archival Ink. Adhere them on the 3 1/2" x 4" panel. Adhere this on the card front as shown.

Flowers : Stamp the flowers from Oakberry Lane Blossoms Cling Stamp Set on a sheet of Rajni Chawla's Vellum Flowerite with Hero Arts unicorn White pigment ink and heat emboss using White Embossing Powder and Heat It Craft ToolDie cut all the flowers using the matching dies from Oakberry Lane Blossoms Die.

Ink the Oakberry Lane flowers with Worn Lipstick Distress Oxide ink as shown using Stack and Store Daubers. Gently rub over the flowers with a piece of soft cloth in circular motion to remove any leftover ink on the white embossing and make it bright again. Shape them using the pointed edge of the Groove Golf Tool Set. Pinch the petals in the middle and then gently curve the edges outwards.

Now use the ball tool and the molding mat from Deluxe Flower Shaping Kit to do a circular motion in the flower center to cup the flowers. Add a drop of 3-D Crystal Lacquer to the flower center, place another flower petal on top and press with the ball tool. Poke a hole in the flower center using the pointed attachment of the Deluxe Flower Shaping Kit.  Add a  bunch of medium Rock Candy Stamens and Pastel Pearl Stamens to the flower center and adhere them with 3-D Crystal Lacquer.

Stamp the flowers from Fragrant Hyacinth Cling Stamp Set on a piece of Deluxe Flower Shaping Paper using Vibrant Fuchsia and Cactus Flower Archival Inks. Ink them with same inks and die cut using matching die from Fragrant Hyacinth Die. Shape them using 3D Hyacinth Shaping Mold and  Deluxe Flower Shaping Kit. Add few white stamens from Assorted Pearl Stamens to the flower centers.

Stamp the leaves from Cottage Tree 'scapes Cling Stamp Set on a piece of Deluxe Flower Shaping Paper using Leaf Green Archival Ink. Ink it with same ink and die cut using matching die from Cottage Tree 'scapes Die. Shape it using  Deluxe Flower Shaping Kit.

Arrange and adhere all the flowers and leaves on the card as shown. Add few rhinestones and pearls to add finishing touch.


Hope you like it...
Thank you for visiting today... :)
Nupur
Disclosure : Compensated affiliate links used when possible  at NO additional cost to you.. Thank you!