Wednesday 31 March 2021

Green & Pink Wreath Card

Hello and welcome to my blog.
Today I am sharing one more card made with the new Spring Garden Collection and one of the older die used in an unusual way. Scroll down for detailed instructions and supply list.
floral wreath card_Nupur Priya_01


Other products:
Couture Creations Dandiya Embossing folder, double sided foam tape, rhinestones and pearls.

Instructions:
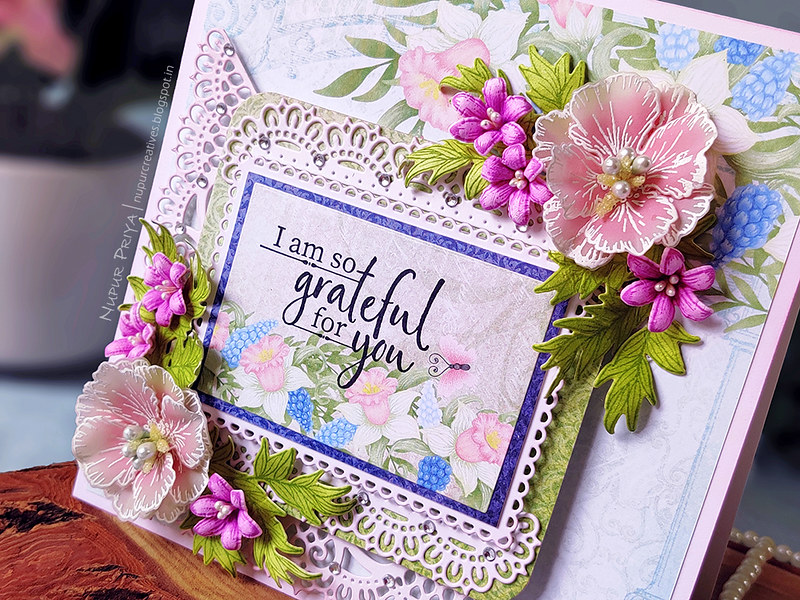
Emboss a 4" x 5 1/4" piece of white cardstock using the Couture Creations Dandiya Embossing folder. Adhere it on a 4 1/4" x 5 1/2" white cardbase.

Die cut 2 pieces of white cardstock using the dies from Decorative Circle Frames Die and Sweetheart Borders Die. Cut the  Sweetheart Borders Diecut so that the center part fits inside the eyelet circle diecut and adhere them together. Ink all the 3 pieces lightly with Leaf Green Archival Ink. Arrange and adhere them as shown on the cardbase using double sided foam tape for the circle piece.

Stamp the flowers from Fragrant Hyacinth Cling Stamp Set on a piece of Deluxe Flower Shaping Paper using Vibrant Fuchsia and Cactus Flower Archival Inks. Ink them with same inks and die cut using matching die from Fragrant Hyacinth Die. Shape them using 3D Hyacinth Shaping Mold and  Deluxe Flower Shaping Kit. Add few white stamens from Assorted Pearl Stamens to the flower centers.

Stamp the leaves from Cottage Tree 'scapes Cling Stamp Set on a piece of Deluxe Flower Shaping Paper using Leaf Green Archival Ink. Ink it with same ink and die cut using matching die from Cottage Tree 'scapes Die. Shape it using  Deluxe Flower Shaping Kit.

Arrange and adhere all the flowers and leaves on the card as shown. Add few pearls and rhinestones to add finishing touch.


Hope you like it...
Thank you for visiting today... :)
Nupur
Disclosure : Compensated affiliate links used when possible  at NO additional cost to you.. Thank you! 

Wednesday 24 March 2021

So Grateful Floral Card

Hello and welcome to my blog 
Today I am sharing a feminine floral card and I love how it turned out.
As usual all the supply list and instructions and down below.
Grateful for you Card__Nupur Priya_01     Grateful for you Card__Nupur Priya_02

Grateful for you Card__Nupur Priya_03
Heartfelt Creations Products: 
HCPC-3947 Fragrant Hyacinth Cling Stamp Set
HCD1-7345 Fragrant Hyacinth Die
HCFB1-497 3D Hyacinth Shaping Mold
HCPC-3939 Cottage Tree 'scapes Cling Stamp Set
HCD1-7333 Cottage Tree 'scapes Die
HCDP1-2124 Delightful Daffodil Paper Collection
18002 Rajni Chawla's Vellum Flowerite
EP100 Opaque Embossing Powder - White
RACP985 Ranger Archival Ink Pad - Cactus Flower
DMCT4185 Groove Golf Tool Set
RAHT Heat It Craft Tool
359848 Spellbinders Tool N' One
SUAH05 5pc. Acrylic Block Set
352854 Metal Tip for Adhesive Bottles
159723 Designer Dries Clear Adhesive
3D1844 3-D Crystal Lacquer

Other products:
Worn Lipstick Distress ink, Worn Lipstick Distress Oxide ink, Hero Arts unicorn White pigment ink,  double sided foam tape, DMC corner rounder punch, pearls and rhinestones.

Instructions:
Cut a piece of 5 3/4" x 5 3/4" piece of pattern paper from  Delightful Daffodil Paper Collection and adhere it on a 6" x 6" white card base lightly inked with Worn Lipstick Distress ink. Die cut a piece of white cardstock with the die from Ornate Pocket Accents Die twice to make a big triangle doily shape. Ink it lightly with Worn Lipstick Distress ink and adhere it on the bottom left corner of the card as shown using double sided foam tape.


Cut a 3 1/2" x 4" pattern paper from the Delightful Daffodil Paper Collection and adhere it on a same sized cardstock. Round the corners using the DMC corner rounder punch. Die cut 2 pieces of white cardstock using the die from Decorative Pocket Accents Die and a piece using the die from Eyelet Rectangle & Basics Die. ink all 3 pieces lightly with Worn Lipstick Distress ink. Cut 2 slightly smaller pieces of pattern papers from the same paper collection and adhere it on the eyelet rectangle die cut as shown. Stamp the sentiment from For My Friend Sentiments Cling Stamp Set on this using Jet Black Archival Ink. Adhere them on the 3 1/2" x 4" panel. Adhere this on the card front as shown.

Flowers : Stamp the flowers from Oakberry Lane Blossoms Cling Stamp Set on a sheet of Rajni Chawla's Vellum Flowerite with Hero Arts unicorn White pigment ink and heat emboss using White Embossing Powder and Heat It Craft ToolDie cut all the flowers using the matching dies from Oakberry Lane Blossoms Die.

Ink the Oakberry Lane flowers with Worn Lipstick Distress Oxide ink as shown using Stack and Store Daubers. Gently rub over the flowers with a piece of soft cloth in circular motion to remove any leftover ink on the white embossing and make it bright again. Shape them using the pointed edge of the Groove Golf Tool Set. Pinch the petals in the middle and then gently curve the edges outwards.

Now use the ball tool and the molding mat from Deluxe Flower Shaping Kit to do a circular motion in the flower center to cup the flowers. Add a drop of 3-D Crystal Lacquer to the flower center, place another flower petal on top and press with the ball tool. Poke a hole in the flower center using the pointed attachment of the Deluxe Flower Shaping Kit.  Add a  bunch of medium Rock Candy Stamens and Pastel Pearl Stamens to the flower center and adhere them with 3-D Crystal Lacquer.

Stamp the flowers from Fragrant Hyacinth Cling Stamp Set on a piece of Deluxe Flower Shaping Paper using Vibrant Fuchsia and Cactus Flower Archival Inks. Ink them with same inks and die cut using matching die from Fragrant Hyacinth Die. Shape them using 3D Hyacinth Shaping Mold and  Deluxe Flower Shaping Kit. Add few white stamens from Assorted Pearl Stamens to the flower centers.

Stamp the leaves from Cottage Tree 'scapes Cling Stamp Set on a piece of Deluxe Flower Shaping Paper using Leaf Green Archival Ink. Ink it with same ink and die cut using matching die from Cottage Tree 'scapes Die. Shape it using  Deluxe Flower Shaping Kit.

Arrange and adhere all the flowers and leaves on the card as shown. Add few rhinestones and pearls to add finishing touch.


Hope you like it...
Thank you for visiting today... :)
Nupur
Disclosure : Compensated affiliate links used when possible  at NO additional cost to you.. Thank you! 

Wednesday 17 March 2021

Hyacinth Frame Card

Hello and welcome to my blog
Today I am sharing another card made with the negative die cut pieces technique that I shared here
This time I have made a frame for my Hyacinth with those pieces.
Scroll down for more details and instructions.Hyacinth Frame_Nupur Priya_01 
Hyacinth Frame_Nupur Priya_02
Heartfelt Creations Products:
HCPC-3947 Fragrant Hyacinth Cling Stamp Set
HCD1-7345 Fragrant Hyacinth Die
HCFB1-497 3D Hyacinth Shaping Mold
HCD2-7337 Teardrop Lattice Gateway Die

Instructions:
Die cut 2 pieces of white cardstock using the dies from Eyelet Royale Die. Trim the frame and adhere them on a 4 1/4" x 5 1/2" white cardbase as shown.

Stamp the hyacinth image from Fragrant Hyacinth Cling Stamp Set on a piece of watercolor cardstock and die cut using the matching die from Fragrant Hyacinth Die. Color in the image using Altenew watercolors. Adhere this on the card front.

Die cut a piece of white cardstock using the dies from  Eyelet Rectangle & Basics Die to make a thin 3" x 4" frame. Adhere the negative die cut pieces of Luxe Gold Cardstock left after cutting Teardrop Lattice Gateway Die on this white frame as shown to create a gold frame. Adhere this frame on the card front using double sided foam tape to frame the Hyacinth.

Stamp the flowers from Fragrant Hyacinth Cling Stamp Set on a piece of Deluxe Flower Shaping Paper using Vibrant Fuchsia and Cactus Flower Archival Inks. Ink them with same inks and die cut using matching die from Fragrant Hyacinth Die. Shape them using 3D Hyacinth Shaping Mold and  Deluxe Flower Shaping Kit. 

Arrange and adhere all the flowers on the Hyacinth as shown. Add a drop of Ivory Seashell Nuvo Crystal Drops to the flower centers. Add few pearls to the die cuts to add finishing touch.


Hope you like it...
Thank you for visiting today... :)
Nupur
Disclosure : Compensated affiliate links used when possible  at NO additional cost to you.. Thank you!