Hello and welcome to Heartfelt Creations inspiration post.
Today we are releasing the second Christmas collection for this year
This collection has beautiful images with matching dies and a snow globe die too.
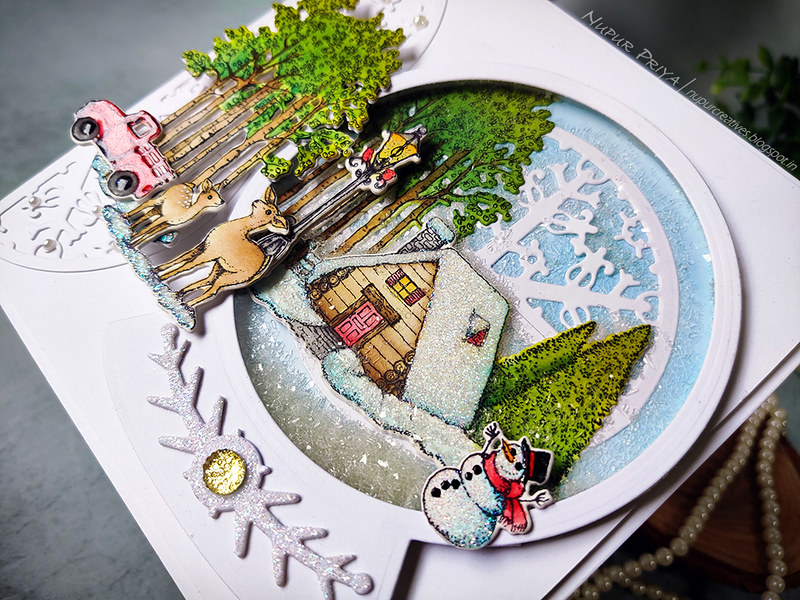
I have made a shaker card with this collection for today's inspiration.
All supplies used to make this card and the instructions can be found below the photographs.

HCPP1-438-2 Paper Pack of 10 - White
GBKK811B1 Clear Cardstock 8.5 x 11
RACP468 Ranger Archival Ink Pad - Jet Black
359848 Spellbinders Tool N' One
352854 Metal Tip for Adhesive Bottles
159723 Designer Dries Clear Adhesive
3D1844 3-D Crystal Lacquer
NU650 Nuvo Crystal Drops - Ebony Black
Other Products:
Twisted Citron, Mowed Lawn, Pine Needles, Gathered Twigs, Walnut Stain, Barn Door, Carved Pumpkin, Mustard Seed, Salty Ocean and Black Soot Distress inks, Canson Hot pressed watercolor cardstock, Sakura gelly roll white gel pen, transparent holographic glitter, Creative Expressions clear micro beads, Twinklets Diamond dust, painting brushes, Oval Makeup brush, pearls and rhinestones.
Instructions:
Die cut 2 decorative semi-circles using the dies from Festive Snowglobe Die and adhere them on one side of a 5 3/4" x 5 3/4" piece of white cardstock, slightly overlapping them in the center. Adhere this piece on a 6" x 6" card base.
Stamp the images from Festive Winterscapes Cling Stamp Set and Woodsy Winterscapes Cling Stamp Set on a piece of watercolor cardstock using Jet Black Archival Ink Pad and die cut them using the matching dies from Festive Winterscapes Die and Woodsy Winterscapes Die. Die cut 2-3 more pieces of each die cut, stack and adhere them together to create a thicker piece. Color in the images using Twisted Citron, Mowed Lawn, Pine Needles, Gathered Twigs, Walnut Stain, Barn Door, Carved Pumpkin, Mustard Seed, Salty Ocean and Black Soot Distress inks. Apply a layer of Designer Dries Clear Adhesive to the snow portions of the images and sprinkle the glitter. Add tiny drops of Ebony Black Nuvo Crystal Drops to the snowman's and deer's eyes and the snowman's buttons. Add a layer of 3-D Crystal Lacquer to the snowman's hat, lamp post and truck.
Die cut 1 solid white snow globe, 1 white snow globe frame and 1 transparent snow globe from white cardstock and Clear Cardstock using the dies from Festive Snowglobe Die. Ink the solid die cutlightly with Salty Ocean Distress ink. Die cut 2 decorative semi-circles using the dies from the same set and adhere them together in the center of the blue die cut as shown.
Arrange and adhere the cottage and tree images on the snow globe as shown and trim off the excess. Add a thin strip of foam adhesive around the outer edge of the snow globe to make a dam. Add a little Creative Expressions clear micro beads and Twinklets Diamond dust in the center. Adhere the clear snow globe die cut and the white snow globe frame die cut on top.
Die cut 3 white pieces of the decorative piece for the bottom of the globe using the die from the same set. Stack and adhere them together to make a thicker piece. Apply a layer of Designer Dries Clear Adhesive to it and sprinkle the glitter. Adhere this piece on the base of the snow globe and add 1 rhinestone on the center of this piece.
Adhere the shaker snow globe on the card base as shown and adhere the remaining colored images as shown using foam adhesive whenever required. Add few pearls on the die cut for finishing touch.
Hope you like it...
Thank you for visiting today... :)