Wednesday 27 January 2021

Just For You Decorative Gateway Dies

Hello and Welcome to my blog
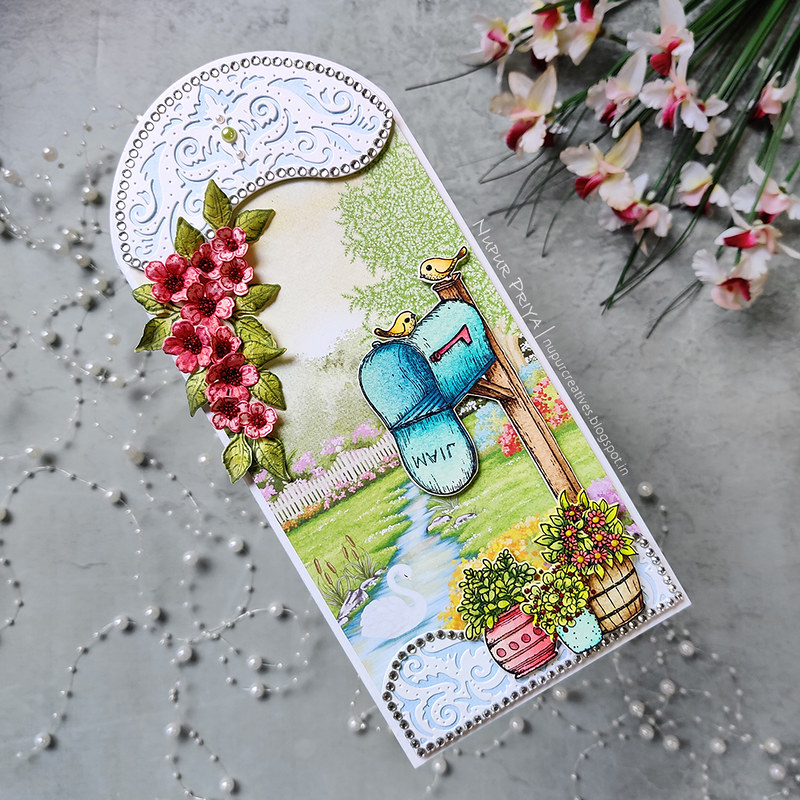
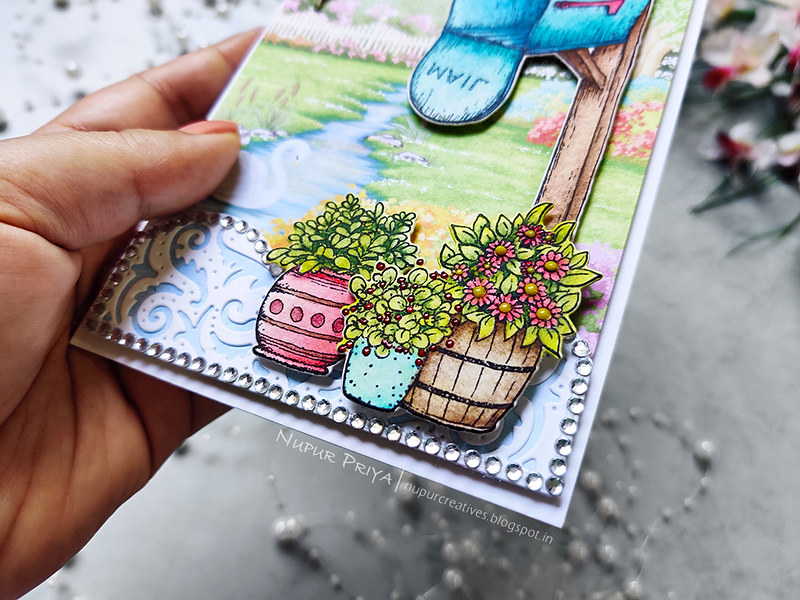
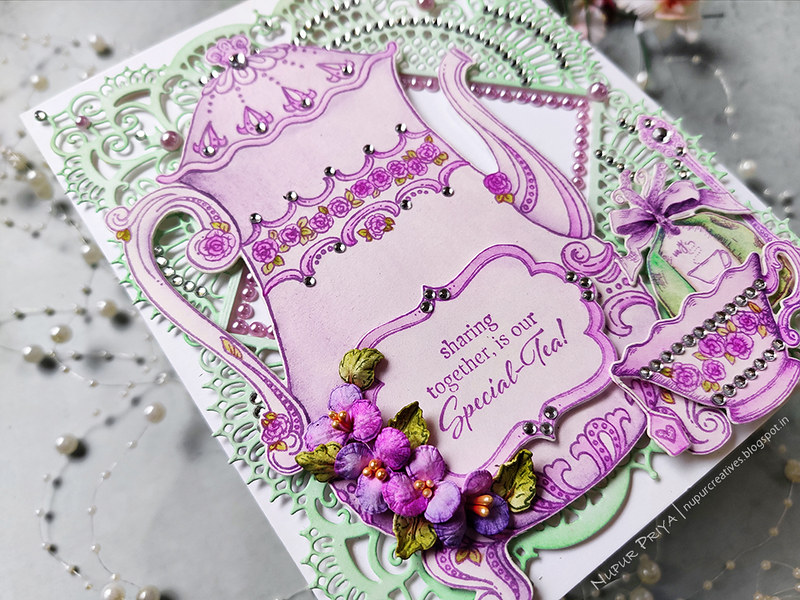
Today we have a special release of 4 sets of gorgeous dies

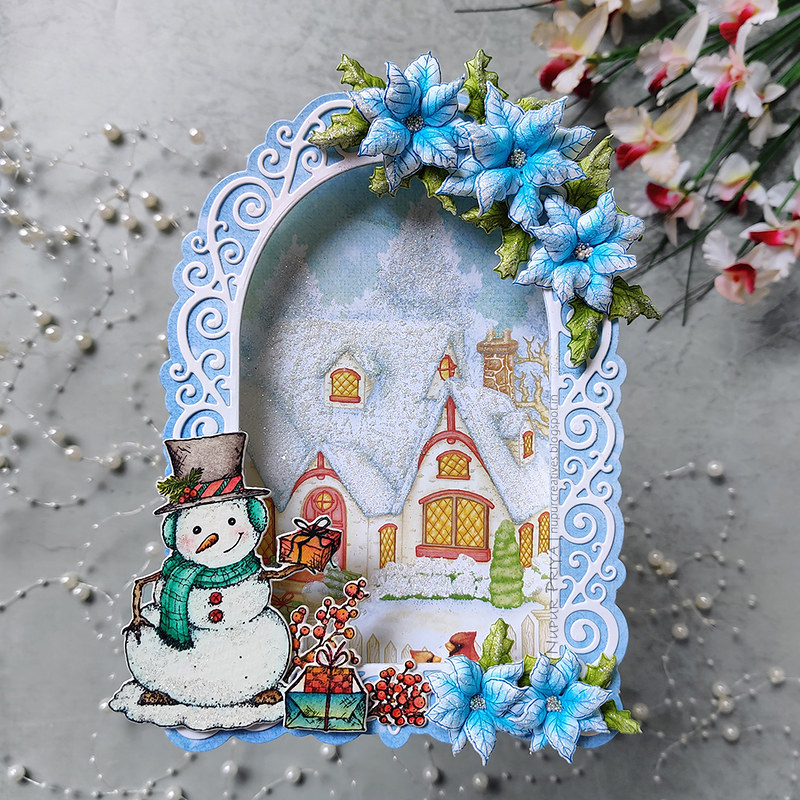
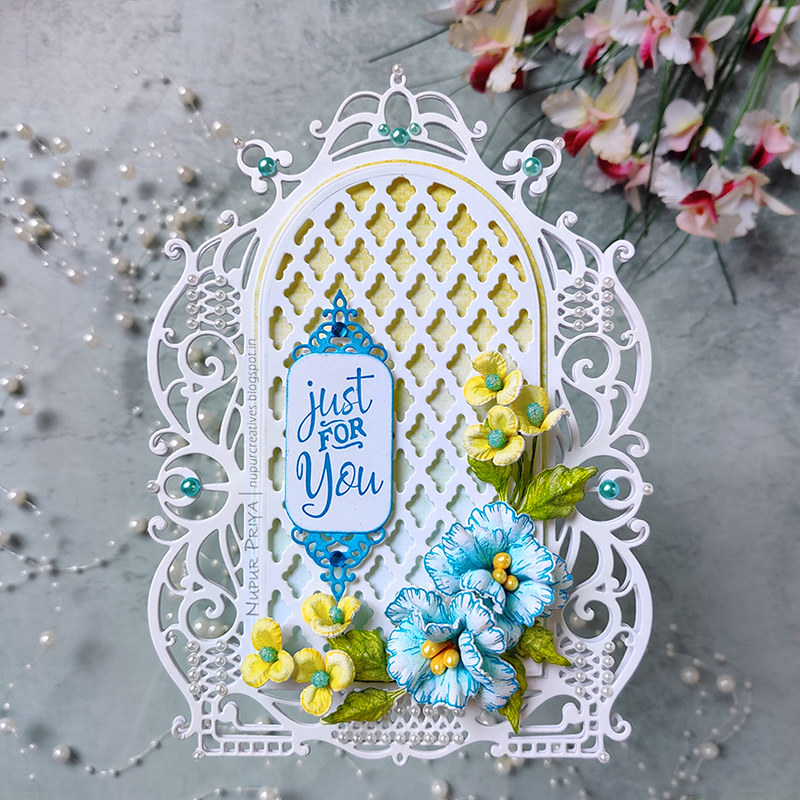
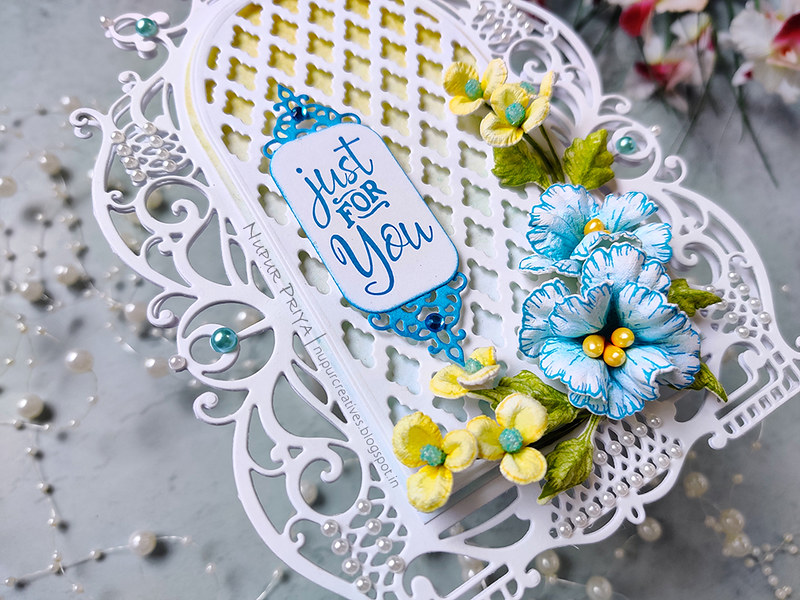
5 x 7 Decorative Gateway Dies

I have made a delicate floral card using 1 of these sets.
The full supply list and instructions can be found down below the photos.
Just For you_Nupur Priya_01

Just For you_Nupur Priya_02

Just For you_Nupur Priya_03

Heartfelt Creations Products:
HCD2-7339 Regal Lattice Gateway Die

Other Products:
Altenew Watercolors, Brustro Cold Pressed Watercolor Cardstock, Brusto Green gold brushes, DMC mini score board, double sided foam tape and transparent glitter.

Instructions:
Card Base: Cut 1 panel away from 5" x 7" Gateway Fold Card and die cut the remaining 2 panels using the die from Regal Lattice Gateway Die so that the fold line is on the left side and slightly inside the cutting edge. Die cut 1 more piece of white cardstock using the same die, align and adhere it on the cardbase to add more strength to the detailed die cut card base and to hide the fold line. Trace the inner edge of the die on a piece of pattern paper from Countryside Cottage Paper Collection, fussy cut it and adhere on the card base. Die cut a piece of white cardstock using the remaining 2 dies from the same set and adhere it on the card front using double sided foam tape.

Blue Flowers and Leaves: Stamp the flowers and leaves from Oakberry Lane Blossoms Cling Stamp Set using Manganese Blue and Leaf Green Archival Inks on a piece of Deluxe Flower Shaping Paper, color them with the same inks and die cut them using the matching dies from Oakberry Lane Blossoms Die.Shape them using 3D Blossoms Shaping MoldDeluxe Flower Shaping Kit and Groove Golf Tool Set. Add a few yellow stamens from Bright Pearl Stamens to the flower centers.

Yellow Flowers: Stamp the flowers from Wisteria Petals Cling Stamp Set on a piece of Deluxe Flower Shaping Paper using Sunflower Archival Ink and color it with the same ink. Die cut them using the matching die from Wisteria Petals Die. Shape the flowers using Deluxe Flower Shaping Kit and Groove Golf Tool Set. Add a blue stamen from Pastel Bead Stamens to the flower centers. Color the stems of the stamens with Leaf Green Archival Ink

Sentiment: Stamp the sentiment from Just For You Sentiments Cling Stamp Set on a piece of white cardstock using Manganese Blue Archival Ink. Die cut this piece using the die from Cut Mat Create 1A Die aligning the sentiment towards the left of the short side Then cut it again after shifting the die so that the sentiment is aligned towards the right side. Die cut a piece of white cardstock using the die from Window Hinges Die and cut it in the middle to make 2 pieces. ink it with Manganese Blue Archival Ink and ink the edges if the sentiment die cut too with the same ink. Adhere the Window Hinges Diecut behind the sentiment die cut on the top and bottom. Adhere the resulting piece on the card front using double sided foam tape as shown. 

Arrange and adhere all the flowers and leaves on the card front as shown. Add pearls and rhinestones to the card to add finishing touch.


Hope you like it...
Thank you for visiting today... :)
Nupur
Disclosure : Compensated affiliate links used when possible  at NO additional cost to you.. Thank you! 

Wednesday 20 January 2021

Shadowbox Snowman Card

Hello and welcome to my blog
Today I am sharing a shadowbox winter card made with Countryside Cottage Collection
The full supply list and instructions are below the photographs.
Snowman with gifts_Nupur Priya_01

Snowman with gifts_Nupur Priya_02

Snowman with gifts_Nupur Priya_03
Heartfelt Creations Products:

Other Products:
Altenew Watercolors, Brustro Cold Pressed Watercolor Cardstock, Brusto Green gold brushes, DMC mini score board, double sided foam tape and transparent glitter.

Instructions:
Die cut a piece of white cardstock and a piece of pattern paper from Countryside Cottage Paper Collection using the largest die from Elegant Swirl Gateway Die and adhere them together to create the back of the card. Die cut 2 pieces of white cardstock and a piece of pattern paper from Countryside Cottage Paper Collection using the dies from Elegant Swirl Gateway Die so that there is a hole in the middle and adhere them together to create front of the card. Score a 2" wide piece of white cardstock at 1/2", 1" and 1 1/2" and fold it in mountain ans valley pattern. Cut this strip down to 3 pieces of 3" and 1 piece of 1/2" length. Adhere the side tabs of the 3" pieces to the sides and bottom and the 1/2" piece to the top to joint the front and back panel of the card. 

Stamp the images from  Countryside Winter 'scapes Cling Stamp Set on a piece of watercolor cardstock using Jet Black Archival Ink and die cut them using the matching dies from Countryside Winter 'scapes Die. Color them using Altenew watercolors and adhere them on the card as shown.

Stamp the poinsettias and leaves from Christmas Poinsettia & Holly Cling Stamp Set using Manganese Blue and Olive Archival Inks on a piece of Deluxe Flower Shaping Paper and die cut them using the matching dies from Christmas Poinsettia & Holly Die. Color the flowers with the same ink and the leaves with Leaf Green Archival Ink. Shape them using 3D Christmas Poinsettia Shaping MoldDeluxe Flower Shaping Kit and Groove Golf Tool Set. Add a little Sweet Shoppe Prills to the flower centers. Arrange and adhere them on the card as shown. Add glitter to the floral arrangement, snowman and the snow on the background to add finishing touch.


Hope you like it...
Thank you for visiting today... :)
Nupur
Disclosure : Compensated affiliate links used when possible  at NO additional cost to you.. Thank you! 

Wednesday 13 January 2021

Countryside Cottage Slimline Card

Hello and welcome to my blog...
Today is the new release day at Heartfelt Creations

Countryside Cottage Collection

This month we have a versatile collection featuring Countryside Cottage and various accent pieces to go with it. It can be used for all seasons be it spring, winter, summer or autumn. 
I have made a spring slimline card for today's inspiration using this set.
As usual the instructions and supplies used for this card follows after the pictures.
Countryside Cottage_Nupur Priya_01

Countryside Cottage_Nupur Priya_02

Countryside Cottage_Nupur Priya_03

Heartfelt Creations Products:

Instructions:
Score a 8" x 9" piece of Deluxe Flower Shaping Paper at 4" and fold to make a 4" x 9" card base. Cut the top part of the card base using the die from Ornate Flourish Gateway Die. Cut a  piece of pattern paper 1/4" smaller than the card front from Countryside Cottage Paper Collection and adhere it on the card front. Die cut 2 pieces of white cardstock using the dies fromScalloped Flourish Gateway Die and Ornate Flourish Gateway Die. Adhere them on pattern paper die cut using the outline dies and then adhere them  on the card front as shown using double sided foam tape.

Stamp the images from Cottage Summer 'scapes Cling Stamp Set on a piece of watercolor cardstock and die cut using matching dies from Cottage Summer 'scapes Die. Arrange and adhere them on the card front as shown. Add tiny drops of Dandelion Yellow and Red Berry Nuvo Crystal Drops to the flowers and berries on the potted plants. Add tiny drops of Ebony Black Nuvo Crystal Drops 

Flower and Leaves: Stamp the Cherry blossoms from Tweet Cherry Blossoms Cling Stamp Set with Red Geranium Archival Ink. Ink them with the same ink using Stack and Store DaubersStamp the leaves from the same stamp set using Olive Archival Ink Pad and ink them with Leaf Green Archival Ink using Stack and Store Daubers Die cut all the leaves and flowers using the matching dies from Tweet Cherry Blossoms Die. Shape them using 3D Cherry Blossom Shaping Mold and  Deluxe Flower Shaping Kit. Add a little Stop Wining Prills to the flower centers. Arrange and adhere all the flowers and leaves as shown on the card front. Add rhinestones and pearls to the die cuts for finishing touch.

Hope you like it...
Thank you for visiting today... :)
Nupur
Disclosure : Compensated affiliate links used when possible  at NO additional cost to you.. Thank you! 

Wednesday 6 January 2021

Special-Tea Card

Hello and welcome to my blog...
Before going ahead with today's post I wanted to wish you all a Very Happy New Year!!!
Last year was tough for everyone and I hope this year brings more hope, joy and happiness for all.

For today's inspiration I have used stamp sets from Tea Time Collection that was released last year in February (a time when we had little to no idea what was coming for us in just a month and how the world is going to change!)
This is a great set for tea lovers!
As usual the instructions and supplies used for this card follows after the pictures.

Special-Tea_Nupur Priya_01

Special-Tea_Nupur Priya_02

Heartfelt Creations Products:
RACP494 Ranger Archival Ink Pad - Majestic Violet
RACP524 Ranger Archival Ink Pad - Vibrant Fuchsia

Other Products:
Cracked Pistachio Distress ink, Altenew Watercolors, Brustro Cold Pressed Watercolor Cardstock, Brusto Green gold brushes, double sided foam tape, pearls and rhinestones.

Instructions:
Card Base: Die cut 2 pieces of Deluxe Flower Shaping Paper using the dies from Ornate Pocket Accents Die and ink them lightly with Cracked Pistachio Distress ink. Adhere them on a 6" x 7" white cardbase as shown using thin strips of double sided foam tape.

Stamp the images from Special Teapot Cling Stamp Set and My Cup of Tea Cling Stamp Set on a piece of watercolor cardstock using Magenta Hue Archival Ink. Color them with Altenew watercolors and die cut them using the matching dies from Special Teapot Die and My Cup of Tea Die. Adhere them on the card front as shown using double sided foam tape.

Flowers: Stamp the flowers from Wisteria Petals Cling Stamp Set on Deluxe Flower Shaping Paper using Majestic Violet Archival Ink Pad and die cut using matching die from Wisteria Petals Die. Ink them with Majestic Violet and Vibrant Fuchsia Archival Ink.

Leaves: Stamp the leaves from French Cottage 'scapes Cling Stamp Set on Deluxe Flower Shaping Paper using Leaf Green 
Archival Ink and ink it with the same ink. Die cut it using matching die from French Cottage 'scapes Die.

Shape all the flowers and leaves using Deluxe Flower Shaping Kit. Add yellow stamens from Small Pastel Pearl Stamens to the flower centers. Adhere the flowers and leaves Around the sentiment as shown. Add pearls and rhinestones to the card for finishing touch.

Hope you like it...
Thank you for visiting today... :)
Nupur
Disclosure : Compensated affiliate links used when possible  at NO additional cost to you.. Thank you!