Wednesday 30 September 2015

Enchanted Mum Accordion Album

Hello friends & welcome to Heartfelt Wednesday...

Today I have a very pretty Accordion style album to share with you all...
(Warning : Picture Heavy Post)
I have used Enchanted Mums Collection for this album. It has 8 tags which can be used for photographs & journaling. 


Hope you like it... Thank you for visiting today  :)


Wednesday 23 September 2015

Enchanted Mum Bouquet

Hello friends & welcome to Heartfelt Wednesday...
Today I am showcasing our new release Enchated Mum Collection.


Hope you like it . Thanks for visiting today  :)


Products Used:
HCPC-3692 Enchanted Mum Bouquet Cling Stamp Set
HCPC-3693 Enchanted Dragonflies Cling Stamp Set
HCD1-769 Enchanted Mum Bouquet Die
HCD1-770 Enchanted Dragonflies Die
HCD1-737 Ornate Gateway Die
HCST1-401 Deluxe Flower Shaping Kit

Other Products:
Mowed Lawn, Vintage Photo, Walnut Stain, Salty Ocean, Chipped Sapphire & Worn Lipstick Distress Inks, Black Archival Ink, Koi waterbrush, Spellbinders A2 Scalloped Borders Three, Ebosser, Martha Stewart scoreboard, white, Gold & watercolor cardstock & pearls.

Project Instruction:
Stamp the vine image from Enchanted Dragonflies Cling Stamp Set with Black Archival ink on watercolor cardstock & color with distress inks. Cut it with matching die from Enchanted Dragonflies Die. Cut it into small pieces & adhere to a 4 3/4" x 4 3/4" card base border.

Take a 4" x 4 3/4" piece of white cardstock & ink with Chipped Sapphire & Salty Ocean distress inks. Cut the long edges with Spellbinders A2 Scalloped Borders Three die. Cut 2 pieces of gold cardstock with Spellbinders A2 Scalloped Borders Three dies & adhere to the inked panel as shown & adhere to the card front with foam adhesive.

Die cut a piece of white cardstock with Ornate Gateway Die & adhere to a 2" x 4 3/4" piece of white cardstock as shown. Adhere this piece to the card front center with foam adhesive.

Stamp the image from Enchanted Mum Bouquet Cling Stamp Set on watercolor cardstock with Black Archival ink & color with Distress inks, die cut it with matching die from Enchanted Mum Bouquet Die. Shape it using Deluxe Flower Shaping Kit & adhere to the card front. Add pearls to add finishing touches.


Sunday 20 September 2015

Life is Better with Friends

Hello Friends & welcome to IBSIC #98 inspiration...
I have made a card using the sketch from this month's challenge.


 I have used the Flower Of The Month: Easter Lily for my focal point . I cut it using Flower Of The Month: Easter Lily Cut File & colored with distress inks.
The sentiment is from Friends Stamp set & the background is made with modelling paste & stencil.
I hope you like my card & join in the challenge...
Thank you for visiting today  :)


Wednesday 16 September 2015

Just For You

Hello friends & welcome to Heartfelt Wednesday...

I have made a card for today...


Hope you like it... Thanks for visiting today  :)


Products Used:

Other Products:
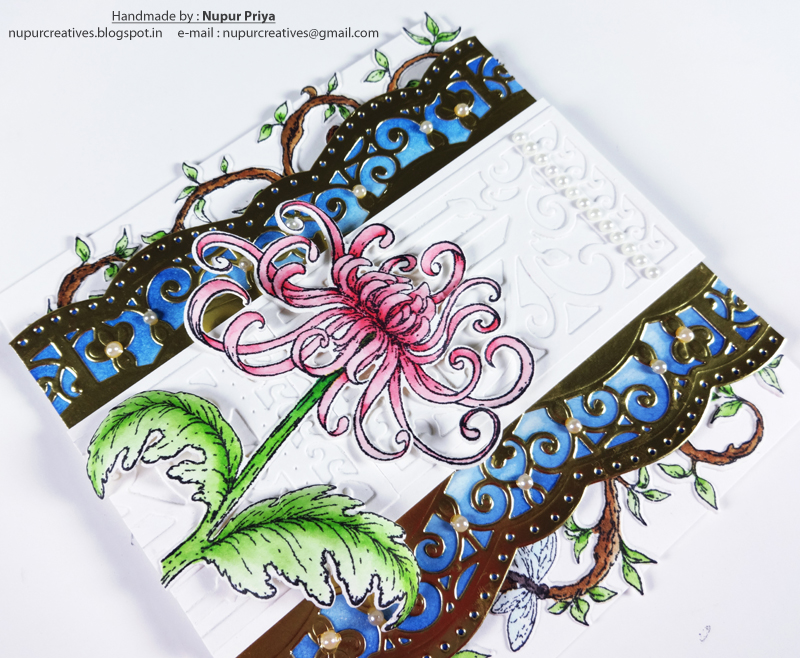
Mowed Lawn, Crushed Olive, Salty Ocean, Seedless Preserve, Antique Linen, Aged Mahogany, Wild Honey, Vintage Photo, Gathered Twigs & Cracked Pistachio Distress Inks, Coffee Archival Ink, Couture Creations Allora embossing folder , Martha Stewart scoreboard, white & watercolor & Pearls.


Project Instruction:
Take a 6" x 6" card base & ink the edges with Vintage Photo & Gathered Twigs Distress Inks. Take a piece of white cardstock, emboss with Couture Creations Allora embossing folder, ink with Cracked Pistachio Distress Ink & adhere to card base with foam adhesive. Die cut 4 pieces of Ornate Gateway Die from white cardstock, ink with Antique Linen Distress Ink & glue to the card front to form a square. 

Stamp Jars & Accents Cling Stamp Set on a piece of watercolor cardstock with Coffee Archival Ink, color with distress inks & trim to a rectangle. Mount it on a slightly larger cardstock inked with Vintage Photo & Gathered Twigs Distress Inks & glue to the card front with foam adhesive. Die cut the berries with the matching die from Farmers Market Fruit Die. Stamp the sentiment from Classic Message Cling Stamp Set, cut it in a banner, ink with Antique Linen & Vintage Photo Distress Inks, shape it & adhere to the card front. Glue the die cut berries on the sentiment banner. Add some pearls to add finishing touches.


Hello Friend

Hello friends, 

I have made a card with fun watercolored background & glittered butterflies for today's post...


I hope you liked my card... Thank you for visiting today  :)

Wednesday 9 September 2015

Enchanted Mum Cake

Hello friends & welcome to Heartfelt Wednesday... 
Today is 2nd Wednesday of the month & that means The launch of a new collection... Wohooo...

ENCHANTED MUM 

Swing open the decorative wrought iron gates and escape to serene and alluring garden surroundings with the Heartfelt Creations Enchanted Mum Collection.  Take in the beauty of shimmering dragonflies as they glide through warm and gentle breezes, landing to perch on beautiful bouquets of chrysanthemums dancing in the sunlight.  Graceful flowing floral images and exquisite die cuts along with soft hues of pinks, purples, greens and yellows are sure to bring about a sense of peace and calm to your soul.  Create your very own impeccable garden themed designs with the assortment of light and airy mums taking centre stage in five gloriously illustrated stamp sets along with swirling vines and beautifully detailed dragonflies, all of which mirror the stunning images found within this enchanting paper collection.  Create authentic, true to life blossoms and embellishments with three coordinating dies, perfect to grace your scrapbook layouts and original card creations.  Whether you are celebrating special occasions or  preserving precious family memories, an enchanting time of creativity awaits you with the Enchanted Mum Collection.  

This is a beautiful collection & I have made a Paper cake to showcase the beautiful bloom from this collection...


Hope you like it... Thanks for visiting today  :)


Products Used:

Other Products:
Mowed Lawn & Festive Berries Distress Inks, Versamark Ink, Ranger Gold Embossing Powder, Ranger Heat-it tool, Ebosser, Martha Stewart scoreboard, white & gold cardstock & Pearls.

Watch this video:https://youtu.be/jJBwQyyza6g to learn how to shape the Enchanted Mums.

Project Instruction:
Make a two-tired cake with white cardstock by glueing 3 1/2" high paper cylinder on top of a 3" high paper cylinder with a bigger diameter. Decorate with Timeless Amour & Decorative Butterfly Corner Die diecuts cut with white cardstock & inked with Festive Berries Distress Ink & gold cardstock. Decorate with pearls.

To make the cake topper Stamp Enchanted Mum Cling Stamp Set & Open Leaf Cling Stamp Set with Versamark ink & heat emboss with Ranger Gold Embossing Powder. Cut them with Enchanted Mum Die & Classic Leaf Die, ink with Festive Berries & Mowed Lawn  Distress Inks. Shape them using Deluxe Flower Shaping Kit. Cut 4 heart from gold cardstock using Timeless Amour Die & glue them together. Arrange them as shown & glue into place to finish.


Entering in:

Update:

Wednesday 2 September 2015

Veggie Collage

Hello Friends...
I am sharing a water-colored card today with a vintage feel for Heartfelt Creations inspiration post.


Hope you like it ... Thank you for visiting today  :)


Products Used:
HCPC-3688 Veggie Collage Cling Stamp Set
HCPC-3685 Jars & Vines Cling Stamp Set
HCPC 3626 Classic Sunflower Cling Stamp Set
HCD1-767 Jars and Vines Die
HCD1 753 Classic Sunflower Die
HCST1-401 Deluxe Flower Shaping Kit

Other Products:
Mowed Lawn, Forest Moss, Vintage Photo, Gathered Twigs, Wild Honey, Fired Brick & Seedless Preserve Distress Inks, Coffee Archival Ink, Koi waterbrush, Spellbinders Reflective Moments Die, Ebosser, Martha Stewart scoreboard, white & watercolor cardstock & seed beads.

Project Instruction:
Die cut 2 pieces of white cardstock with Spellbinders Reflective Moments Die. Ink one piece with Vintage Photo & Gathered Twigs Distress Inks. Score the other one at 1 1/4" from the top & adhere it to the back of inked piece. Stamp Veggie Collage Cling Stamp Set on watercolor cardstock with Coffee Archival Ink, Color with Distress Inks, trim & adhere to the card front as shown.

Stamp Classic Sunflower Cling Stamp Set & leaves from Jars & Vines Cling Stamp Set with Coffee Archival Ink & die cut with co-ordinating dies from Jars and Vines Die & Classic Sunflower Die. Ink them with Mowed Lawn, Forest Moss & Wild Honey Distress Inks. Shape them using Deluxe Flower Shaping Kit. Add some seed beads to the flower centers & adhere the flowers & leaves to the card front.