Thursday, 31 January 2013

Birthday Themed Magic Explosion Box & A Great News...

 Helloo....

So here is the big news...
I am a new ICR  DT member..Yayyyy..
This is the first time for me ...
I am so excited & looking forward to this new experience..  :)

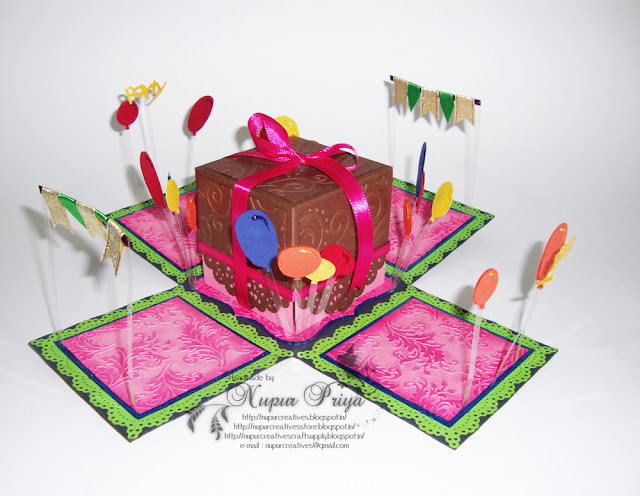
Now onto my new project... Another Birthday themed Explosion box...

This is for the best friend of my customer ..
She wanted to gift her something unique & personalized...
She wanted something  similar to my sister's explosion box I made last year on her birthday..
But it turned out totally different :)
And I am glad that she loved it... & that's all that matters...  :)
Being appreciated for the time & effort you put into a project to make it that extra special
& bring a smile on the recipient's face...  :)

She wanted a picture on the top of the lid..
When I was working on this explosion box I received some dies that I had ordered few days back...
& as I am very impatient when it comes to playing with my new toys I used it on this project... hehehe..
I used golden mirror board & spellbinder's decorative label 8 to make the frame for the photograph
& the sentiment in front (scroll down for the image).


I used 1 inch dark maroon & 5mm emerald green satin ribbon to decorate the side of the lid..
I used some red glitter glue & emerald green mirror board for the box panels 


Below is the semi-opened explosion box..

Inside the box..
The balloons & party are die cuts..
The banners is made with ribbons..
The panels are punched, embossed, inked & glittered..


The Box in the center is holding something unusual for an explosion box... ;)

Can you guess what's inside.... :)

Its a real chocolate cake covered with dark chocolate & Fondant flowers... :D
hehehe...

My customer wanted to gift her friend a real cake that she can eat...
& she wanted it in the middle of the explosion box instead of a fake paper cake...
It was an unusual request... but still I took the challenge...
The main problem was to pack it so that it won't spoil the paper & arrive safely & without damage to another city via courier....
So I made another mini explosion box inside attached to the main box 
wrapped the cake in cling film & then in bubble wrap..
& put it inside... & tied the lid with a ribbon...
I told you its something unusual... hehehe  :)
Its in transit now... so lets hope it arrives safely...
I will update this post later on to let you guys know if my effort worked or not...

Now its turn for another new die used on this box...
Do you recognize the lacy edge ... ;)

Most of you must have recognized it but for those who want to know the answer... 
It is Cherry Lynn French Pastry Doily... ;)
Adds so much elegance to the lid... :)
I love love love my new dies... :)


Supplies used :

P.S. : Have you entered in the GIVEAWAY at my Craft Supply Store yet....???
Enter to win some crafty goodies & some clear stamps from my store...  :)


Linking in:

Thank you for visiting...


Friday, 18 January 2013

Cardini in a Gift Box

Hello...
Here is the other gift for my sister...
Its a cardini... 
I got this inspiration from Erum of Vibgyor Krafts
She makes beautiful Cardinis & cards... 

I made a Purple, pink & green box for the calendar...
I used a Itsy-Bitsy embossing folder with ink applied on the debossed side for faux letterpress effect.
The sentiment is a freebie...It was printed & then diecut with spellbinders labels 4...
& then inked with memento rose bud ink..
the purple matte behind the sentiment was also diecut & sponged with memento rose bud ink..
The white lace & the green satin ribbon the were  adhered on top with Red Double Sided Tape..


I added 1 strip of pink satin ribbon around the lid & the base of the gift box to give it some added strength & beauty...

The front is made in the same way as the lid... I added some black feathers & 2 handmade stick pins with blue heart beads & pearls..
Then I added a piece of white lace & the blue satin ribbon & a bow to embellish it...

It opens up to reveal 4 photographs on one side & 2 photographs on the other side.
The photographs were adhered on embossed & inked mattes of matching colours..


For the back I made a die cut pocket with the sentiment to hold a tag.
She loved this... infact this is her fav gift of this year... :D

Supplies used :

P.S. : Have you entered in the GIVEAWAY at my Craft Supply Store yet....???
Enter to win some crafty goodies & some clear stamps from my store...  :)


Thanx for visiting

Click here to win some beautiful die cuts & handmade flowers from Sindhu..


Calendar in a gift box

Hello..

Today I am going to share a very special project with you all...
Its a gift I made for my  sister's birthday..
I made 1 calendar with gift box & 1 cardini with gift box...
I will share the cardini in my next post...

I forgot to measure the size of the finished items as I was in a hurry to pack it & dispatch it...
I made a Purple, pink & green box for the calendar...
I used a Sizzix embossing folder with ink applied on the debossed side for faux letterpress effect.
The pink matte was also inked up to get a rich & bright pink colour...
The sentiment is a freebie...It was printed & then diecut with spellbinders labels 4...
the pink matte behind the sentiment was also diecut & sponged with memento rose bud ink..
The paper lace was punched with MS Doily punch & the I adhered the dark green satin ribbon on top with Red Double Sided Tape..

The base of the box is green...
I added 1 strip of satin ribbon around the lid & the base of the gift box to give it some added strength & beauty...
I wrapped the calendar in 2 matching paper napkins to prevent any damage during transit & it also serves the decorative purpose...

Now you can tell the reason behind the colour combination of the box...  :)
Purple is one of her fav colours so I made the calendar in this combination...
The base of the calendar is done as the box lid... 
The flowers & leaves were punched, sponged, embossed & then assembled...

Here is the closeup of the flower arrangement...

She loved the calendar & the box...  :)
Stay tuned for the Cardini....

Supplies used :

P.S. : Have you entered in the GIVEAWAY at my Craft Supply Store yet....???


Thanx for visiting

Thursday, 10 January 2013

2nd Upcycled 3D Glitter Glue Storage

Hello...

I upcycled another empty roll of carton tape to make storage for my glitter glue bottles...
(Click here to see the previous one...)

This time I kept it very simple...
I added a circular mount board at the base then I lined the inside with black CS...
I stamped with angel pink from memento dew drops on yellow CS & then added some holographic glitter glue on some parts of the design.. 
I have distressed top edge with dried marigold distress ink & applied same glitter on top ...
For the bottom black border I used the MS Doily punch ...
I also added a black satin ribbon on top of black punched CS...
Next I added some rhinestones & done.... 
I didn't feel the need to use any embellishments as it is looking pretty even without them...


P.S. : Have you entered in the GIVEAWAY at my Craft Supply Store yet....???


Thank You For visiting..

Friday, 4 January 2013

Upcycled 3D Glitter Glue Storage

Helloo...

I know I have not posted anything in the last 2 weeks.... 
But trust me I was very busy with many things...
I have opened my online craft supply shop... 
[Do visit my store for some amazing deals... & a giveaway will be announced in a few days... so stay tuned to win some awesome goodies....  :)  ]
I was also busy designing.... 
MY OWN LINE OF STAMPS... :)
& The sneak peeks will start in few days... yayyy...
I am also taking order for customized watermarks & Clear stamps...
( Click  here to view  a sample )  

So, moving on to today's project...

I made this....

From this...

I love Glitter Glue.... Its a mess free way of adding glitter to the projects...
& whenever I go to some craft store & see a new colour I buy it....
& Now I have more than 30 of them.... hehehe...
Previously I used to store them in a Ferrero Rocher box...
but it can only hold 16 bottles ...
So I had to figure out a way to store the remaining bottles... 
Something with a straight edge so that they won't start falling....
& these empty carton tape rolls were perfect...
I had some left from the time we shifted to our new flat...
(I had to hide them from my hubby who likes to throw away things that are useless according to him... hehehe )

So I took an empty roll of carton tape, a mount board circle (to make base).... Lined the inside with white alabaster paper... Then embellished it with Pattern Paper , Lace, (adhered with hot glue gun )Satin Ribbon,  Kundan Stones, Glitter Glue, & some Quilled flowers & leaves & converted an ugly looking & useless piece of empty roll into a beautiful storage for my glitter glue bottles...   :)


Isn't it pretty....!!!
I love it....
I think I will make few more of these...


Supplies used:

Thank you for visiting

Entering in :
Crafter's Corner : Anything but not a card or layout