Friday, 19 July 2013

Humming Birds

Hello friends...

I finally got Humming Birds stamp today.. :Yayyyy
& I loved this stamp from the day I saw it...
So I couldn't wait to make something with it immediately... :)
So here is what I came up with...
A friendship day card.. with heat embossed background & a lot of inking...
I have used Peacock  Feathers (LOVE it ) & Black Soot
All the layers are propped on Foam tapes to add dimension..


Entering in:

Friday, 12 July 2013

Distress Ink Pad Storage Unit

Hello friends...

So finally I started & completed a project (in 5 hours flat) that had been on my mind for quite sometime ...
This is a DIY Distress Ink Pad Storage Unit..
I love the final outcome...
It is inexpensive, sturdy & totally functional ...

Earlier I used to store my Distress Ink Pads like this...


& every time I wanted to use some colour in the middle or bottom... I had to take out all of them...
& sometimes they fell... & crowded my craft table...

So I finally decided it was enough & I had to store them in the correct way to avoid all the mess...
Below are the step-by-step pix of the making of my storage unit...
They are pretty much self explanatory ...
I used 6 sheets of 12"x12" 300gsm kraft CS, 2 sheets of chipboard, few sheets of black CS (I lost count ... sorry), double sided red liner tape,fabric Glue, hot glue gun  & 1 sheet of pattern paper to make it..
The finished size is aprox... 8.5" x 10.25" x 2.75" & it has 24 shelves.. 
cutting the kraft CS to size
all the shelves scored & cut... ready to be assembled
Assembled shelves
All ready to be covered with paper
Front view of the completed Distress Ink Pad Storage Unit filled with the Ink Pads
Side view of the completed Distress Ink Pad Storage Unit filled with the Ink Pads
I decided not to add any embellishment as this is kept on the side table cum shelf near my craft table...
& I might ruin any embellishment I put on these while reaching for my adhesive basket kept next to it... hehehe
Moreover I will keep my smaller acrylic blocks on the top of this unit for easy access...
I just covered it with black paper & pattern paper.. & done... Tadaaaaa....

Hope you all like it..  :)

Thank you for visiting...

Thursday, 11 July 2013

Lucy Cromwell Mini Album

Hello friends...

Here is a mini I made sometime back...
it is an envelope mini..
I have used Kraft envelopes for this one..
The papers & die cuts are from Papermania Lucy cromwell collection..
This collection is very feminine, flowery & with soft theme & lots of soft pinks, purples,blues ...

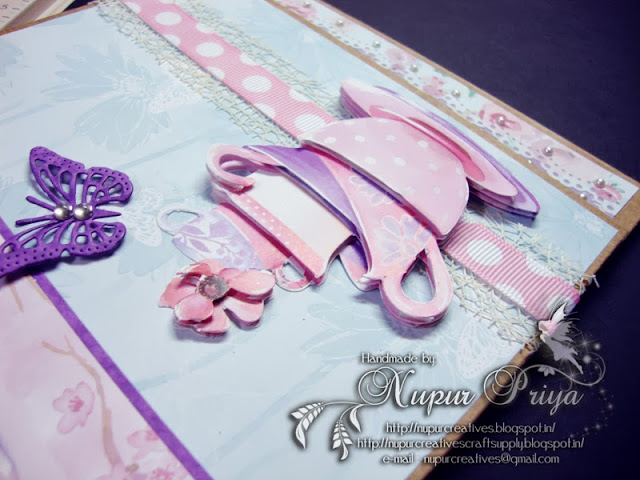
The cover has a beautiful 3D decoupaged Cup arrangement.. ribbons... butterflies pearls & lacy border..


closeup of 3D decoupaged cups
This mini has 6 pages with 6 full sized tags in each page..
It can hold 24 full sized pictures easily & many small sized photographs depending on the size..

Here is the video of this mini if you want to see the inside pages & tags..

Thank you for visiting...


Wednesday, 10 July 2013

Tag with Handmade PP & Embellishment

Hello friends..
A new month & a new challenge at 'For the Love of Crafting'

The theme for this month is to make a tag with a little twist... & the twist is that you have to make your own background...( pattern papers cannot be used ) & to add atleast 1 handmade embellishment..

I made a pink tag with a flower, flourishes & lots of pearls..
I started with spun sugar to make my background.. next I took a newsprint background stamp & stamped it using worn lipstick...then I dry embossed it .. distressed the edges with my scissors & highlighted the embossing along the edges with worn lipstick..
The flower is made with spellbinders rose creations die & peacock feathers..
I have added some die cut flourishes & leaves underneath the flower..
Some half pearls were added to highlight the embossing...

Hope you like my tag & join us at  'For the Love of Crafting' for this challenge  :)

Thank you for visiting..

Entering in :
Crafting for all seasons : bingo (Pink, Flowers & blue)


Sunday, 7 July 2013

Magic Explosion boxes for Rakshabandhan

These Magic Explosion Boxes are specifically been made for the occasion of Rakshabandhan... Perfect for sending rakhi in style..

The first one is Purple, gold & kraft
It is approximately 4"x4"x4.25".

Top view
 The lid is decorated with a purple & gold rosette with an emerald rhinestone.
Front view
 The front has a decorative tag with 'Happy Rakhi !' written in gold.
 All the panels are embossed & inked with a golden border.
The inside view
The inside panels are decorated with golden heat embossing, inking & delicate inked paper cut outs  rhinestones for a rich festive look.
 The center has a box with magnetic lid closure which can be used for keeping chocolates.

Top view of the open box with tags 
When the lid is removed the box opens up to reveal 4 pockets with embossed & inked tags. 3 tags have plastic sleeves attached to them with a ribbon.. each one of them holds 1 item related with this festival.. ie. Roli, Akshat & Rakhi & the 4th tag has a place to write a personal message.
You can view the video HERE

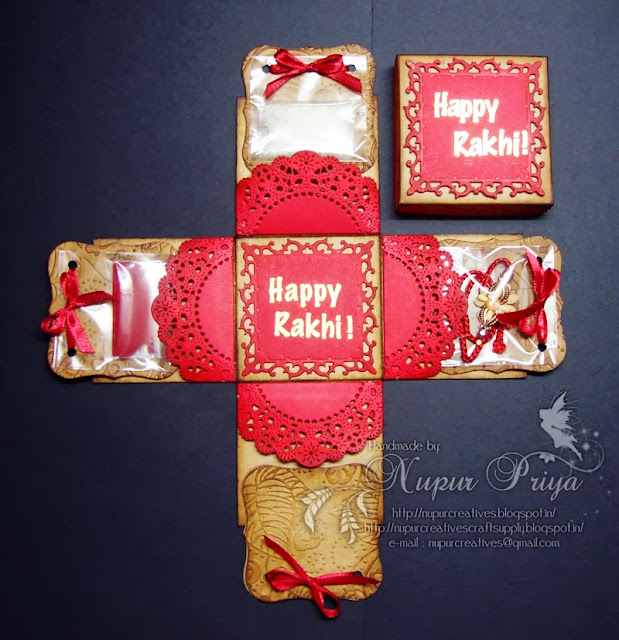
The first one is Red, gold & kraft
It is approximately 3"x3"x3".

Top View
The box is decorated with delicate,embossed & inked paper cut outs.
The top has a decorative tag with 'Happy Rakhi !' written in gold.


The box can be used to hold chocolates also
Open view
When the lid is removed the box opens up to reveal 4 pockets with embossed & inked tags. 3 tags have plastic sleeves attached to them with a ribbon.. 
Each one of them holds 1 item related with this festival.. ie. Roli, Akshat & Rakhi & the 4th tag has a place to write a personal message.

P.S. : Rakhi, roli, akshat & chocolates are only for demonstration purpose.. They will not be included in the pack.

Saturday, 6 July 2013

Sneak -peek

Hello friends...

Today I am just dropping by to share a sneak-peek of my recent projects with all of you...
I have been working continuously & have made some new projects..
But I am not getting the time to take the pix & post them here..
I have shared some of the projects on my Facebook Page
& I hope to share them here soon..
Till then here is a sneak-peek of some of my photo-flip-books I made on different themes...
The charm assemblies are also handmade & I have also tried 3 different styles of closures  :)

Thank you for visiting..