Thursday, 12 November 2020

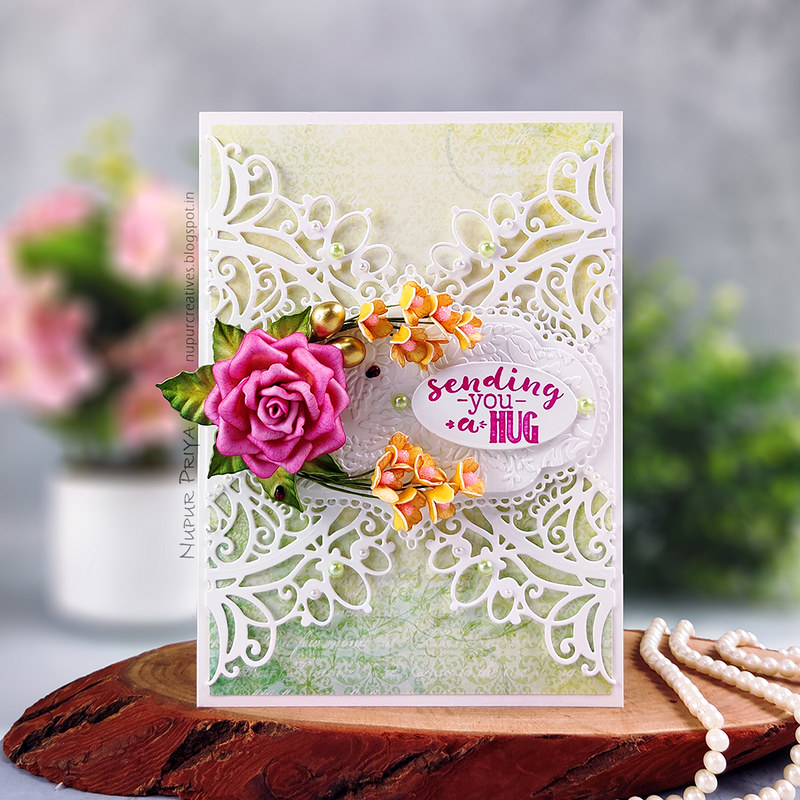
A Rose with a Hug

Hello and welcome to my blog!
Today I am sharing the 2nd card in the set with the of 3 cards I made with Art Foam Paper by Heartfelt Creations. I will reveal the last card from the set tomorrow so stay tuned!

This card was inspired by one of my previous card design but I made few changes to keep things interesting. Both card bases look same at the 1st glance but the other card was a gate-fold card with a belly band but this is a regular card. Also the colors are very different. 

As always the supply list and instructions for this card can be found below the photographs
A Rose with a Hug_Nupur Priya_01

A Rose with a Hug_Nupur Priya_02

A Rose with a Hug_Nupur Priya_03

Heartfelt Creations Products:

Other Products:
Dark Green Chalk Pastel, clothes iron, Cuttlebug Anna Griffin Juliet Damask embossing folder, pearls, double sided foam tape and hot glue gun

Instructions:
Die cut 2 pieces of white cardstock using the dies from Decorative Circle Frames Die and Courtyard Elegance Die. Score both the die cuts in the middle and then trim them on one side, 1/2" from the score line. Adhere the 1/2" tab on a 4 1/2" x 6 1/2" piece of pattern paper from Calla Lily Paper Collection. Adhere this piece on a 5" x 7" piece of white card base made with Deluxe Flower Shaping Paper. Adhere the die cut flaps in the middle using double sided foam tape.

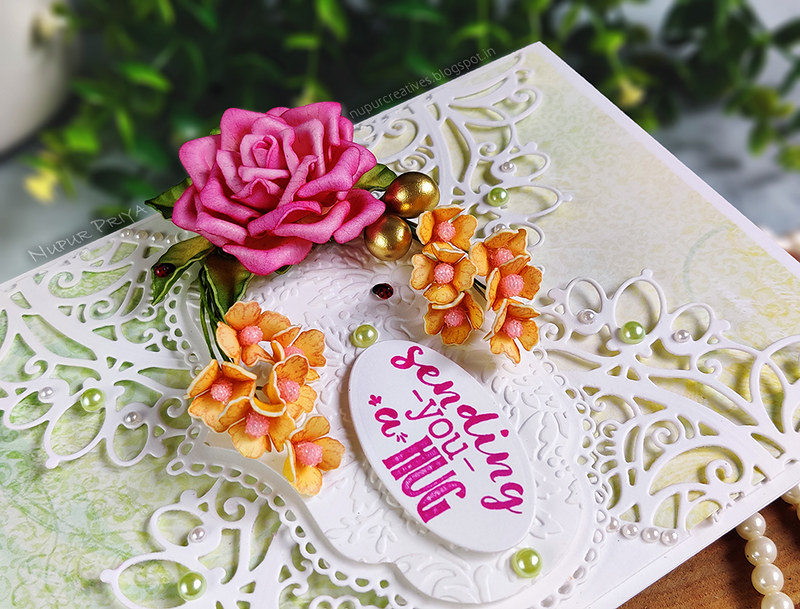
Die cut 2 pieces of white cardstock using the dies from Album Tags and Accents Die. Emboss the smaller die cut using the Cuttlebug Anna Griffin Juliet Damask embossing folder. Stamp the sentiment from Just For You Sentiments Cling Stamp Set with Vibrant Fuchsia Archival Ink on a piece of white cardstock and die cut it using the oval die from Elaborate Oval Frames Die. Stack and adhere all the 3 die cuts as shown on the card base using double sided foam tape. 

Stamp the flowers from Classic Rose Cling Stamp Set  on Art Foam Paper using Plum Archival Ink and die cut them using matching die from Classic Rose Die. Color them using Vibrant Fuchsia and Sunflower Archival Ink. Heat the petals with clothes iron and curl their edges with fingers. Then shape them using the largest ball tool from  Deluxe Flower Shaping Kit. Glue the petals with hot glue gun to assemble the rose.

Stamp the leaves from Cheery Pansy Cling Stamp Set on Art Foam Paper using Fern Green Archival Ink and die cut them using matching dies from Cheery Pansy Die. Color them using Fern Green and Sunflower Archival Ink. Heat the leaves with clothes iron and quickly press on the leaf shape on 3D Pansy Shaping Mold to shape the leaves. Apply a little Dark Green Chalk Pastel to the edges.

Stamp the smallest flowers from Small Sweet Peony Cling Stamp Set on Art Foam Paper using Monarch Orange Archival Ink and die cut them using matching die from Small Sweet Peony Die. Color them using Sunflower Archival Ink. Heat the flower with clothes iron shape them using Deluxe Flower Shaping Kit. Add a pink Pastel Bead Stamens to the flowers. ink the stem of the pollens using Fern Green Archival Ink.

Arrange and adhere all the flowers and leaves on the card front as shown. Add few ladybugs made with Ebony Black and Red Berry Nuvo Crystal Drops, few gold stamens from Assorted Rose Hip Stamens and pearls to add finishing touch.


Hope you like it...
Thank you for visiting today... :)
Nupur
Disclosure : Compensated affiliate links used when possible  at NO additional cost to you.. Thank you! 

Wednesday, 11 November 2020

Pink Dazzling Dahlia

Hello and welcome to my blog!
Today is The day for a brand new launch by Heartfelt Creations:


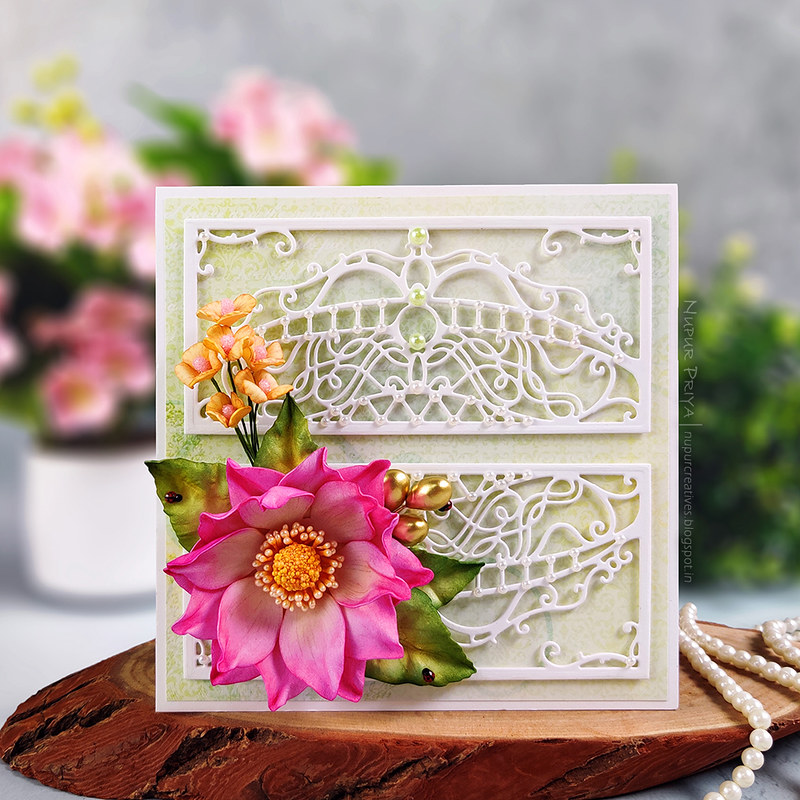
It is a gorgeous collection and I had so much fun making this card... Love how the flower turned out... so life like and gorgeous!
This card the 1st card of a set of 3 cards I made with Art Foam Paper. I will reveal the 2nd card from the set tomorrow so stay tuned!
I have also altered the stamen to make the flower center for my Dahlia... isn't it looking beautiful!

As always the supply list and instructions for this card can be found below the photographs
Dazzling Dhalia_Nupur Priya_01

Dazzling Dhalia_Nupur Priya_02

Dazzling Dhalia_Nupur Priya_03

Dazzling Dhalia_Nupur Priya_04

Heartfelt Creations Products:
HCPC-3928 Dazzling Dahlia Cling Stamp Set
HCD1-7323 Dazzling Dahlia Die
HCPC-3929 Dahlia and Leaves Cling Stamp Set
HCD1-7324 Dahlia and Leaves Die
HCFB1-494 3D Dahlia Shaping Mold

Other Products:
Dark Green Chalk Pastel, clothes iron, pearls, double sided foam tape and hot glue gun

Instructions:
Cut a piece of 5 3/4" x 5 3/4" pattern paper from Calla Lily Paper Collection and adhere it on a 6" x 6" white card base made with Deluxe Flower Shaping Paper. Die cut 4 pieces of white cardstock using the dies from Eyelet Royale Die. Adhere 2 - 2 pieces together. Adhere 3 layers of thin strips of white cardstock behind each edge of the die cut to add dimension and height to both the die cuts. Adhere the final pieces to the card front as shown.

Stamp the smaller flower from Dazzling Dahlia Cling Stamp Set on Art Foam Paper using Plum Archival Ink and die cut them using matching die from Dazzling Dahlia Die. Color them using Vibrant Fuchsia and Sunflower Archival Ink. Heat the petals with clothes iron and pinch them with fingers. Then shape them using the largest ball tool from  Deluxe Flower Shaping Kit. To make the flower center Take a yellow pollen from Assorted Rose Hip Stamens, cover it with Designer Dries Clear Adhesive and sprinkle Go ManGo Prills. Let it dry and then adhere Small Pastel Pearl Stamens all around it. Add this to the Dahlia in the center.

Stamp the leaves from Dahlia and Leaves Cling Stamp Set on  on Art Foam Paper using Fern Green Archival Ink and die cut them using matching dies from Dahlia and Leaves Die. Color them using Fern Green and Sunflower Archival Ink. Heat the leaves with clothes iron and quickly press on the leaf shape on 3D Dahlia Shaping Mold to shape the leaves. Apply a little Dark Green Chalk Pastel to the edges.

Stamp the smallest flowers from Oakberry Lane Blossoms Cling Stamp Set on Art Foam Paper using Monarch Orange Archival Ink and die cut them using matching die from Oakberry Lane Blossoms Die. Color them using Sunflower Archival Ink. Heat the flower with clothes iron shape them using Deluxe Flower Shaping Kit. Add a pink Pastel Bead Stamens to the flowers. ink the stem of the pollens using Fern Green Archival Ink.

Arrange and adhere all the flowers and leaves on the card front as shown. Add few ladybugs made with Ebony Black and Red Berry Nuvo Crystal Drops, few gold stamens from Assorted Rose Hip Stamens and pearls to add finishing touch.


Hope you like it...
Thank you for visiting today... :)
Nupur
Disclosure : Compensated affiliate links used when possible  at NO additional cost to you.. Thank you! 
Wednesday, 4 November 2020

Floral Congratulations

Hello and welcome to my blog 
Today I am sharing a card made with Wild Rose Collection
As usual you can find the list of supplies and instructions down below...
Floral Congratulations_Nupur Priya_01

Floral Congratulations_Nupur Priya_02

Heartfelt Creations Products:
Die cut a piece of white cardstock and a piece of silver cardstock using the die from Intricate Swirl Frames Die. Cut the white die cut at 1" from both sides length wise and adhere them on top and bottom of 4 1/4" x 5 1/2" white card base. Adhere the silver die cut on a piece of pattern paper from Summer's Garden Paper Collection and trim the paper so that there is a slim border around the die cut. Adhere this piece on a slightly smaller white cardstock. Adhere this piece on the card front as shown using double sided foam tape. 

Stamp the sentiment from Celebrate Love Sentiments Cling Stamp Set on a strip of same pattern paper with Seedless Preserve Distress ink. ink the edges with the same ink. Adhere the center piece of the remaining white die cut on one of the ends and trim the extra. Adhere this sentiment strip as shown in the center.

Stamp the flowers and leaves from Small Wild Rose Cling Stamp Set and Oakberry Lane Blossoms Cling Stamp Set on a piece of Deluxe Flower Shaping Paper using Plum and Leaf Green Archival Ink. Die cut them using matching dies from Small Wild Rose Die and  Oakberry Lane Blossoms Die. Color the flowers with Dusty Concord distress ink and the leaves with Vibrant Fuchsia and Leaf Green Archival Inks. Shape the flowers and leaves using Small 3D Wild Rose Shaping Mold and  3D Blossoms Shaping Mold. Adhere Lettuce Entertain You Prills to the flower centers. Arrange and adhere them on the card front as shown. Add few ladybugs made with Ebony Black and Red Berry Nuvo Crystal Drops, few clear dew drop gems and pearls to add finishing touch.


Hope you like it...
Thank you for visiting today... :)
Nupur
Disclosure : Compensated affiliate links used when possible  at NO additional cost to you.. Thank you!