Hello friends...
Today is Second Wednesday of the month & that means the launch of a new collection at Heartfelt Creations...
Cascading Fuchsia
Heartfelt Creations invites you to join us for a stroll through a quaint cottage garden where your cares will melt away and your creative energy will be refreshed and renewed. The Cascading Fuchsia Collection of stamps, dies and papers is bursting with lush greenery and exquisite beauty. Here, you'll find pendant shaped clusters of show-stopping pink, purple and magenta blossoms that are also called "Angel's Earrings." Graceful vines, lacy patterns, flitting butterflies, shady bowers and delicate latticework come together and form this restful haven. It's a celebration of the simple things that fill this moment in time with wonder and spontaneous joy. Cascading Fuchsia: It's a flawless garden of peerless delight and a creative sanctuary for the artist in you.
I love this new collection... The papers, stamps & images are gorgeous...
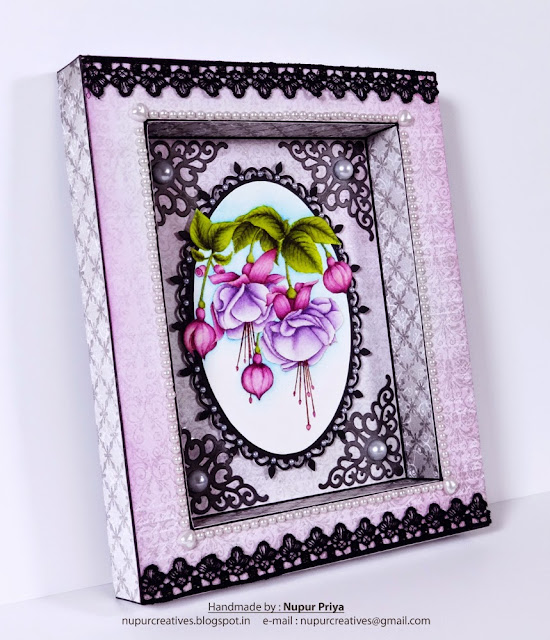
I have made a shadow box with Fuchsia Bouquet Cling Stamp Set & no line coloring technique...
Hope you like it...
Products Used:
Other Products:
Antique Linen, Forest Moss, Peeled Paint, Crushed Olive, Dusty Concord, Seedless Preserve, Salty Ocean, Black Soot & Gathered Twigs Distress Inks, Spellbinders Corner Flourish Two Die, ebosser, Martha Stewart scoreboard, white, black & watercolor cardstock, Koi waterbrush, Pearls, Lace & adhesive.
Project Instruction:
Die cut a piece of black cardstock with Decorative Oval Die. Stamp the Fuchsia Bouquet Cling Stamp Set with Antique Linen Distress Ink on Watercolor cardstock, color with various Distress inks & Koi waterbrush, fussy cut it to fit the Decorative Oval Die as shown & adhere it the die cut. Die cut 4 pieces of Spellbinders Corner Flourish Two Die with White cardstock & ink with Black Soot Distress Ink.
Make a 8 1/2" x 7 1/2" x 1/2" Shadow box with black cardstock & mat with Cascading Fuchsia Paper Collection. Adhere the Decorative Oval Die cut with colored image & the 4 corner die cuts as shown. Adhere black lace on top & bottom of the shadow box. Add pearls to embellish.


Oh my goodness! This shadow box is gorgeous, just like all your projects Nupur! You take such care with the details and the end results are always stunning!! Beautifully done!
ReplyDeletebeautiful altered project, your colouring is just amazing on this image
ReplyDeleteStunning project Nupur! My next weeks card is also done with "no-line stamping" but colored with Copics! Great minds think alike, LOL Hugs
ReplyDeleteWow! This is just stunning. Your coloring is gorgeous.
ReplyDeleteGreat ides Nupur! I love your shadow box and your coloring is amazing! Just beautiful!
ReplyDeleteYour coloring techniques are amazing. I honestly....am speechless. That box is lovely! Heartfelt is so lucky to have you on the team! You sure bring the products to life!
ReplyDeleteabsolutely gorgeous!
ReplyDeleteThe coloring here is just heavenly! What a gorgeous project!
ReplyDeleteNupur, your no line coloring is amazing! Absolutely perfect! Your shadow box is truly a work of art that leaves me speechless!
ReplyDeleteHugs,
Tracey
This is just beautiful! Hugs xx
ReplyDeleteWow Nupur, that shadow box is gorgeous!! I love the papers you chose and how you decorated it.
ReplyDeleteHi Nupur, love the colors in this shadow box. The black really makes it ooo! Hugs
ReplyDelete