
Hello Friends and welcome to Heartfelt Wednesday.
Today I have a clean and simple card to share with you all.
I have used the cluster stamping technique to create the background for this card.
This is a great technique to get more use out of your sentiment stamps and it also creates an interesting background without drawing the attention from the focal image.
Read till the end for the full supply list and the instructions for this card.
Heartfelt Creations Products:
HCPC-3843 Special Birthday Sentiments Cling Stamp Set
HCPC-3844 For My Friend Sentiments Cling Stamp Set
HCPC-3845 Just For You Sentiments Cling Stamp Set
HCPC-3846 Thank You Sentiments Cling Stamp Set
HCPC-3847 Celebrate Love Sentiments Cling Stamp Set
HCPC-3848 Cheerful Note Sentiments Cling Stamp Set
HCD1-7201 Ticket and Tags Die
HCD1-7203 Ornamental Tags Die
HCPP3-452 12 x 12 Cardstock Pack of 25 - White
RACP468 Ranger Archival Ink Pad - Jet Black
359848 Spellbinders Tool N' One
RAHT Heat It Craft Tool
D120601 Darice Adhesive Foam Strips
3D1844 3-D Crystal Lacquer
NU650 Nuvo Crystal Drops - Ebony Black
Other Products:
Black Versafine Ink or Versamark Ink, Salty Ocean Distress Oxide ink, Ranger Black embossing powder, iCraft Stencil, Clarity Stencil brushes, MISTI, MS Scoreboard, Red marker, Black cardstock and Green Twine.
Instructions:
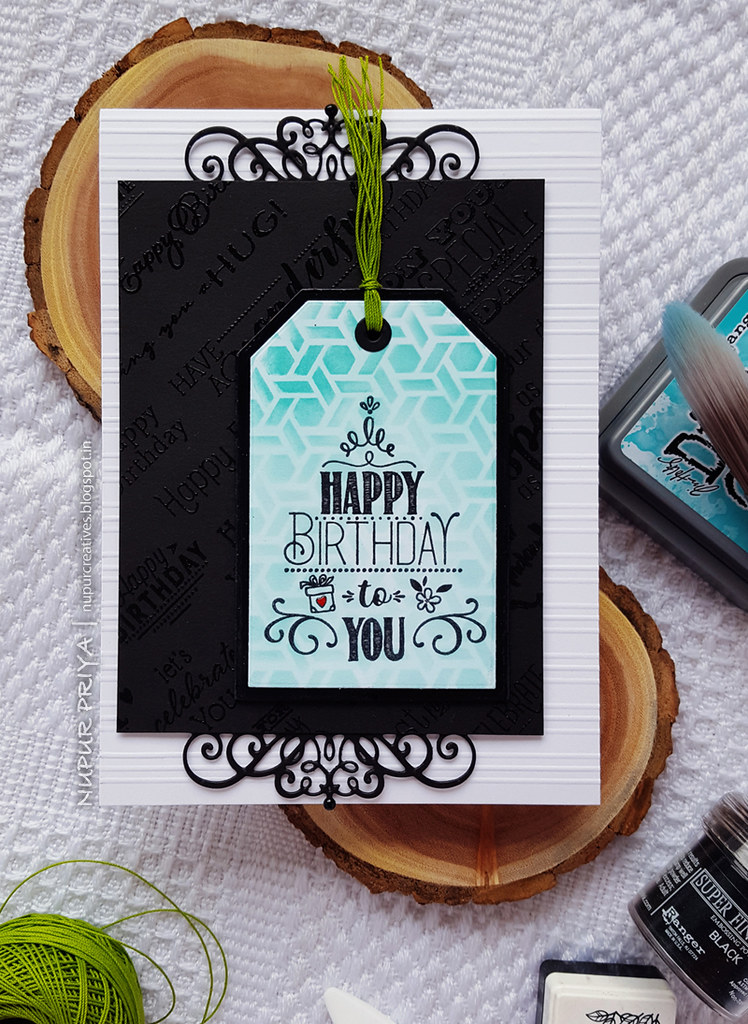
Take a 5" x 7" White cardbase and score the front horizontally to create textured background as shown.
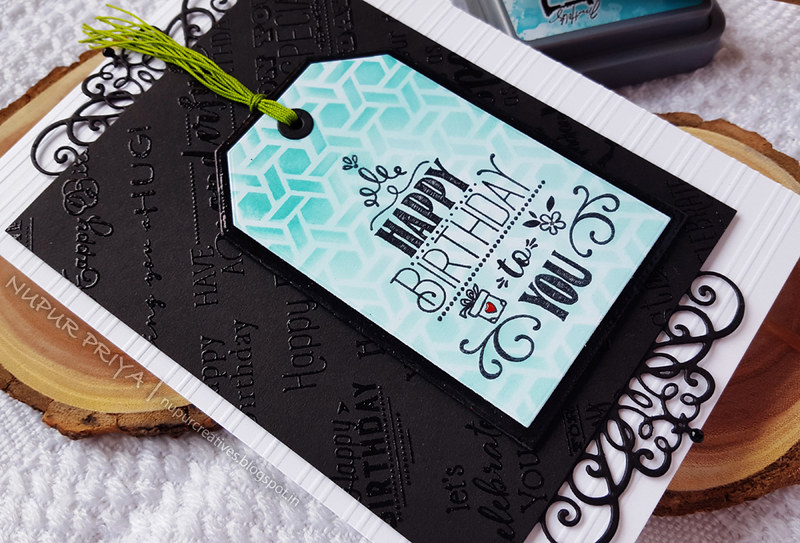
Take birthday sentiments stamps from Special Birthday Sentiments Cling Stamp Set, For My Friend Sentiments Cling Stamp Set, Just For You Sentiments Cling Stamp Set, Thank You Sentiments Cling Stamp Set, Celebrate Love Sentiments Cling Stamp Set and Cheerful Note Sentiments Cling Stamp Set and arrange them diagonally on the MISTI door. Stamp it with Black Versafine Ink or Versamark Ink on a piece of black cardstock and heat emboss it using Ranger Black embossing powder and Heat It Craft Tool. Trim this piece to 4 1/4" x 5 1/2". Die cut 2 pieces of black cardstock using the die from Ornamental Tags Die and adhere it at the top and bottom of the stamped piece we just created so that the total height reaches 7". Adhere it on the scored card front as shown using Darice Adhesive Foam Strips..
Stamp the sentiment from Special Birthday Sentiments Cling Stamp Set on a piece of white cardstock and die cut it using the tag dies from Ticket and Tags Die. Ink it with Salty Ocean Distress Oxide ink using Clarity Stencil brushes. Die cuat a piece of black cardstock using the larger tag die from the same set and create the tag using all the pieces. Thread few pieces of green twine through the tag hole and adhere it to the card front using Darice Adhesive Foam Strips. Color in the tiny heart on the tag using red marker and cover it with 3-D Crystal Lacquer. Add drops of Ebony Black Nuvo Crystal Drops on the die cut to add finishing touch.
Hope you like it...
Today I have a clean and simple card to share with you all.
I have used the cluster stamping technique to create the background for this card.
This is a great technique to get more use out of your sentiment stamps and it also creates an interesting background without drawing the attention from the focal image.
Read till the end for the full supply list and the instructions for this card.
Heartfelt Creations Products:
HCPC-3843 Special Birthday Sentiments Cling Stamp Set
HCPC-3844 For My Friend Sentiments Cling Stamp Set
HCPC-3845 Just For You Sentiments Cling Stamp Set
HCPC-3846 Thank You Sentiments Cling Stamp Set
HCPC-3847 Celebrate Love Sentiments Cling Stamp Set
HCPC-3848 Cheerful Note Sentiments Cling Stamp Set
HCD1-7201 Ticket and Tags Die
HCD1-7203 Ornamental Tags Die
HCPP3-452 12 x 12 Cardstock Pack of 25 - White
RACP468 Ranger Archival Ink Pad - Jet Black
359848 Spellbinders Tool N' One
RAHT Heat It Craft Tool
D120601 Darice Adhesive Foam Strips
3D1844 3-D Crystal Lacquer
NU650 Nuvo Crystal Drops - Ebony Black
Other Products:
Black Versafine Ink or Versamark Ink, Salty Ocean Distress Oxide ink, Ranger Black embossing powder, iCraft Stencil, Clarity Stencil brushes, MISTI, MS Scoreboard, Red marker, Black cardstock and Green Twine.
Instructions:
Take a 5" x 7" White cardbase and score the front horizontally to create textured background as shown.
Take birthday sentiments stamps from Special Birthday Sentiments Cling Stamp Set, For My Friend Sentiments Cling Stamp Set, Just For You Sentiments Cling Stamp Set, Thank You Sentiments Cling Stamp Set, Celebrate Love Sentiments Cling Stamp Set and Cheerful Note Sentiments Cling Stamp Set and arrange them diagonally on the MISTI door. Stamp it with Black Versafine Ink or Versamark Ink on a piece of black cardstock and heat emboss it using Ranger Black embossing powder and Heat It Craft Tool. Trim this piece to 4 1/4" x 5 1/2". Die cut 2 pieces of black cardstock using the die from Ornamental Tags Die and adhere it at the top and bottom of the stamped piece we just created so that the total height reaches 7". Adhere it on the scored card front as shown using Darice Adhesive Foam Strips..
Stamp the sentiment from Special Birthday Sentiments Cling Stamp Set on a piece of white cardstock and die cut it using the tag dies from Ticket and Tags Die. Ink it with Salty Ocean Distress Oxide ink using Clarity Stencil brushes. Die cuat a piece of black cardstock using the larger tag die from the same set and create the tag using all the pieces. Thread few pieces of green twine through the tag hole and adhere it to the card front using Darice Adhesive Foam Strips. Color in the tiny heart on the tag using red marker and cover it with 3-D Crystal Lacquer. Add drops of Ebony Black Nuvo Crystal Drops on the die cut to add finishing touch.
Hope you like it...
Thank you for visiting today... :)

Beautiful card Nupur! I love how you did the backgrounds!
ReplyDeleteWhat a gorgeous card, I love the embossing, such a wonderful idea!
ReplyDelete