
Hello Friends and welcome to Heartfelt Wednesday...
Today is a new release day and it is a perfect collection to make your father's day cards and gifts...
Happy Camper Collection
There’s absolutely no better way to spend the lazy, hazy, dog days of summer than packing up the camper and heading out onto the open road for a weekend adventure! Whether parked in a secluded campsite among the towering pines, or hunkered down in a modern camping resort, spending time in your home on wheels always guarantees fantastic memories made, and time to slow down and unwind. Soaking up the sun, splashing in the lake, and then heading back to warm up around the campfire and enjoy a chocolatey s’more while the stars come out and flickering fire flies dance through the trees…this is life at its finest! Join us as we celebrate grand traveling adventures with the new Happy Camper Collection from Heartfelt Creations! Wind your way through a fun filled decorative paper collection showcasing picturesque scenes of playful campsites featuring whimsical camper trailers, exciting sentiments, and cheerful florals! Relax and kick up your feet as you soak in the happy colors of grass like greens, sunny yellows, rustic reds, playful pinks and sky blues, along with enchanting patterns including colorful banners, bright polka dots and pleasing plaids! An adorable assembling of cling stamp sets, along with coordinating dies, allow for designing and creating a multitude of adventurous scenes and settings perfect for the summer season! With two adorable camper trailers, an assortment of camping themed accessories such as stringed lights, playful party banners, a charming patio set, as well as a campfire and your favorite fur baby, the design possibilities for handmade greeting cards, scrapbook layouts and altered art projects are endless, allowing you to dream up the perfect happy place to escape to! So, come along with us as we hit the trails, set up camp and take time to slow down and enjoy the simple things in life with the new Happy Camper Collection….no bug spray required!
moving on to my card for today... I have made a shaker card... I love making them but I don't know why I don't make them more often.... Anyways maybe I will make more for my upcoming projects!
Don't forget to read till the end for full supply list and instructions for this card...


Heartfelt Creations Products:
HCPC-3879 My Happy Place Cling Stamp Set
HCPC-3880 Elements of Home Cling Stamp Set
HCD1-7207 Hand-stitched Accents Die
HCD1-7243 My Happy Place Die
HCD1-7244 Elements of Home Die
HCDP1-2103 Happy Camper Paper Collection
HCPP3-452 12 x 12 Cardstock Pack of 25 - White
GBKK811B1 Clear Cardstock 8.5 x 11
RACP468 Ranger Archival Ink Pad - Jet Black
Zig Clean Color Real Brush Markers
159723 Designer Dries Clear Adhesive
352854 Metal Tip for Adhesive Bottles
D120601 Darice Adhesive Foam Strips
3D1844 3-D Crystal Lacquer
ANC850 Spring Bling Prills : Lettuce Entertain You
NU651 Nuvo Crystal Drops - Gloss White
DMCT4185 Groove Golf Tool Set
HCDA2-450 Stack and Store Daubers-Pack of 30
411231 5pc. Acrylic Block Set
Other Products:
Salty Ocean and Mowed Lawn Distress inks, Hero Arts Unicorn white pigment ink, Watercolor cardstock, Paint brushes and pearls.
Instructions:
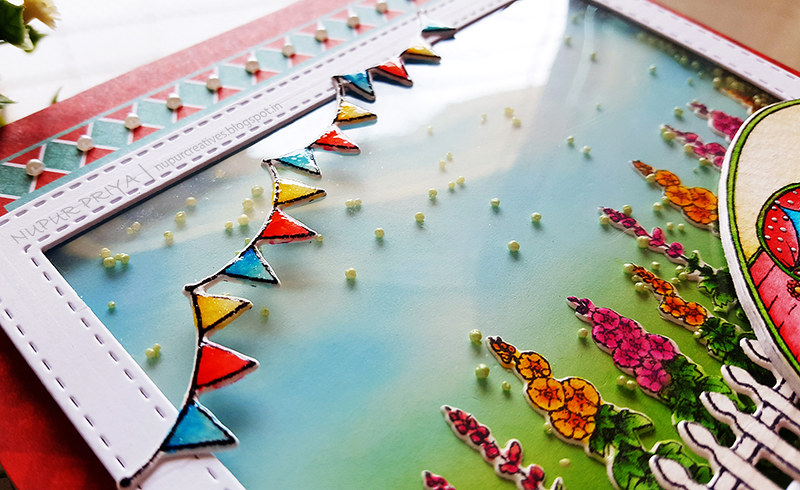
Take a 6" x 6" white card base and cover the front using a 6" x 6" card panel from the Happy Camper Paper Collection. Stamp the banner, flower bushes and fence images from Elements of Home Cling Stamp Set and the camper image from My Happy Place Cling Stamp Set on a piece of watercolor cardstock using Jet Black Archival Ink Pad. Cut them out using the matching dies from Elements of Home Die and My Happy Place Die. Color the images using Zig Clean Color Real Brush Markers. Die cut 4 more pieces of white cardstock using the camper die. Stack and adhere all of them together.
Die cut a piece of Clear Cardstock using the outer rectangle from Hand-stitched Accents Die. Die cut a piece of white cardstock using both the rectangle dies from the same set to make a frame. Adhere the Clear Cardstock piece behind the frame die cut. Adhere the banner, fence and camper die cuts as shown on the frame. Adhere Darice Adhesive Foam Strips on the back of the frame so that there is no gap to make the front of the shaker window.
Take a piece of white cardstock a little smaller than the frame we created in previous step. Ink it with Salty Ocean and Mowed Lawn Distress inks and Hero Arts Unicorn white pigment ink to create the background of the shaker card. Glue the flower bushes to this panel and then pour a little Lettuce Entertain You Prills from Spring Bling Prills in the center. Adhere the front of the shaker window on top and adhere the final shaker piece of the card front as shown. adhere some pearls to the card as shown and apply a coat of 3-D Crystal Lacquer to the banner to add finishing touch.
Hope you like it...
Thank you for visiting today... :)

I love this shaker card and your gorgeous coloring Nupur!
ReplyDeleteYou just keep creating gorgeous cards!!!
ReplyDelete