
Hello and welcome to Heartfelt inspiration...
It's a special launch week and we have some gorgeous dies for you guys...
Heartfelt Creations has been coming out with special mini release since last year and manages to surprise us each time with yet another amazing collection....
This time it is Diamond Dies... This collection has 4 sets of dies:
Diamond Basics Die
Eyelet Diamond Die
Lacy Diamond Die
Diamonds & Lace Die
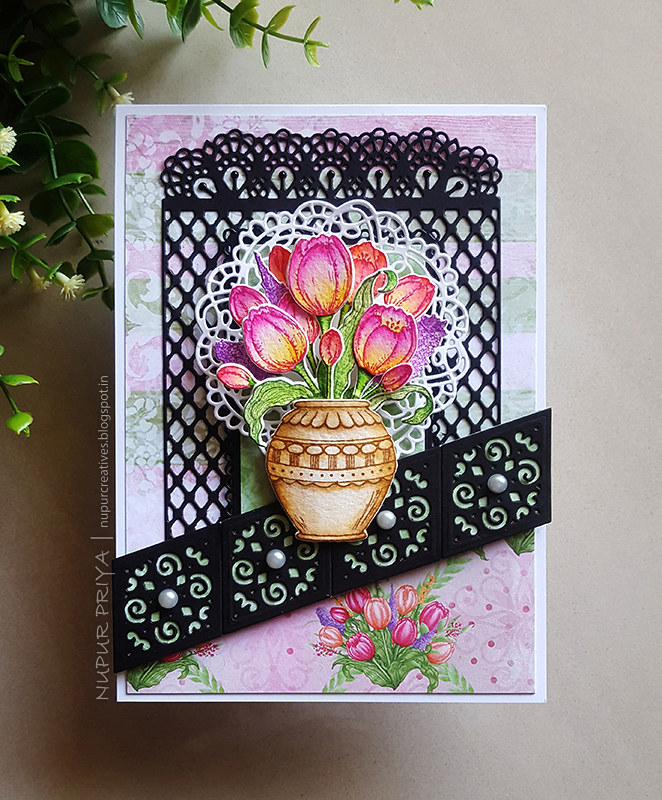
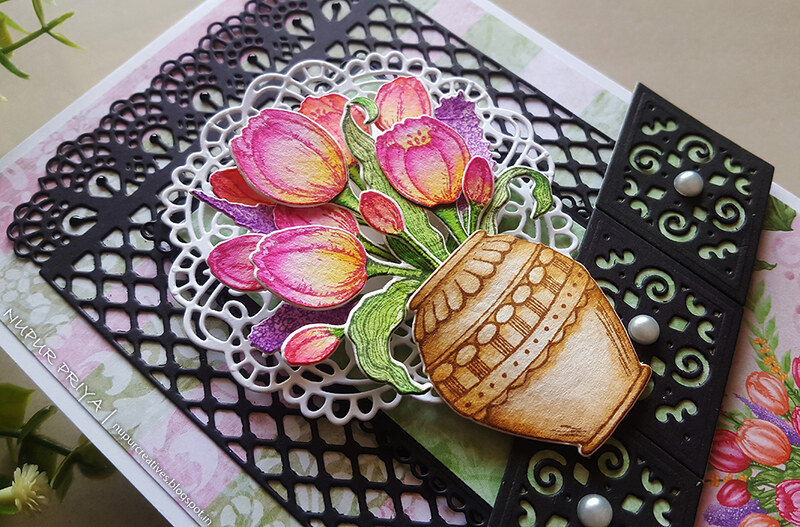
I have used Diamonds & Lace Die for today's card along with some of the older dies and Tulip Time collection. I have tried to show you how you can use the small accent pieces in a different way to create a border.
Read till the end for complete list of supplies and instruction for this card.
Heartfelt Creations Products: HCPC-3859 Tulip Bouquet Cling Stamp Set
HCPC-3860 Tulip Vase & Fillers Cling Stamp Set
HCD1-7179 Butterfly Kisses Decorative Die
HCD2-7189 Eyelet Rectangle & Basics Die
HCD1-7219 Tulip Bouquet Die
HCD1-7220 Tulip Vase & Fillers Die
HCD1-7229 Diamonds & Lace Die
HCDP1-298 Tulip Time Paper Collection
HCPP3-452 12 x 12 Cardstock Pack of 25 - White
HCPP1-438-1 Paper Pack of 10 - Black
NU650 Nuvo Crystal Drops - Ebony Black
Zig Clean Color Real Brush Markers
352854 Metal Tip for Adhesive Bottles
159723 Designer Dries Clear Adhesive
D120601 Darice Adhesive Foam Strips
RACP482 Ranger Archival Ink Pad - Olive
RACP524 Ranger Archival Ink Pad - Vibrant Fuchsia
RACP451 Ranger Archival Ink Pad - Coffee
RACP494 Ranger Archival Ink Pad - Majestic Violet
Other Products: Watercolor Cardstock and Pearls.
Instructions: Cut a piece of 4 3/4" x 6 3/4" piece of pattern paper from Tulip Time Paper Collection and adhere it to a 5" x 7" white cardbase. Cut another piece of 5 3/4" x 2 1/2" pattern paper from the same paper collection and cut the top at an angle so that the height of left side is 1" and the right side is 2 1/2". Adhere this piece to the bottom of the card.
Die cut a piece of black cardstock using the largest die fromDiamonds & Lace Die and adhere it to the
card font as shown. Die cut a piece of black cardstock using the eyelet die from Eyelet Rectangle & Basics Die and adhere it to center of the previous die cut using Darice Adhesive Foam Strips. Mat it with a piece of pattern paper from Tulip Time Paper Collection. Die cut a piece of white cardstock using the doily die from Butterfly Kisses Decorative Die and adhere it to the Eyelet Rectangle layer using Darice Adhesive Foam Strips.
Die cut 4 pieces of black cardstock using the dies from Diamonds & Lace Die and adhere them on a strip of pattern paper as shown to create a border. Trim the extra pattern paper and adhere this border on the card front as shown using Darice Adhesive Foam Strips.
Stamp the vase from Tulip Vase & Fillers Cling Stamp Set on a piece of watercolor cardstock using Coffee Archival Ink Stamp the flowers from the same stamp set on watercolor cardstock using Vibrant Fuchsia, Majestic Violet and Olive Archival Inks. Die cut these using matching dies from Tulip Vase & Fillers Die. Stamp the flower bunch image from Tulip Bouquet Cling Stamp Set on watercolor cardstock using Vibrant Fuchsia and Olive Archival Inks. Die cut these using matching die from Tulip Bouquet Die. Color all the images using Zig Clean Color Real Brush Markers. Curve the Vase slightly to give a rounded shape.
Arrange and adhere all the flowers, leaves and vase as shown. Add few pearls and Ebony Black Nuvo Crystal Drops to the die cuts to add finishing touch.
Hope you like it...
It's a special launch week and we have some gorgeous dies for you guys...
Heartfelt Creations has been coming out with special mini release since last year and manages to surprise us each time with yet another amazing collection....
This time it is Diamond Dies... This collection has 4 sets of dies:
Diamond Basics Die
Eyelet Diamond Die
Lacy Diamond Die
Diamonds & Lace Die
I have used Diamonds & Lace Die for today's card along with some of the older dies and Tulip Time collection. I have tried to show you how you can use the small accent pieces in a different way to create a border.
Read till the end for complete list of supplies and instruction for this card.
Heartfelt Creations Products: HCPC-3859 Tulip Bouquet Cling Stamp Set
HCPC-3860 Tulip Vase & Fillers Cling Stamp Set
HCD1-7179 Butterfly Kisses Decorative Die
HCD2-7189 Eyelet Rectangle & Basics Die
HCD1-7219 Tulip Bouquet Die
HCD1-7220 Tulip Vase & Fillers Die
HCD1-7229 Diamonds & Lace Die
HCDP1-298 Tulip Time Paper Collection
HCPP3-452 12 x 12 Cardstock Pack of 25 - White
HCPP1-438-1 Paper Pack of 10 - Black
NU650 Nuvo Crystal Drops - Ebony Black
Zig Clean Color Real Brush Markers
352854 Metal Tip for Adhesive Bottles
159723 Designer Dries Clear Adhesive
D120601 Darice Adhesive Foam Strips
RACP482 Ranger Archival Ink Pad - Olive
RACP524 Ranger Archival Ink Pad - Vibrant Fuchsia
RACP451 Ranger Archival Ink Pad - Coffee
RACP494 Ranger Archival Ink Pad - Majestic Violet
Other Products: Watercolor Cardstock and Pearls.
Instructions: Cut a piece of 4 3/4" x 6 3/4" piece of pattern paper from Tulip Time Paper Collection and adhere it to a 5" x 7" white cardbase. Cut another piece of 5 3/4" x 2 1/2" pattern paper from the same paper collection and cut the top at an angle so that the height of left side is 1" and the right side is 2 1/2". Adhere this piece to the bottom of the card.
Die cut a piece of black cardstock using the largest die fromDiamonds & Lace Die and adhere it to the
card font as shown. Die cut a piece of black cardstock using the eyelet die from Eyelet Rectangle & Basics Die and adhere it to center of the previous die cut using Darice Adhesive Foam Strips. Mat it with a piece of pattern paper from Tulip Time Paper Collection. Die cut a piece of white cardstock using the doily die from Butterfly Kisses Decorative Die and adhere it to the Eyelet Rectangle layer using Darice Adhesive Foam Strips.
Die cut 4 pieces of black cardstock using the dies from Diamonds & Lace Die and adhere them on a strip of pattern paper as shown to create a border. Trim the extra pattern paper and adhere this border on the card front as shown using Darice Adhesive Foam Strips.
Stamp the vase from Tulip Vase & Fillers Cling Stamp Set on a piece of watercolor cardstock using Coffee Archival Ink Stamp the flowers from the same stamp set on watercolor cardstock using Vibrant Fuchsia, Majestic Violet and Olive Archival Inks. Die cut these using matching dies from Tulip Vase & Fillers Die. Stamp the flower bunch image from Tulip Bouquet Cling Stamp Set on watercolor cardstock using Vibrant Fuchsia and Olive Archival Inks. Die cut these using matching die from Tulip Bouquet Die. Color all the images using Zig Clean Color Real Brush Markers. Curve the Vase slightly to give a rounded shape.
Arrange and adhere all the flowers, leaves and vase as shown. Add few pearls and Ebony Black Nuvo Crystal Drops to the die cuts to add finishing touch.
Hope you like it...
Thank you for visiting today... :)

Very pretty.
ReplyDeleteYour card is beautiful! What lovely colors and of course your flowers are amazing!
ReplyDeleteStunning Nupur. . . love it. X
ReplyDelete