
Hello friends and welcome to Heartfelt Wednesday
Today I am sharing another card made with the latest Happy Camper Collection
Read till the end for full list of supplies and instructions for this card.


Heartfelt Creations Products:
HCPC-3878 Happy Camper Cling Stamp Set
HCD1-7242 Happy Camper Die
HCD1-7248 Regal Frame & Accents Die
HCDP1-2103 Happy Camper Paper Collection
HCPP3-452 12 x 12 Cardstock Pack of 25 - White
RACP468 Ranger Archival Ink Pad - Jet Black
Zig Clean Color Real Brush Markers
3D1844 3-D Crystal Lacquer
159723 Designer Dries Clear Adhesive
352854 Metal Tip for Adhesive Bottles
D120601 Darice Adhesive Foam Strips
411231 5pc. Acrylic Block Set
359848 Spellbinders Tool N' One
Other Products:
Instructions:
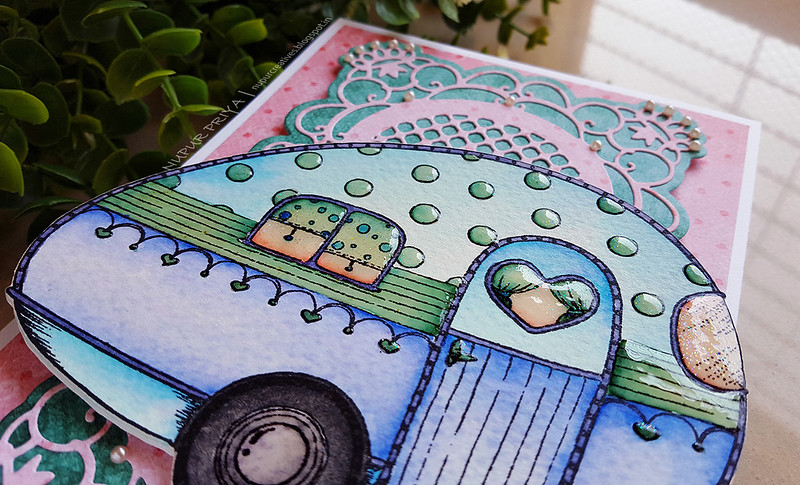
Cut a 4 3?4" x 6 3/4" piece of pattern paper from Happy Camper Paper Collection and adhere it to a 5" x 7" white card base. Die cut a piece of white cardstock and 2 pieces of pattern paper from the same paper collection using the dies from Regal Frame & Accents Die. Adhere them together as shown. Cut the final piece in the middle horizontally and adhere them on the card front using Darice Adhesive Foam Strips as shown so that there is a gap of 1/2" in between both the pieces.
Stamp the camper image from Happy Camper Cling Stamp Set on a piece of watercolor paper using Jet Black Archival Ink and color it using Zig Clean Color Real Brush Markers. Die cut this using matching die from Happy Camper Die. Die cut 4 more pieces of white cardstock using the same die, stack and adhere all the 5 die cuts together. Apply a coat of 3-D Crystal Lacquer to some selected areas of the camper and dust a little transparent holographic glitter. Once the 1st layer is dry apply a 2nd layer of 3-D Crystal Lacquer on top of the previous one. Adhere this final piece on the card front using Darice Adhesive Foam Strips. Add pearls to the die cut to add finishing touch.
Hope you like it...
Today I am sharing another card made with the latest Happy Camper Collection
Read till the end for full list of supplies and instructions for this card.
Heartfelt Creations Products:
HCPC-3878 Happy Camper Cling Stamp Set
HCD1-7242 Happy Camper Die
HCD1-7248 Regal Frame & Accents Die
HCDP1-2103 Happy Camper Paper Collection
HCPP3-452 12 x 12 Cardstock Pack of 25 - White
RACP468 Ranger Archival Ink Pad - Jet Black
Zig Clean Color Real Brush Markers
3D1844 3-D Crystal Lacquer
159723 Designer Dries Clear Adhesive
352854 Metal Tip for Adhesive Bottles
D120601 Darice Adhesive Foam Strips
411231 5pc. Acrylic Block Set
359848 Spellbinders Tool N' One
Other Products:
Canson watercolor cardstock, Transparent holographic glitter and pearls.
Instructions:
Cut a 4 3?4" x 6 3/4" piece of pattern paper from Happy Camper Paper Collection and adhere it to a 5" x 7" white card base. Die cut a piece of white cardstock and 2 pieces of pattern paper from the same paper collection using the dies from Regal Frame & Accents Die. Adhere them together as shown. Cut the final piece in the middle horizontally and adhere them on the card front using Darice Adhesive Foam Strips as shown so that there is a gap of 1/2" in between both the pieces.
Stamp the camper image from Happy Camper Cling Stamp Set on a piece of watercolor paper using Jet Black Archival Ink and color it using Zig Clean Color Real Brush Markers. Die cut this using matching die from Happy Camper Die. Die cut 4 more pieces of white cardstock using the same die, stack and adhere all the 5 die cuts together. Apply a coat of 3-D Crystal Lacquer to some selected areas of the camper and dust a little transparent holographic glitter. Once the 1st layer is dry apply a 2nd layer of 3-D Crystal Lacquer on top of the previous one. Adhere this final piece on the card front using Darice Adhesive Foam Strips. Add pearls to the die cut to add finishing touch.
Hope you like it...
Thank you for visiting today... :)

Gorgeous card Nupur...love the colors!
ReplyDeleteGorgeous!
ReplyDelete