Wednesday, 3 June 2015

Fuchsia Cluster

Hello friends...
Welcome to another inspiration for Heartfelt Creations
I have made a tag for today's post...

Products Used:

Other Products:
Mowed Lawn, Picked Raspberry, Seedless Preserve, Salty Ocean & Brushed Corduroy Distress Inks, Black Archival Ink, Ranger Sail Boat Blue & Citrus Alcohol Inks, Koi waterbrush, Ebosser, Martha Stewart scoreboard, white, glossy white & watercolor cardstock, Spellbinders Labels One dies, Spellbinders Decorative Labels One dies, Pearls, Ribbon, Rhinestones & Adhesive.

Project Instruction:
Take a 7" x 3 1/2" white cardstock, cut both the top & bottom edges into semicircles &  Ink with Brushed Corduroy Distress Ink.

Ink a glossy white cardstock with Ranger Sail Boat Blue & Citrus Alcohol Inks & die cut it with Raindrops on Roses Die. Cut this die cut into half & adhere to the top & bottom of the tag. 

Die cut white cardstock with largest & second largest Spellbinders Decorative Labels One dies. Ink the largest die cut with Picked Raspberry Distress Ink. Adhere them to the tag with foam tape as shown.

Die cut a piece of white cardstock with Spellbinders Labels One die & ink with Brushed Corduroy Distress Ink. Stamp Fuchsia Clusters Cling Stamp Set on watercolor cardstock with Black Archival Ink, color with distress inks & Koi waterbrush & fussy cut it to mat on the die cut. Adhere both to the tag as shown with foam tape. Add some pearls, rhinestones & a pink ribbon bow to finish.


Monday, 1 June 2015

Wonderful Sister

Hello friends...
How are you all... I have a feminine watercolor card today featuring our  Big Wonderful Stamp Set from our May release &  Humming Birds stamp set...
 I wanted to create an oval frame for my sentiment so I started off by stamping the flower from Humming Birds stamp set in the center of all four sides & then masked off 2 adjacent flowers & stamped a flower in the middle... 
 Then I stamped my sentiment from  Big Wonderful Stamp Set in the middle... I just love this stamp set...It is such a wonderful stamp set which has so many possibilities with mix and match sentiments for anyone you know... 
I hope you like it... Thanks for visiting today...  :)


Sunday, 31 May 2015

Let Your Soul & Spirit Fly

Hello Friends...

 I hope you enjoyed all the beautiful inspirations of the latest release by IBS...
Today I am featuring Seaside Sentiments &  Seaside stamp sets...
I have created a scene with the light house & flying birds image from  Seaside stamp set & the sentiment is from Seaside Sentiments stamp set...

Thank you for visiting today...


Saturday, 30 May 2015

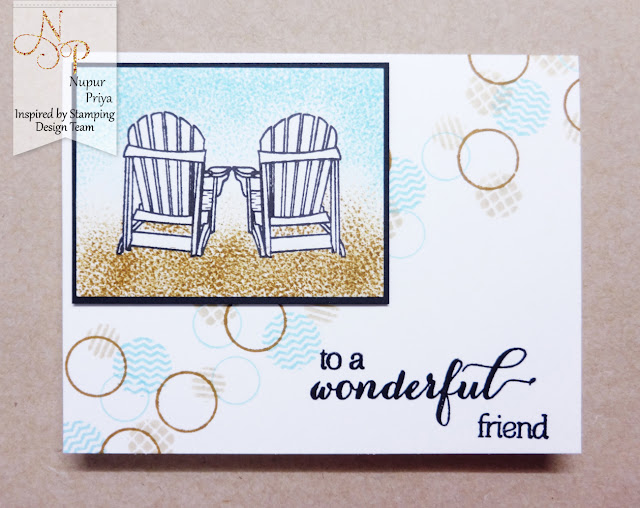
Wonderful Friend

Hello friends...

Welcome to IBS Saturday Designer Feature...

Today I am sharing a card with Pointillism effect...
 To make my focal point I stamped the beach chair from Seaside stamp set & masked it with post-it- note... Then I took my inks & the stamp circled in red from the  Polka Dots stamp set & stamped several times to create the Pointillism effect in the sand & sky area...


 The background was created with Polka Dots stamp set... & the sentiment is from Big Wonderful Stamp Set


Thank you for visiting...


Wednesday, 27 May 2015

Have a Wonderful Day

Hello friends...
Welcome to  Heartfelt Creations Wednesday ...
I have made a beautiful floral cad for today's inspiration...
I love making my own pattern papers using stamps, inks & stencils...
It is magical how a plain white paper can transform into something so beautiful... :)
I hope you like it too...


Products Used:
HCPC-3670 Fuchsia Spray Cling Stamp Set
HCPC 3645 Leafy Branch Cling Stamp Set
HCPC 3650 Butterfly Medley Cling Stamp Set
HCPC 3651 Botanical Rose Cling Stamp Set
HCPC-3665 Everyday Hero Newsprint Cling Stamp Set
HCPC-3673 Heartfelt Sentiments Cling Stamp Set
HCD1 757 Leafy Branch Die
HCD1 758 Botanical Wings Die
HCD1-762 Decorative Oval Die
HCD1 759 Butterfly Medley Die
247027 Fantastix Blending Tool
HCST1-401 Deluxe Flower Shaping Kit

Other Products
Mowed Lawn, Forest Moss, Picked Raspberry, Seedless Preserve, Tumbles Glass, Broken China & Chipped Sapphire Distress Inks, Black Archival Ink, Versamark Ink, Ebosser, Martha Stewart scoreboard, white cardstock, Memory Box Textured Flourish Stencil, Ranger Heat it tool, WOW White Embossing Powder, Pollens, Pearls & Prima Gold Rush Glass Glitter.

Project Instruction:
Take a 6" x 6" card base & ink the edges with Picked Raspberry & Seedless Preserve Distress inks. Take a 5 3/4" x 5 3/4" white cardstock & stamp Fuchsia Spray Cling Stamp Set & Everyday Hero Newsprint Cling Stamp Set with black Archival Ink. Ink it with Tumbles Glass, Broken China & Chipped Sapphire Distress Inks. Take  Memory Box Textured Flourish Stencil & ink with Chipped Sapphire Distress Ink. Color in the image with various Distress Inks & Fantastix Blending Tool. Die cut Decorative Oval Die from white cardstock, ink lightly with Picked Raspberry Distress Ink & adhere to the prepared background as shown. Trim away the excess die cut & adhere this panel to the card base. 


Stamp flowers from Botanical Rose Cling Stamp Set with Picker Raspberry Distress ink & leaves with Forest Moss Distress Ink & cut with Botanical Wings Die. Ink the flowers with Picked Raspberry & Seedless Preserve Distress Inks & leaves with Mowed Lawn & Forest Moss Distress Inks. Shape them & add Prima Gold Rush Glass Glitter to the flower centers. Adhere them to the card base as shown. Add pollens to the flower arrangement.

Stamp the sentiment from Heartfelt Sentiments Cling Stamp Set with Black archival ink on white cardstock. Cut it into banner, ink with Seedless Preserve Distress Ink, shape it & adhere to the card base. 

Stamp Butterfly Medley Cling Stamp Set with Versamark ink, heat emboss it with WOW White Embossing Powder & cut it with Butterfly Medley Die. Ink it with Seedless Preserve Distress Ink & adhere to the sentiment banner. Add pearls to embellish.


Friday, 22 May 2015

Experiments with paper cake

Hello friends...

I have a new explosion box to share... I made it last year & shared the sneak-peek on my Fb page & Instagram...

Here is the full reveal...


 I tried to make the cake more decorative & realistic than my previous paper cakes & I love how it turned out  :)
Hope you like it...
Thank you for visiting today...


Wednesday, 20 May 2015

Fuchsia Clusters Card

Hello friends...

Welcome to  Heartfelt Creations Wednesday ...
Today I am showcasing 2 beautiful stamps from Cascading Fuchsia Collection...
Hope you like it  :)


Products Used:
HCPC-3671 Fuchsia Clusters Cling Stamp Set
HCPC-3669 Vining Fuchsia Cling Stamp Set
HCPC 3471 Tattered Collage Cling Stamp Set
HCD1-743 Raindrops on Roses Die
Other Products
Mowed Lawn, Picked Raspberry, Abandoned Coral & Black Soot Distress Inks, Black Archival Ink, Versamark Ink, Memento Tuxedo Black Ink, Wow Silver Pearl Embossing Powder, Ranger Heat it tool, Spellbinders A2 Scalloped Borders One, Ebosser, Martha Stewart scoreboard, white & watercolor cardstock, Koi waterbrush, Pearls & 

Project Instruction:
Take a 6" x 6" card base & ink the edges with Picked Raspberry & Abandoned Coral Distress Inks. Take a 5 3/4" x 5 3/4" white cardstock & stamp Vining Fuchsia Cling Stamp Set twice to form a circle with Versamark Ink, emboss with Wow Silver Pearl Embossing Powder & ink with Mowed Lawn & Black Soot Distress Ink. Stamp Tattered Collage Cling Stamp Set with Memento Tuxedo Black Ink randomly on this embossed background. Adhere it to the Card base with foam adhesive. 

Die cut Spellbinders A2 Scalloped Borders One Die & Raindrops on Roses Die & ink with Picked Raspberry & Abandoned Coral Distress Inks. Stamp the Fuchsia Clusters Cling Stamp Set with Black Archival Ink on Watercolor cardstock, color with various Distress inks & Koi waterbrush,  fussy cut it as shown & adhere it to the Raindrops on Roses  die cut. Adhere this & the border die cut to the card base. Add pearls to embellish.