Wednesday 26 February 2020

Die Cut See-Through Card

Hello Friends and welcome...
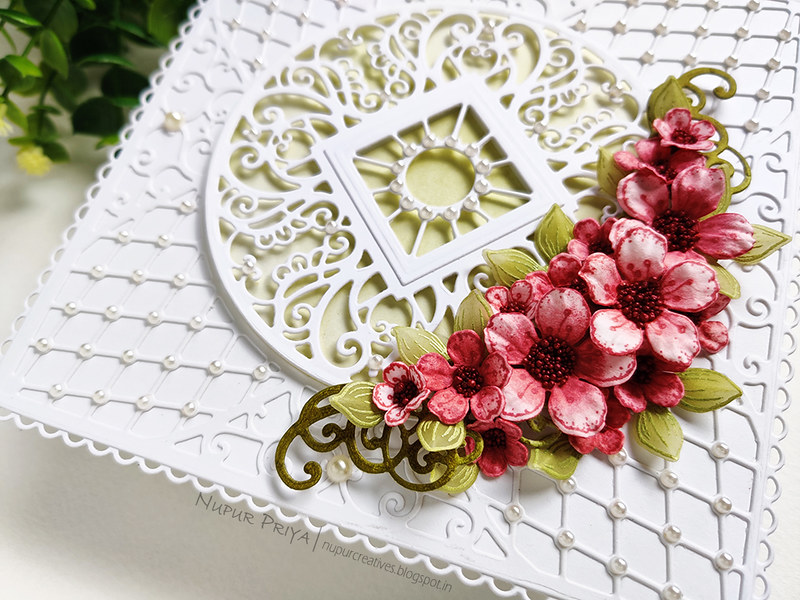
Today I am sharing a card  today which has a fun see- see through window that was made using Eyelet Royale Die
I love experimenting and coming up with new ways to use my dies and I love how this turned out...
Read till the end for full supply list and instructions for this card
Die Cut See-Through Card_Nupur Priya_01

Die Cut See-Through Card_Nupur Priya_02


Heartfelt Creations Products:

HCPC-3905 Elegant Teapot & Florals Cling Stamp Set
HCD1-7282 Eyelet Royale Die
HCD1-7288 Elegant Teapot & Florals Die
HCDP1-2112 Tea Time Paper Collection
HCPP1-438-2 Paper Pack of 10 - White
RACP468 Ranger Archival Ink Pad - Jet Black
359848 Spellbinders Tool N' One
411231 5pc. Acrylic Block Set
352854 Metal Tip for Adhesive Bottles
159723 Designer Dries Clear Adhesive

Other Products: Picked Raspberry, Mowed Lawn and Mermaid Lagoon Distress inks, paint brush, watercolor cardstock, transparent glitter and green pearls.


Instructions: Die cut a piece of white cardstock using the die from 
Eyelet Royale Die. Again die cut the same piece of cardstock using the same die on the other side matching the straight edge in the middle to get piece as shown in the image. Remove the top and bottom edges of the final piece so the resulting pieces looks like the die cut in the image. Trace the top and bottom curved inner edge of this die cut on the front flap of a 4 1/4" x 5 1/2" top folding white card base. Fussy cut the traced edges and adhere the die cut on it as shown. Trim off the excess die cut. Cut a 4 1/4" x 5 1/2" piece of purple patterned paper from  Tea Time Paper Collection and adhere it inside the card base so that it shows trough the die cut window on the front.

Ink the image from 
Elegant Teapot & Florals Cling Stamp Set using Jet Black Archival Ink Pad and stamp it on a piece of scrap paper and then immediately stamp it on a piece of watercolor cardstock to get 2nd generation stamping. Color in the image using Picked Raspberry, Mowed Lawn and Mermaid Lagoon Distress inks. Die cut the colored image using matching die from Elegant Teapot & Florals Die. Die cut 4 more pieces of white cardstock using the same die and adhere them all together to make a thicker piece. Apply transparent glitter to the image. Once the glue dries adhere this piece to the die cut window on the card front that we created earlier. Add some green pearls to the die cut to add finishing touch.


Hope you like it...

Thank you for visiting today... :)
Nupur
Disclosure : Compensated affiliate links used when possible  at NO additional cost to you.. Thank you! 

Wednesday 19 February 2020

Tea Pot and Florals Card

Hello and welcome to Heartfelt Wedneday
Today I am sharing a card that I made using the new Tea Time Collection along with some of the decorative dies. I have used the dies to create tiles for my background. I kept them white on white so that they don't distract from the focal image and then embellished them with pearls.

Read till the end for full supply list and instruction
Die cut Tiles Background Card_Nupur Priya_01

Die cut Tiles Background Card_Nupur Priya_02
Die cut Tiles Background Card_Nupur Priya_03


Heartfelt Creations Products: 

HCPC-3905 Elegant Teapot & Florals Cling Stamp Set
HCD1-7281 Stairway Gardens Die
HCD1-7282 Eyelet Royale Die
HCD1-7283 Courtyard Elegance Die
HCD1-7288 Elegant Teapot & Florals Die
HCPP1-438-2 Paper Pack of 10 - White
RACP468 Ranger Archival Ink Pad - Jet Black
359848 Spellbinders Tool N' One
411231 5pc. Acrylic Block Set
352854 Metal Tip for Adhesive Bottles
159723 Designer Dries Clear Adhesive
3D1844 3-D Crystal Lacquer
D120601 Darice Adhesive Foam Strips


Other Products: 

Picked Raspberry, Mowed Lawn, Wild Honey and Dusty Concord Distress inks, paint brush, watercolor cardstock, purple and white pearls.

Instructions: 

Die cut a pieces of white cardstock using the dies from Stairway Gardens DieEyelet Royale Die and Courtyard Elegance Die. Adhere them on pieces of white cardstock. Arrange and adhere them as shown on a 4 1/4" x 5 1/2" card base using Darice Adhesive Foam Strips. Trim off the excess die cuts handing off the edges.

Ink the images from Elegant Teapot & Florals Cling Stamp Set using Jet Black Archival Ink Pad and stamp it on a piece of scrap paper and then immediately stamp it on a piece of watercolor cardstock to get 2nd generation stamping. Color in the images using Picked Raspberry, Mowed Lawn, Wild Honey and Dusty Concord Distress inks. Die cut the colored images using matching dies from Elegant Teapot & Florals Die. Die cut 4 more pieces of white cardstock using the same dies and adhere them all together to make a thicker piece. Adhere them on the card front as shown using  Darice Adhesive Foam Strips under the jug for added dimension. Apply a coat of  3-D Crystal Lacquer on parts of the jug. Add some purple and white pearls to the die cut to add finishing touch.


Hope you like it...

Thank you for visiting today... :)
Nupur
Disclosure : Compensated affiliate links used when possible  at NO additional cost to you.. Thank you! 

Wednesday 12 February 2020

Tea Bag Holder

Hello and welcome to Heartfelt Wednesday
Today is new release day and this months collection is Beau-Tea-Ful!!!

Tea Time Collection

As soon as I saw this collection I was sure that I wanted to make a Tea bag holder so that is exactly what I created for the release day inspiration...
Don't you think that this gift will make any tea lover happy :)
The cups are so pretty! I used them to on the cover. I added 3-D Crystal Lacquer to some parts od the cups to make then glossy and adhered the cups so that they have a slight curve for a more 3D look.
Then I paired them with some vellum flowers.

As usual the full supply list and the instructions for this Tea bag holder is at the end.

Tea bag Holder_01_NupurPriya

Tea bag Holder_02_NupurPriya


Tea bag Holder_03_NupurPriya


Tea bag Holder_04_NupurPriya


Tea bag Holder_05_NupurPriya


Heartfelt Creations Products: 

HCPC-3855 Floral Fashionista Cling Stamp Set
HCPC-3874 Purr-fect Posies Cling Stamp Set
HCD1-7215 Floral Fashionista Die
HCD1-7238 Purr-fect Posies Die
HCDP1-2112 Tea Time Paper Collection
HCPP1-438-2 Paper Pack of 10 - White
18002 Rajni Chawla's Vellum Flowerite
RACP468 Ranger Archival Ink Pad - Jet Black
RACP436 Ranger Archival Ink Pad - Leaf Green
EP100 Opaque Embossing Powder - White
RAHT Heat It Craft Tool
HCS1-457-3 Pastel Bead Stamens-Medium
359848 Spellbinders Tool N' One
411231 5pc. Acrylic Block Set
3D1844 3-D Crystal Lacquer
352854 Metal Tip for Adhesive Bottles
159723 Designer Dries Clear Adhesive
HCDA2-450 Stack and Store Daubers-Pack of 30
HCST1-401 Deluxe Flower Shaping Kit
DMCT4185 Groove Golf Tool Set

Other Products :
Picked Raspberry, Mermaid Lagoon, Wild Honey, Mowed Lawn and Twisted Citron Distress inks, Hero Arts Unicorn White pigment ink, transparent glitter and pearls.


Instructions :
Take a 7 1/2" x 7" piece of white cardstock and score it at 3 1/2" and 4 ". Cut slightly smaller pieces of pattern paper from Tea Time Paper Collection ink the edges with Picked Raspberry Distress ink and decorate both the sides. 


Take 4 pieces of 3 7/8" x 3 3/8" white cardstock and score at 1/2" on 3 sides and cut the 2 bottom corners to make 4 pockets. Die cut the middle using the die from  Stairway Gardens Die. Adhere a piece of pattern paper behind the die cut window. Trim away the solid corner left after die cutting on the pocket as shown. Fold the score lines and adhere the pocket inside the cover of the Tea bag holder.


Die cut 2 pieces of white cardstock using the die from Ornamental Tags Die. Adhere them together and trim it down 3 edges to get the piece as shown in the image. Apply glue on the die cut and apply transparent glitter on top. Adhere this piece to the bottom of the cover as shown.


Ink the images from My Cup of Tea Cling Stamp Set using Jet Black Archival Ink Pad and stamp it on a piece of scrap paper and then immediately stamp it on a piece of watercolor cardstock to get 2nd generation stamping. Color in the images using Picked Raspberry, Mermaid Lagoon, Wild Honey, Mowed Lawn and Twisted Citron Distress inks. Die cut the colored images using matching dies from My Cup of Tea Die. Apply a coat of  3-D Crystal Lacquer on parts of the cups. Gently curve the cups using fingers. Attach a small piece of cardstock folded in the middle  on the back side of the side opposite the handles. Adhere this piece, handle and the bottom edge of the cups on the card front retaining the curve on the top edge of the cups. Stack the cups on the front as shown.


Stamp the flowers from Purr-fect Posies Cling Stamp Set and Floral Fashionista Cling Stamp Set on Rajni Chawla's Vellum Flowerite with Hero Arts Unicorn White pigment ink and heat emboss it using White Embossing Powder and Heat It Craft Tool. Die cut them using matching dies from Purr-fect Posies Die and Floral Fashionista Die. Ink the Purr-fect Posies flowers with Leaf Green  Archival Ink. Shape them using Groove Golf Tool Set. Cut apart the flower petals to use as leaves. Add a pink Pastel Bead Stamens to the Floral Fashionista flowers after shaping them with Deluxe Flower Shaping Kit. Arrange and adhere the flowers and leaves as shown. Add few pearls on the die cuts to add finishing touch.


P.S. : If you want to join Heartfelt Creations Design team then there are still few days left to apply. Click HERE for more details.


Hope you like it...

Thank you for visiting today... :)
Nupur
Disclosure : Compensated affiliate links used when possible  at NO additional cost to you.. Thank you! 

Wednesday 5 February 2020

Cherry Blossom Card + HFC DT Call

Hello friends and welcome to Heartfelt Wednesday,
Have you ever wanted to be on the design team of Heartfelt Creations?
If your answer is 'YES' then this is your chance to try as Heartfelt Creations is having a DT call:

Design Team Call: For a limited time, we are having an open design team call! Could you be a great fit to join our team? Click here for more details and to apply. 


Moving on to my card for today...

Today I am showcasing the new dies on my card along with Cherry Blossoms
Read till the end for full supply list and instructions for this card.
P.S. : Please ignore the mismatched fonts... Blogger is acting strange and I have tried everything to correct it but it reverts back... Also If you know how to fix this then do let me know. Thanks
Cherry Blossom Card_Nupur Priya_01

Cherry Blossom Card_Nupur Priya_02


Cherry Blossom Card_Nupur Priya_03


Cherry Blossom Card_Nupur Priya_04


Heartfelt Creations Products:
HCPC-3866 Tweet Cherry Blossoms Cling Stamp Set
HCPC-3874 Purr-fect Posies Cling Stamp Set
HCD2-751 Cut Mat Create 2A Die
HCD1-7230 Tweet Cherry Blossoms Die
HCD1-7238 Purr-fect Posies Die
HCD1-7281 Stairway Gardens Die
HCD1-7283 Courtyard Elegance Die
HCPP1-438-2 Paper Pack of 10 - White
18002 Rajni Chawla's Vellum Flowerite
HCPP1-475 Deluxe Flower Shaping Paper - Pack of 50
RACP993 Ranger Archival Ink Pad - Red Geranium
RACP436 Ranger Archival Ink Pad - Leaf Green
ANC851 Rock N' Roll Prills - Stop Wining
EP100 Opaque Embossing Powder - White
RAHT Heat It Craft Tool
352854 Metal Tip for Adhesive Bottles
159723 Designer Dries Clear Adhesive
D120601 Darice Adhesive Foam Strips
HCST1-401 Deluxe Flower Shaping Kit
DMCT4185 Groove Golf Tool Set
HCFB1-474 3D Cherry Blossom Shaping Mold
HCDA2-450 Stack and Store Daubers-Pack of 30
359848 Spellbinders Tool N' One.
173842 Scor-Pal Measuring & Scoring Board
411231 5pc. Acrylic Block Set


Other Products:
Bundled Sage and Forest Moss Distress inks, Hero Arts Unicorn White pigment ink and pearls.

Instructions:

Die cut a piece of white cardstock using the largest die from Stairway Gardens Die and adhere it on a 5 3/4" x 5 3/4" white card base. Die cut another piece of white cardstock using the 2nd and 3rd largest die from Courtyard Elegance Die and adhere it on the card front. Die cut a piece of white cardstock using the circle die from same set and another piece of cardstock using the outline circle, it's decorative insert and the square decorative insert dies. Ink the solid circle die cut using Bundled Sage distess ink and adhere it in the center of the die cut on the card front. Adhere the detailed circle die cut on the inked circle die cut using Darice Adhesive Foam Strips. Die cut a piece of white cardstock using the 2 smallest dies in this set. Align and adhere it on the previous die cut.


Stamp the Cherry blossoms from Tweet Cherry Blossoms Cling Stamp Set with Red Geranium Archival Ink. Ink them with the same ink using Stack and Store Daubers. Shape them using 3D Cherry Blossom Shaping Mold and  Deluxe Flower Shaping Kit. Add a little Stop Wining Prills to the flower centers. 

Stamp the flowers from Purr-fect Posies Cling Stamp Set on Rajni Chawla's Vellum Flowerite with Hero Arts Unicorn White pigment ink and heat emboss it using White Embossing Powder and Heat It Craft ToolShape them using Groove Golf Tool Set. Die cut them using matching dies from Purr-fect Posies Die. Ink the flowers with Leaf Green  Archival Ink. Cut apart the flower petals to use as leaves. 

Die cut a piece of white cardstock using the decorative swirl die from  Cut Mat Create 2A Die and ink it with Forest Moss distress ink. Cut it in the middle and adhere the swirls on the edge of the circle die cut using Darice Adhesive Foam Strips as shown. Arrange the flowers and leaves as shown on the card front. Add few pearls to the die cut to add finishing touch.


Hope you like it...

Thank you for visiting today... :)
Nupur
Disclosure : Compensated affiliate links used when possible  at NO additional cost to you.. Thank you!