Wednesday 28 October 2020

Fence and Flowers

Hello and welcome to my blog and Heartfelt Wednesday...
How are you all? The weather here has started turning cold and so I have a fall themed card for today made with the new Home on the Farm Collection
As usual the supply list and instructions can be found below the photograph
Home to Farm_Nupur Priya_02

Heartfelt Creations Products:
HCPC-3927 Barnyard Accents Cling Stamp Set
HCD1-7214 Ornate Pocket Accents Die
HCPP1-438-2 Paper Pack of 10 - White
RACP468 Ranger Archival Ink Pad - Jet Black
352854 Metal Tip for Adhesive Bottles
159723 Designer Dries Clear Adhesive
NU650 Nuvo Crystal Drops - Ebony Black

Other Products:
Altenew Watercolors, Brustro Green Gold round brushes, Brustro hot pressed watercolor cardstock, Prima Distressing tool, Tim Holtz Stamp Platform, rhinestones and double sided foam adhesive.

Instructions :

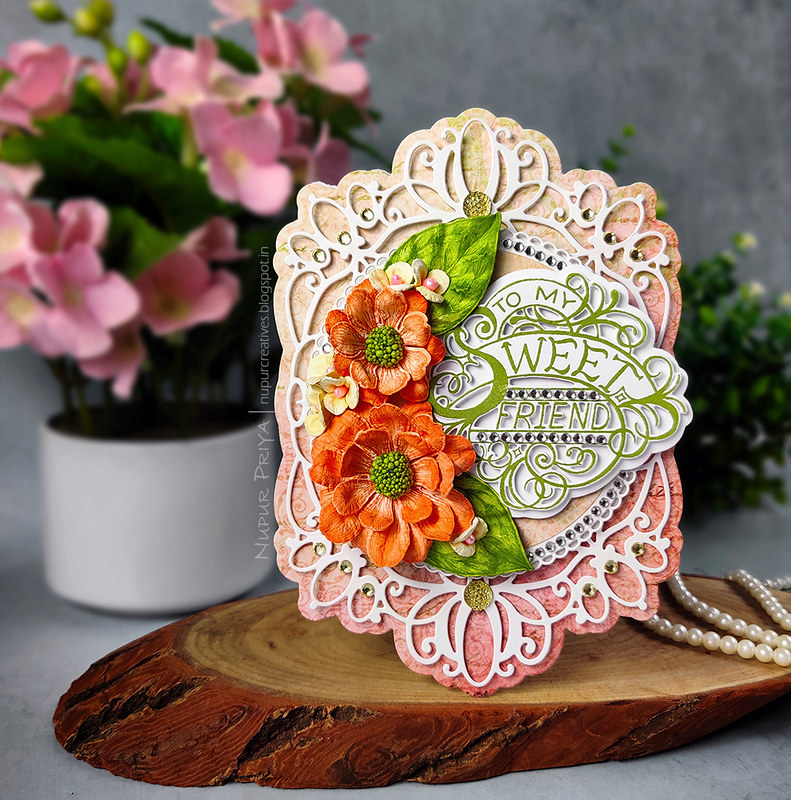
Cut 3 pieces of pattern papers measuring 6 3/4" x 4 3/4", 6 1/2" x 4 1/2" and 6 1/4" x 4 1/4" and distress their edges using Prima Distressing tool. Adhere all the pieces on a slightly smaller pieces of white cardstock. Layer and adhere them on a 5" x 7" white card base with double sided foam adhesive. Die cut 2 pieces of white cardstock using the die from Ornate Pocket Accents Die and adhere them on the top left corner and bottom right corner of the topmost layer.


Stamp the images from Barnyard Accents Cling Stamp Set with Jet Black Archival Ink on a sheet of Brustro hot pressed watercolor cardstock. Color the images using Altenew Watercolors, Brustro Green Gold round brushes. Die cut the images using the matching dies from Barnyard Accents DieArrange and adhere the images as shown using double sided foam adhesive as shown. Add tiny drops of 
Ebony Black Nuvo Crystal Drops to the flower centers. Add few rhinestones to the die cuts to add finishing touch.


Hope you like it...

Thank you for visiting today... :)
Nupur
Disclosure : Compensated affiliate links used when possible  at NO additional cost to you.. Thank you! 

Friday 23 October 2020

Home on the Farm

Hello and welcome to my blog and Heartfelt Wednesday...
How are you all? Today I am sharing a fall themed card made with the new Home on the Farm Collection
As usual the supply list and instructions can be found below the photograph
Home on the Farm Card_Nupur Priya Heartfelt Creations Products :
HCPC-3925 Home on the Farm Cling Stamp Set
HCPP1-438-2 Paper Pack of 10 - White
RACP468 Ranger Archival Ink Pad - Jet Black
159723 Designer Dries Clear Adhesive

Other Products:
Altenew Watercolors, Brustro Green Gold round brushes, Brustro hot pressed watercolor cardstock, Prima Distressing tool, Tim Holtz Stamp Platform and double sided foam adhesive.

Instructions :
Cut 2 pieces of pattern papers measuring 6" x 6" and 5 3/4" x 5 3/4" and distress their edges using Prima Distressing tool. Layer and adhere them on a 6" x 6" white card base.

Stamp the images from 
Home on the Farm Cling Stamp Set and Happy Meadows Cling Stamp Set with Jet Black Archival Ink on a sheet of Brustro hot pressed watercolor cardstock. Color the images using Altenew Watercolors, Brustro Green Gold round brushes. Die cut the images using the matching dies from Home on the Farm Die and Happy Meadows DieArrange and adhere the images as shown using double sided foam adhesive.

Hope you like it...
Thank you for visiting today... :)
Nupur
Disclosure : Compensated affiliate links used when possible  at NO additional cost to you.. Thank you! 

Thursday 22 October 2020

To My Sweet Friend

Hello and welcome to my blog and Heartfelt Wednesday...

Zinnia Card_Nupur Priya_01

Zinnia Card_Nupur Priya_02

Zinnia Card_Nupur Priya_04

Zinnia Card_Nupur Priya_05

Heartfelt Creations Products:

Other Products:
 Double sided foam adhesive, hot glue gun and rhinestones.

Instructions:
Card Base: Take a 5" x 7" white card base and die cut it using the largest die from Decorative Circle Frames Die so the the folded edge is slightly inside the die cutting edge. Die cut a piece of white cardstock and a sheet of pattern paper from Summer's Garden Paper Collection using the same die and adhere them to the card base. Die cut a piece of white cardstock using the 2nd largest die from the same set and adhere this die cut on the card base using double sided foam adhesive.

Die cut a piece of white cardstock using the largest die from Eyelet Circle and Basics Small Dies and adhere it to the card base using double sided foam adhesive. Die cut a circle from a piece of pattern paper from the same paper collection using the 2nd largest die from the same die set and adhere it on the eyelet circle die cut.

Stamp the sentiment from Fancy Special Day Cling Stamp Set with Leaf Green Archival Ink on a piece of white cardstock and die cut it using the matching die from  Fancy Special Day Die. Die cut another piece of white cardstock using the layering die for this sentiment. Adhere the stamped die cut on the layering piece using double sided foam adhesive. Adhere this piece on the cardbase as shown using double sided foam adhesive.

Orange Zinnia Flowers and Leaves: Stamp the flowers from Small Garden Zinnia Cling Stamp Set on a sheet of Deluxe Flower Shaping Paper with Monarch Orange Archival Ink and color them with Tiger Lily and Monarch Orange Archival Ink. Die cut them using the matching dies from Small Garden Zinnia Die. Shape them using Small 3D Zinnia Shaping Mold and Deluxe Flower Shaping Kit. Drop a little hot glue gun drop in the Ribbit  Prills jar and cover it with the prills. Take it out when it cools down and add it to the flower centers.

Stamp the leaves from Small Garden Zinnia Cling Stamp on a sheet of Deluxe Flower Shaping Paper with Leaf Green Archival Ink and color them with the same ink. Die cut them using the matching die from Small Garden Zinnia Die. Shape them using Small 3D Zinnia Shaping Mold.

Yellow flowers: Stamp the flowers from Wisteria Petals Cling Stamp Set on a sheet of Deluxe Flower Shaping Paper with Buttercup Archival Ink. Ink them with the same ink and die cut them using matching die from Wisteria Petals Die. Shape them using Deluxe Flower Shaping Kit. Add a pink stamen from Medium Pastel Pearl Stamens to the flower centers.

Arrange and adhere the flowers and leaves as shown around the sentiment  die cut. Add few rhinestones on the die cuts to add finishing touch to the card.


Hope you like it...
Thank you for visiting today... :)
Nupur
Disclosure : Compensated affiliate links used when possible  at NO additional cost to you.. Thank you! 

Wednesday 21 October 2020

Elegant Die Cut Card

Hello and welcome to my blog and Heartfelt Wednesday...
How are you all? I have another fall themed card for today made with the new Home on the Farm Paper Collection
As usual the supply list and instructions can be found below the photograph
Elegant Die Cut Card_Nupur Priya_01

Elegant Die Cut Card_Nupur Priya_02

Heartfelt Creations Products:
HCD1-7281 Stairway Gardens Die
HCD1-7282 Eyelet Royale Die
HCPP1-438-2 Paper Pack of 10 - White
352854 Metal Tip for Adhesive Bottles
159723 Designer Dries Clear Adhesive

Other Products:
Double sided foam adhesive and rhinestones.

Instructions:
Die cut a 6" x 6" piece of white cardstock using the largest die from Eyelet Royale Die. Cut strips of red pattern paper from Home on the Farm Paper Collection and adhere them behind the holes on all the 4 edges. Adhere this piece on a 6" x 6" white card base. Cut a 5 1/2" x 5 1/2" piece of pattern paper from the same paper collection and adhere it on the die cut card base. Die cut 2 pieces of white cardstock using the dies form Eyelet Royale Die and adhere them on the card base as shown.

Die cut 2 pieces of white cardstock using the die from Stairway Gardens Die. Adhere the same red pattern paper behind the dies and trim off the extra. Adhere the dies in the middle of the card front as shown using double sided foam adhesive. Fussy cut a piece of framed scene from Home on the Farm Paper Collection and adhere it on a piece of white cardstock to make it more sturdy. Adhere this piece as a focal image in the center on the card as shown  using double sided foam adhesive. Add few rhinestones to the die cuts to add finishing touch.


Hope you like it...
Thank you for visiting today... :)
Nupur
Disclosure : Compensated affiliate links used when possible  at NO additional cost to you.. Thank you!