Showing posts with label Embossing. Show all posts

Sunday, 7 February 2021

On Your Special Day

Hello and welcome to my blog!
Today I am sharing a pretty pink floral card made with vellum flowers

On Your Special Day_Nupur Priya_01 
On Your Special Day_Nupur Priya_02

Heartfelt Creations Products:
HCST1-401 Deluxe Flower Shaping Kit

Other products:
Pickerd Raspberry Distress ink, Worn Lipstick Distress Oxide ink, Hero Arts Unicorn white pigment ink, Wow superfine embossing powder, WOW heat gun, Crafter's Companion Regency Swirls 3D Embossing Folder, Oval makeup brushes, double sided foam tape and pearls

Instructions:
Emboss a 6 1/2" x 4 1/2" piece of white cardstock using Crafter's Companion Regency Swirls 3D Embossing Folder. Adhere it on a slightly bigger piece of cardstock that has been inked lightly with Picked Raspberry distress ink. Adhere the resulting piece on a 5" x 7" white card base using double sided foam tape.

Die cut a piece of white cardstock using the die from Regal Frame & Accents Die. Ink it with Picked Raspberry distress ink and adhere it on the card front using double sided foam tape. Stamp the sentiment from Fancy Special Day Cling Stamp Set on a piece of white cardstock using Leaf Green Archival Ink and die cut it using the matching die from Fancy Special Day Die. Adhere it on the pink die cut using double sided foam tape.

Vellum Flower : Stamp the flowers from Oakberry Lane Blossoms Cling Stamp Set on a sheet of Rajni Chawla's Vellum Flowerite with Hero Arts unicorn White pigment ink and heat emboss using Wow superfine embossing powder and WOW heat gun. Die cut all the flowers using the matching dies from Oakberry Lane Blossoms Die and Floral Fashionista Die.

Ink the Oakberry Lane flowers with Worn Lipstick Distress Oxide ink as shown using Stack and Store Daubers. Gently rub over the flowers with a piece of soft cloth in circular motion to remove any leftover ink on the white embossing and make it bright again. Shape them using the pointed edge of the Groove Golf Tool Set. Pinch the petals in the middle and then gently curve the edges outwards.

Now use the ball tool and the molding mat from Deluxe Flower Shaping Kit to do a circular motion in the flower center to cup the flowers. Add a drop of 3-D Crystal Lacquer to the flower center, place another flower petal on top and press with the ball tool. Poke a hole in the flower center using the pointed edge of the Groove Golf Tool Set.  Add a  bunch of medium Rock Candy Stamens and Pastel Pearl Stamens to the flower center and adhere them with 3-D Crystal Lacquer.

Yellow flowers: Stamp the flowers from Wisteria Petals Cling Stamp Set on a sheet of Deluxe Flower Shaping Paper with Buttercup Archival Ink. Ink them with the same ink and die cut them using matching die from Wisteria Petals Die. Shape them using Deluxe Flower Shaping Kit. Add a pink stamen from Medium Pastel Pearl Stamens to the flower centers.

Leaves : Stamp the leaves from Oakberry Lane Blossoms Cling Stamp Set several times on a sheet of Deluxe Flower Shaping Paper with  Leaf Green Archival Ink and die cut them using matching die from  Oakberry Lane Blossoms Die. Ink them using Leaf Green and Vibrant Fuchsia Archival Inks. Shape the leaves using 3D Blossoms Shaping Mold.

Arrange and adhere the flowers and leaves as shown using  3-D Crystal Lacquer as shown around the sentiment  die cut. Add few pearls on the die cuts to add finishing touch to the card.


Hope you like it...
Thank you for visiting today... :)
Nupur
Disclosure : Compensated affiliate links used when possible  at NO additional cost to you.. Thank you! 

Tuesday, 4 February 2020

Faux Stained Glass and Embossing Card

Hello friends and welcome to another day of inspiration..
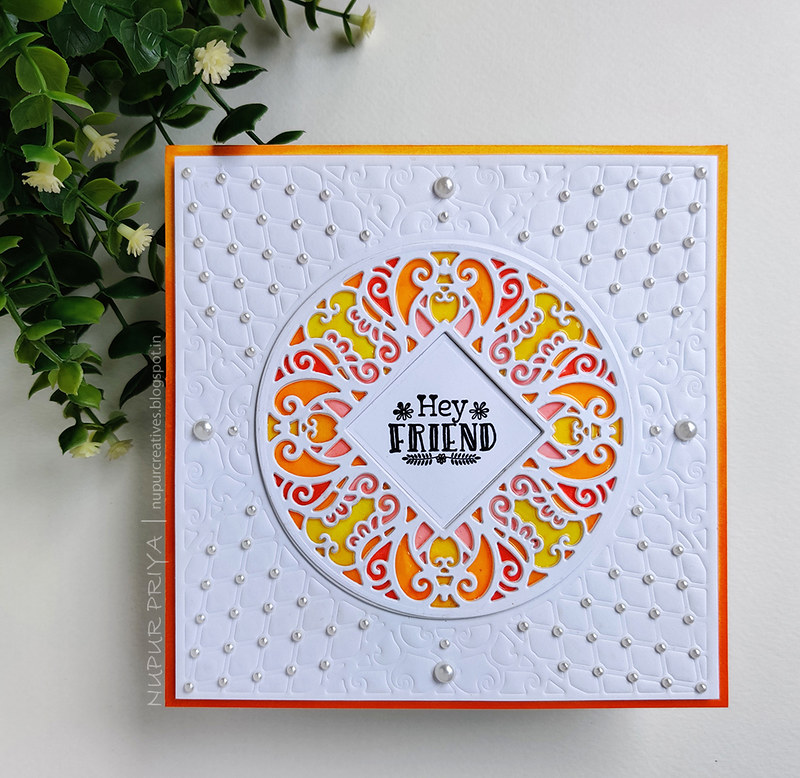
Today I have a card that has Courtyard Elegance Die as the hero.
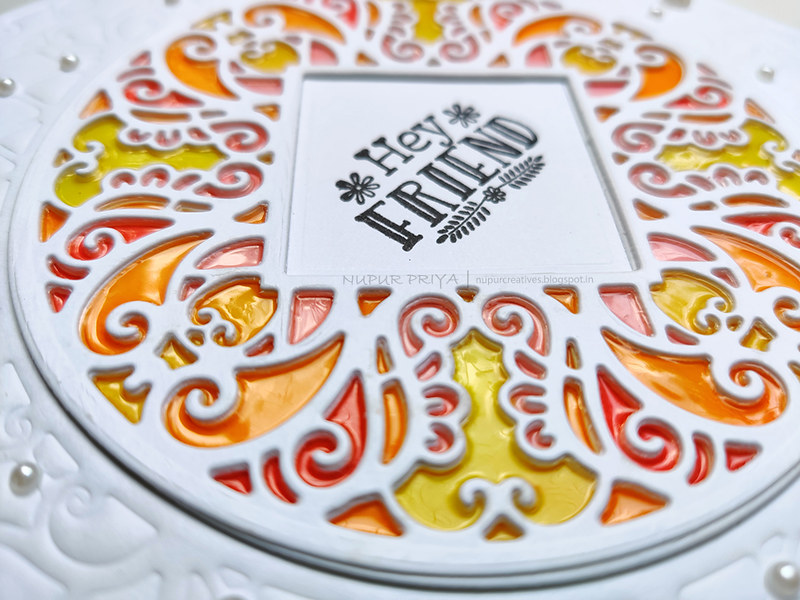
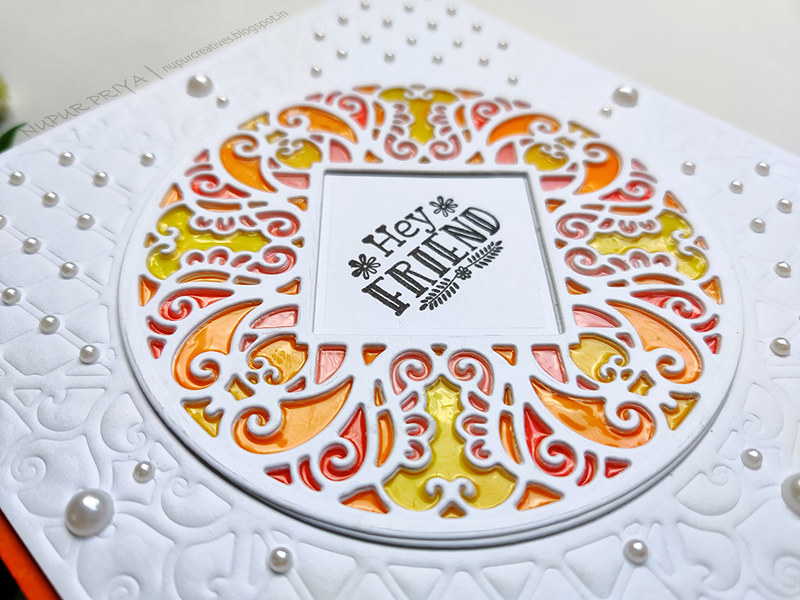
I have used only 1 die set to create this card. The outer bigger dies were used for creating the mat and dry embossing. The smaller pieces were used to create a faux stained glass effect.
The stained glass effect looks so cool in real life!

All the coloring was done using Zig Clean Color Real Brush Markers. This color combination is out of my comfort zone and to be honest it took me few tries and to get it to a point where I liked it. I actually wanted to use all the colors of the rainbow  but halfway through I thought it looked too busy in this small design so I only used the red, orange, yellow and light pink.

I have used 3-D Crystal Lacquer for the glassy bits (scroll down for the close-up) I use it with Metal Tip for Adhesive Bottles which helps me in getting in the nooks and crannies and also helps in getting finer lines. It dries hard and non-tacky so even if I stack more cards on top it won't stick to them!
I also added white pearls to spruce up the dry embossing. 
Read till the end for full supply list and instructions for this card... Faux Stained Glass and Embossing with dies card_Nupur Priya_01


Faux Stained Glass and Embossing with dies card_Nupur Priya_02


Faux Stained Glass and Embossing with dies card_Nupur Priya_03


Heartfelt Creations Products : 

HCPC-3844 For My Friend Sentiments Cling Stamp Set 
HCD1-7283 Courtyard Elegance Die
HCPP1-438-2 Paper Pack of 10 - White
Zig Clean Color Real Brush Markers
RACP468 Ranger Archival Ink Pad - Jet Black
359848 Spellbinders Tool N' One
411231 5pc. Acrylic Block Set
352854 Metal Tip for Adhesive Bottles
159723 Designer Dries Clear Adhesive
D120601 Darice Adhesive Foam Strips
3D1844 3-D Crystal Lacquer

Other Products :

Pearls and Spellbinders Tan Embossing Mat

Instructions :

Die cut 4 pieces of white cardstock using the 2 circle and 1 small square dies from Courtyard Elegance Die. Stack and adhere them together to make a thicker piece. 

Die cut a piece of white cardstock using the 2nd largest square die from the same die set. Emboss this piece of cardstock using the 4 middle size dies from the same set and Spellbinders Tan Embossing Mat. Stamp the sentiment from  For My Friend Sentiments Cling Stamp Set in the middle of the square as shown using Jet Black Archival Ink Pad. Color the design inside the circle die using shades of yellow, orange, pink and red from Zig Clean Color Real Brush Markers. Align and adhere the circle die cut piece we made earlier on the colored piece. Fill in the colored parts of the die cut with 2 coats of 3-D Crystal Lacquer. Let the 1st layer dry before applying the 2nd layer.


Color the edges of a 6" x 6" white card base with the shades of light and dark orange from Zig Clean Color Real Brush Markers that was used to color in the circle to create an ombre look. Adhere the embossed piece on the card base using Darice Adhesive Foam Strips. Adhere pearls on the embossed areas to add finishing touch.


Hope you like it...

Thank you for visiting today... :)
Nupur
Disclosure : Compensated affiliate links used when possible  at NO additional cost to you.. Thank you! 

Friday, 17 January 2020

Purple Love Swans Card

Hello Friends and welcome to Heartfelt inspiration post...

Heartfelt Creations have opened the Design Team VOTING for the next DT term. I love working with Heartfelt Creations it is the best design team and I would like to continue my journey with them and I need your help. If you like my work then please vote for me and 4 more DT members by clicking on THIS link.
Thank you so much!

From today I will be posting few cards that I missed earlier...

If you follow Heartfelt Creations blog then you might have seen today's card and few other cards that I will be posting in the coming weeks...
This card was created using the Calla Lily Collection that was released in December 2019. This is a beautiful image and I love the sparkling swans so I added lots of clear glitter on them so they shine and sparkle and look gorgeous in real life. They add so much glamour to this simple card!

Love Swans_Nupur Priya_01

Love Swans_Nupur Priya_03

Love Swans_Nupur Priya_02

Heartfelt Creations Products:
HCPC-3847 Celebrate Love Sentiments Cling Stamp Set

HCPC-3898 Feathery Swan Cling Stamp Set
HCD1-7162 Eyelet Hearts Die
HCD1-7276 Feathery Swan Die
HCPP1-438-2 Paper Pack of 10 - White
HCGP1-488 Luxe Gold Cardstock
359760 Embossing Powder - Gold
352854 Metal Tip for Adhesive Bottles
159723 Designer Dries Clear Adhesive
D120601 Darice Adhesive Foam Strips
3D1844 3-D Crystal Lacquer
RAHT Heat It Craft Tool
HCDA2-450 Stack and Store Daubers-Pack of 30

Other Products: 
Black Soot, Seedless Preserve, Carved Pumpkin, Mustard Seed Distress inks, Versamark ink, watercolor cardstock, transparent glitter, Dew drops, Craft Treat Mandal Stencil and Crafter's Companion 3D Embossing Folder - Ornate Lace

Instructions: 
Lightly ink the edges of a 4 1/4" x 5 1/2" white card base with Seedless Preserve Distress ink. Emboss a 4" x 5 1/4" white cardstock using Ornate Lace  Crafter's Companion 3D Embossing Folder and adhere it on the card base using Darice Adhesive Foam Strips.

Die cut a piece of 
 Luxe Gold Cardstock using the largest Eyelet Hearts Die. Adhere it on the card base as shown  using Darice Adhesive Foam Strips. Trace the inner edge of the die on a piece of white cardstock and fussy cut the traced heart. Ink this heart using Seedless Preserve Distress ink and Craft Treat Mandal Stencil then adhere it on the card base using Darice Adhesive Foam Strips.

Stamp the swan image from 
Feathery Swan Cling Stamp Set on a piece of watercolor cardstock using Versamark ink and heat emboss using Heat It Craft Tool and Gold Embossing Powder. Color the image using Black soot, Seedless Preserve, Carved Pumpkin, Mustard Seed Distress inks. Die cut the image using the matching die from Feathery Swan Die. Die cut 4 more pieces of white cardstock using the same die, stack and adhere them all together to make a thicker piece. Adhere it on the Heart piece as shown. Use Stack and Store Daubers to apply a thin layer of Designer Dries Clear Adhesive on the swans and sprinkle it with transparent glitter. Apply 2 or 3 layers of 3-D Crystal Lacquer on the beak and feathers of the swan using Metal Tip for Adhesive Bottles. Let the layers dry completely before applying the next coat.

Stamp the sentiment from Celebrate Love Sentiments Cling Stamp Set on a strip if white cardstock using Versamark ink and heat emboss using Heat It Craft Tool and Gold Embossing Powder. Trim it to 4" width and adhere it on a slightly wider strip of 
 Luxe Gold Cardstock. Adhere it on the card front below the heart and swans using Darice Adhesive Foam Strips. Adhere few Clear Dew Drops around the swans for finishing touch.


Hope you like it...

Thank you for visiting today... :)
Nupur
Disclosure : Compensated affiliate links used when possible  at NO additional cost to you.. Thank you! 

Wednesday, 15 January 2020

Bird Card + Design Team Voting for Heartfelt Creations

Hello and welcome to Heartfelt Wednesday...
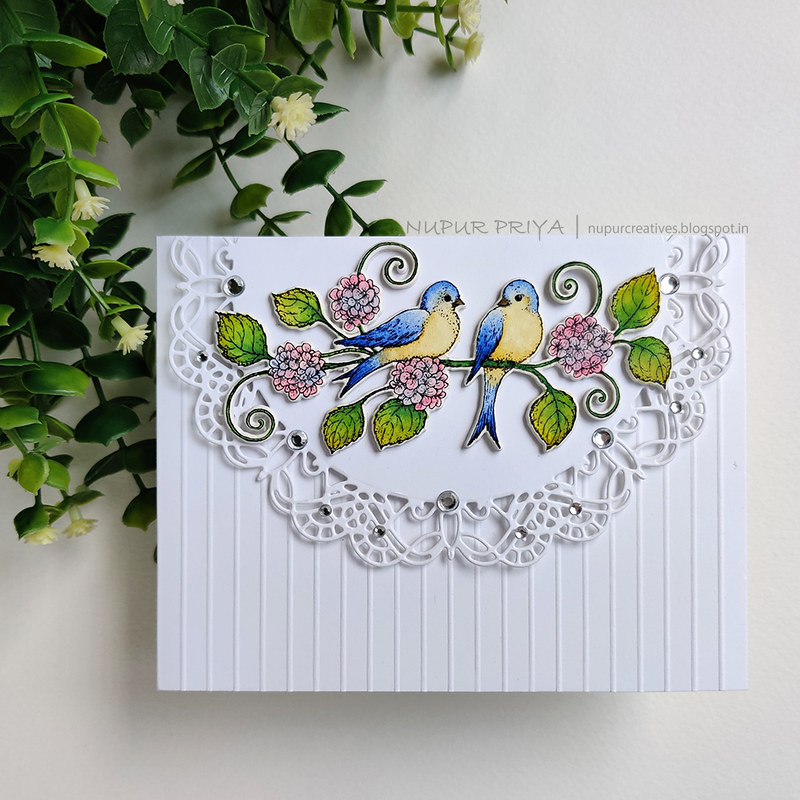
Today I am sharing a card that I made using the latest Cottage Garden Collection and I have some simple tips too which will add oomph to a simple card and take it to another level...
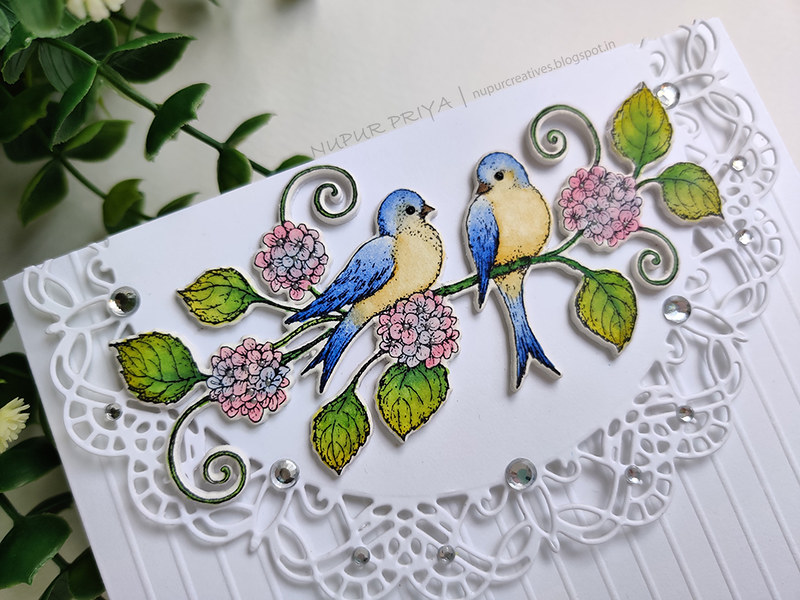
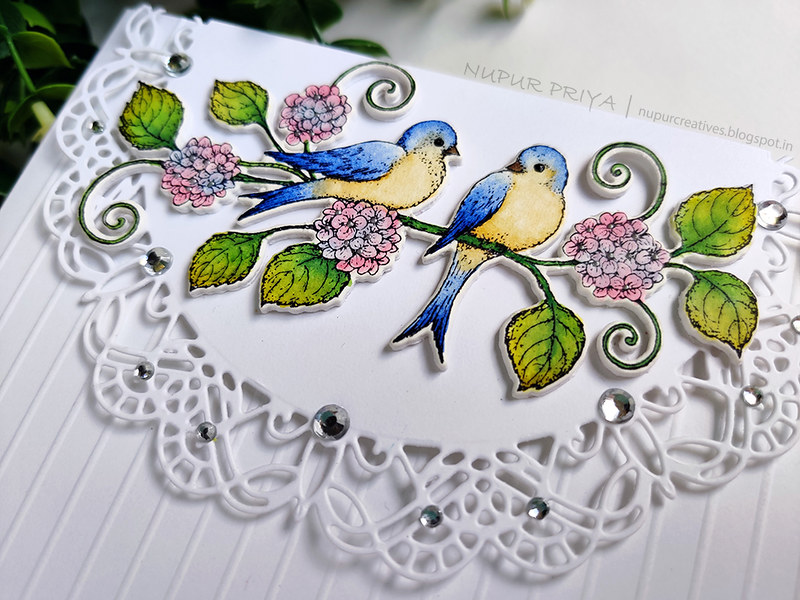
It is a very clean and simple card using just a watercolored image, 1 die cut and a scoreboard to add texture to card base.
Tip no. 1 is adding score lines to the card base. It is a great way to quickly add texture and interest to a simple card without taking the focus away from the main image.
 Another great tip is to elevate the focal image. It can be done by using foam adhesive but for intricate image like this I like to use multiple stacked die cuts.
3rd tip is to add a drop of black Nuvo drop to the eyes. it is just a small detail but with great impact.
Read till the end for more detailed instructions for this card and full supply list.

Also today Heartfelt Creations have opened the Design Team VOTING for the next DT term. I love working with Heartfelt Creations it is the best design team and I would like to continue my journey with them and I need your help. If you like my work then please vote for me and 4 more DT members by clicking on THIS link.
Thank you so much!

And if you want to join this amazing Design Team then watch out for the annual DT call on their website!

Bird Hydrangea card_Nupur Priya_01

Bird Hydrangea card_Nupur Priya_02

Bird Hydrangea card_Nupur Priya_03

Heartfelt Creations Products:
HCPC-3901 Fresh Cut Hydrangea Cling Stamp Set
HCD1-7271 Rounded Window Frame Die
HCD1-7279 Fresh Cut Hydrangea Die
HCPP1-438-2 Paper Pack of 10 - White
RACP468 Ranger Archival Ink Pad - Jet Black
359848 Spellbinders Tool N' One
411231 5pc. Acrylic Block Set
352854 Metal Tip for Adhesive Bottles
159723 Designer Dries Clear Adhesive
D120601 Darice Adhesive Foam Strips
NU650 Nuvo Crystal Drops - Ebony Black
NU655 Nuvo Crystal Drops - Silver Lining

Other Products:
Worn Lipstick, Shaded Lilac, Mowed Lawn and Crushed Olive Distress inks,Martha Stewart Score Board, rhinestones, Gansai Tmabi watercolors, watercolor cardstock and paint brush


Instructions:
Take a 4 1/4" x 5 1/2" whiet cardbase and score the front at every 1/4" increment. Die cut a piece of white cardstock using the die from Rounded Window Frame Die and adhere it to the top of the cardbase as shown using Darice Adhesive Foam Strips. Cut off the portion of the die cut hanging off the edge on the card base.


Stamp the image from Fresh Cut Hydrangea Cling Stamp Set on a piece of watercolor cardstock and color it using Gamsai Tambi watercolors, 
Worn Lipstick, Shaded Lilac, Mowed Lawn and Crushed Olive Distress inks. Die cut the image using matching die from Fresh Cut Hydrangea DieDie cut 4 more pieces of white cardstock using the same die. Stack and adhere all the die cuts together to make a thicker piece and adhere it on the card front as shown. Add tiny drops of Ebony Black Nuvo Crystal Drops to the bird's eyes and tiny drops of Silver Lining Nuvo Crystal Drops to the hydrangeas. Adhere few rhinestones to the die cut to add finishing touch.


Just a reminder... if you like my work then please vote for me and 4 more DT members by clicking on THIS link.
Thank you so much!

Hope you like it...

Thank you for visiting today... :)
Nupur
Disclosure : Compensated affiliate links used when possible  at NO additional cost to you.. Thank you! 

Thursday, 28 March 2019

Pansies in a Mug

Hello friends and welcome to Heartfelt Wednesday...
Today I am here to share a new card with you all
It looks so beautiful in real life with all the texture on the black background and then a pop of color in the focal image... This is a great way to make the focal point stand out on a busy background...
Read till the end for full supply list and instructions for this card.
20190328_085226

20190328_081542

Heartfelt Creations Products: 
HCPC-3863 Burst of Spring Cling Stamp Set
HCD1-7202 Album Tags and Accents Die 
HCD1-7213 Elegant Pocket Accents Die 
HCD1-7223 Burst of Spring Die 
HCPP1-438-1 Paper Pack of 10 - Black
RACP468 Ranger Archival Ink Pad - Jet Black
411231 5pc. Acrylic Block Set
159723 Designer Dries Clear Adhesive
Zig Clean Color Real Brush Markers
D120601 Darice Adhesive Foam Strips

Other Products: 
Canson watercolor cardstock,Crafter's Companion Regency Swirls 3D Embossing Folder and paint brush.

Instructions: 
Take a 4 1/4" x 5 3/4" piece of black cardstock and emboss it using Crafter's Companion Regency Swirls 3D Embossing Folder. Adhere it to a 4 1/2" x 6" black top folding cardbase. Take 2 pieces of  black cardstock and die cut 1 using the dies from Elegant Pocket Accents Die  and another one using the die from Album Tags and Accents Die. Position them as shown and adhere them together. Adhere this piece to the card base using Darice Adhesive Foam Strips.

Stamp the image from Burst of Spring Cling Stamp Set on a piece of watercolor cardstock using Jet Black Archival Ink and color it using Zig Clean Color Real Brush Markers and a paint brush. Die cut the image using the matching die from Burst of Spring Die . Adhere it to the card base as shown using Darice Adhesive Foam Strips. Add black rhinestone to the die cut for finishing touch.


Hope you like it...

Thank you for visiting today... :)
Nupur
Disclosure : Compensated affiliate links used when possible  at NO additional cost to you.. Thank you!