Wednesday 26 June 2019

Floral Happy Camper Card

Hello friends and welcome to Heartfelt Wednesday
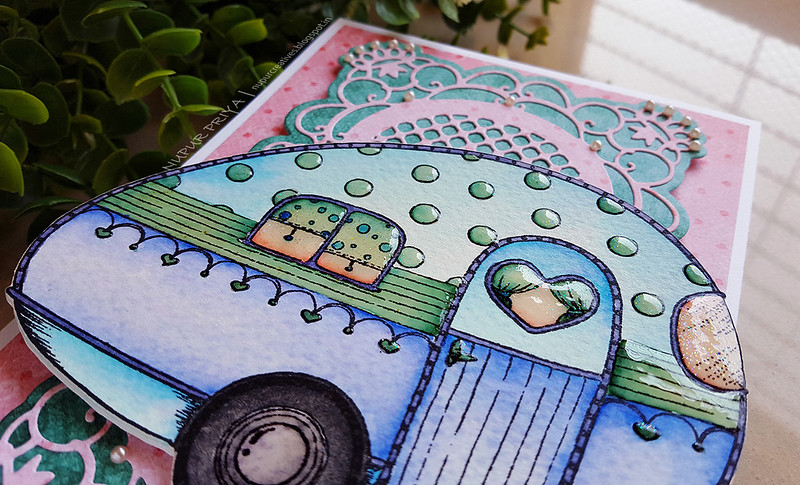
Today I am showcasing the camper with some of the older dies and stamps.
Read till the end to see the full supply list and instructions for this card...
Floral Happy Camper Card_Nupur Creatives_1

Floral Happy Camper Card_Nupur Creatives_2

Heartfelt Creations Products:
HCPC-3801 Simply Classic Stamp Set
HCPC-3855 Floral Fashionista Cling Stamp Set
HCPC-3879 My Happy Place Cling Stamp Set
HCD1-7159 Simply Classic Die
HCD2-7189 Eyelet Rectangle & Basics Die
HCD2-7190 Frame a Card Leafy Borders Die

HCD2-7192 Eyelet Lace Frames Die
HCD1-7215 Floral Fashionista Die
HCD1-7243 My Happy Place Die

HCPP3-452 12 x 12 Cardstock Pack of 25 - White
HCPP1-438-1 Paper Pack of 10 - Black
HCPP1-475 Deluxe Flower Shaping Paper - Pack of 50
RACP468 Ranger Archival Ink Pad - Jet Black
RACP985 Ranger Archival Ink Pad - Cactus Flower
RACP494 Ranger Archival Ink Pad - Majestic Violet
RACP482 Ranger Archival Ink Pad - Olive
RACP436 Ranger Archival Ink Pad - Leaf Green
Zig Clean Color Real Brush Markers
Nuvo Crystal Drops - Bright Gold
D120601 Darice Adhesive Foam Strips
352854 Metal Tip for Adhesive Bottles
159723 Designer Dries Clear Adhesive
HCS1-459-1 Assorted Pearl Stamens-Small
HCS1-458-1 Bright Pearl Stamens-Small
HCFB1-471 3D Petite Florals Shaping Mold
359848 Spellbinders Tool N' One
411231 5pc. Acrylic Block Set
Zig Clean Color Real Brush Markers
HCDA2-450 Stack and Store Daubers-Pack of 30

HCST1-401 Deluxe Flower Shaping Kit

Other Products:

Gathered Twigs Distress ink, Watercolor Cardstock

Instructions:

Die cut 4 pieces of cardstock using the Frame a Card Leafy Borders Die and glue it to a 5 "x 5" white card base. Die cut a piece of white cardstock using the die from Eyelet Rectangle & Basics Die.
Die cut a pieces of white and a piece of black cardstock using the die from Eyelet Lace Frames Die. Ink the white Eyelet Rectangle & Basics diecut and Eyelet Lace Frames diecut lightly using Gathered Twigs Distress ink. Cut the black die cut in half. Arrange and adhere all the pieces together as shown and then the resulting piece on the card front using Darice Adhesive Foam Strips.

Stamp the camper image from My Happy Place Cling Stamp Set on a piece of watercolor cardstock and die cut using matching die from My Happy Place Die. Die cut 4 more pieces of white cardstock using the same die, stack and adhere them all together. Color in the image using Zig Clean Color Real Brush Markers. Adhere it on the card front as shown.

Stamp the flowers from Floral Fashionista Cling Stamp Set using Cactus FlowerMajestic Violet Archival Inks  on Deluxe Flower Shaping Paper and ink them with same inks using Stack and Store Daubers. Die cut them using the matching dies from Floral Fashionista Die. Shape them using 3D Petite Florals Shaping Mold and Deluxe Flower Shaping Kit. Add Assorted Pearl Stamens and Bright Pearl Stamens to the flower centers. 

Stamp the leaves from Simply Classic Stamp Set using Olive Archival Ink and ink them with  Leaf Green Archival Ink on Deluxe Flower Shaping Paper using Stack and Store Daubers. Die cut them using the matching die from Simply Classic Die. Shape them using Deluxe Flower Shaping Kit. Arrange and adhere the flowers and leaves as shown. Apply tiny drops of Bright Gold Nuvo Crystal Drops to the die cuts and the polka dots in the camper curtains to add finishing touch.


Hope you like it...

Thank you for visiting today... :)
Nupur
Disclosure : Compensated affiliate links used when possible  at NO additional cost to you.. Thank you! 

Wednesday 19 June 2019

Pink and Blue Camper Card

Hello friends and welcome to Heartfelt Wednesday
Today I am sharing another card made with the latest Happy Camper Collection
Read till the end for full list of supplies and instructions for this card.

Pink And Blue Happy Camper Card_ Nupur Creatives_1

Pink And Blue Happy Camper Card_ Nupur Creatives_3

Pink And Blue Happy Camper Card_ Nupur Creatives_2

Heartfelt Creations Products:

HCPC-3878 Happy Camper Cling Stamp Set
HCD1-7242 Happy Camper Die
HCD1-7248 Regal Frame & Accents Die
HCDP1-2103 Happy Camper Paper Collection
HCPP3-452 12 x 12 Cardstock Pack of 25 - White
RACP468 Ranger Archival Ink Pad - Jet Black
Zig Clean Color Real Brush Markers
3D1844 3-D Crystal Lacquer
159723 Designer Dries Clear Adhesive
352854 Metal Tip for Adhesive Bottles
D120601 Darice Adhesive Foam Strips
411231 5pc. Acrylic Block Set
359848 Spellbinders Tool N' One


Other Products:
Canson watercolor cardstock, Transparent holographic glitter and pearls.


Instructions:
Cut a 4 3?4" x 6 3/4" piece of pattern paper from Happy Camper Paper Collection and adhere it to a 5" x 7" white card base. Die cut a piece of white cardstock and 2 pieces of pattern paper from the same paper collection using the dies from Regal Frame & Accents Die. Adhere them together as shown. Cut the final piece in the middle horizontally and adhere them on the card front using Darice Adhesive Foam Strips as shown so that there is a gap of 1/2" in between both the pieces.

Stamp the camper image from Happy Camper Cling Stamp Set on a piece of watercolor paper using Jet Black Archival Ink and color it using Zig Clean Color Real Brush Markers. Die cut this using matching die from Happy Camper Die. Die cut 4 more pieces of white cardstock using the same die, stack and adhere all the 5 die cuts together. Apply a coat of 3-D Crystal Lacquer to some selected areas of the camper and dust a little transparent holographic glitter. Once the 1st layer is dry apply a 2nd layer of 3-D Crystal Lacquer on top of the previous one. Adhere this final piece on the card front using Darice Adhesive Foam Strips. Add pearls to the die cut to add finishing touch.


Hope you like it...

Thank you for visiting today... :)
Nupur
Disclosure : Compensated affiliate links used when possible  at NO additional cost to you.. Thank you! 

Wednesday 12 June 2019

Happy Camper Shaker Card


Hello Friends and welcome to Heartfelt Wednesday...

Today is a new release day and it is a perfect collection to make your father's day cards and gifts...

Happy Camper Collection
There’s absolutely no better way to spend the lazy, hazy, dog days of summer than packing up the camper and heading out onto the open road for a weekend adventure! Whether parked in a secluded campsite among the towering pines, or hunkered down in a modern camping resort, spending time in your home on wheels always guarantees fantastic memories made, and time to slow down and unwind. Soaking up the sun, splashing in the lake, and then heading back to warm up around the campfire and enjoy a chocolatey s’more while the stars come out and flickering fire flies dance through the trees…this is life at its finest! Join us as we celebrate grand traveling adventures with the new Happy Camper Collection from Heartfelt Creations! Wind your way through a fun filled decorative paper collection showcasing picturesque scenes of playful campsites featuring whimsical camper trailers, exciting sentiments, and cheerful florals! Relax and kick up your feet as you soak in the happy colors of grass like greens, sunny yellows, rustic reds, playful pinks and sky blues, along with enchanting patterns including colorful banners, bright polka dots and pleasing plaids! An adorable assembling of cling stamp sets, along with coordinating dies, allow for designing and creating a multitude of adventurous scenes and settings perfect for the summer season! With two adorable camper trailers, an assortment of camping themed accessories such as stringed lights, playful party banners, a charming patio set, as well as a campfire and your favorite fur baby, the design possibilities for handmade greeting cards, scrapbook layouts and altered art projects are endless, allowing you to dream up the perfect happy place to escape to! So, come along with us as we hit the trails, set up camp and take time to slow down and enjoy the simple things in life with the new Happy Camper Collection….no bug spray required!


moving on to my card for today... I have made a shaker card... I love making them but I don't know why I don't make them more often.... Anyways maybe I will make more for my upcoming projects!


Don't forget to read till the end for full supply list and instructions for this card...

Happy Camper Shaker Card_ Nupur Creatives_1

Happy Camper Shaker Card_ Nupur Creatives_2

Happy Camper Shaker Card_ Nupur Creatives_4

Happy Camper Shaker Card_ Nupur Creatives_3


Heartfelt Creations Products: 

HCPC-3879 My Happy Place Cling Stamp Set
HCPC-3880 Elements of Home Cling Stamp Set
 HCD1-7207 Hand-stitched Accents Die
HCD1-7243 My Happy Place Die
HCD1-7244 Elements of Home Die
HCDP1-2103 Happy Camper Paper Collection
HCPP3-452 12 x 12 Cardstock Pack of 25 - White
GBKK811B1 Clear Cardstock 8.5 x 11
RACP468 Ranger Archival Ink Pad - Jet Black
Zig Clean Color Real Brush Markers
159723 Designer Dries Clear Adhesive
352854 Metal Tip for Adhesive Bottles
D120601 Darice Adhesive Foam Strips
3D1844 3-D Crystal Lacquer
ANC850 Spring Bling Prills : Lettuce Entertain You
NU651 Nuvo Crystal Drops - Gloss White
DMCT4185 Groove Golf Tool Set
HCDA2-450 Stack and Store Daubers-Pack of 30
411231 5pc. Acrylic Block Set

Other Products: 

Salty Ocean and Mowed Lawn Distress inks, Hero Arts Unicorn white pigment ink, Watercolor cardstock, Paint brushes and pearls. 

Instructions:

Take a 6" x 6" white card base and cover the front using a  6" x 6" card panel from the Happy Camper Paper Collection. Stamp the banner, flower bushes and fence images from Elements of Home Cling Stamp Set and the camper image from My Happy Place Cling Stamp Set on a piece of watercolor cardstock using Jet Black Archival Ink Pad. Cut them out using the matching dies from Elements of Home Die and My Happy Place Die. Color the images using Zig Clean Color Real Brush Markers. Die cut 4 more pieces of white cardstock using the camper die. Stack and adhere all of them together.

Die cut a piece of Clear Cardstock using the outer rectangle from Hand-stitched Accents Die. Die cut a piece of white cardstock using both the rectangle dies from the same set to make a frame. Adhere the Clear Cardstock piece behind the frame die cut. Adhere the banner, fence and camper die cuts as shown on the frame. Adhere Darice Adhesive Foam Strips on the back of the frame so that there is no gap to make the front of the shaker window.


Take a piece of white cardstock a little smaller than the frame we created in previous step. Ink it with Salty Ocean and Mowed Lawn Distress inks and Hero Arts Unicorn white pigment ink to create the background of the shaker card. Glue the flower bushes to this panel and then pour a little Lettuce Entertain You Prills from Spring Bling Prills in the center. Adhere the front of the shaker window on top and adhere the final shaker piece of the card front as shown. adhere some pearls to the card as shown and apply a coat of 3-D Crystal Lacquer to the banner to add finishing touch.


Hope you like it...

Thank you for visiting today... :)
Nupur
Disclosure : Compensated affiliate links used when possible  at NO additional cost to you.. Thank you! 

Friday 7 June 2019

Purr-fect Posies Thank You Card

Hello Friends and welcome to Heartfelt inspiration week!

Before I move on to my card for today I would like to thank everyone who took time out and voted for me During the Design team voting and I am so happy and excited to announce that I made it to the team for another year... Wooohooo
Thank you again for believing in me and supporting me... I love you all !!!

Now let's have a look at my card...It is a very simple and quick shaped card but it is still eye-catching because of the beautiful dies and papers by Heartfelt Creations.

Read till the end for full supply list and instructions for this card...

Purr-fect Posies Thank You Card_Nupur Creatives 4

Purr-fect Posies Thank You Card_Nupur Creatives 2

Purr-fect Posies Thank You Card_Nupur Creatives 1

Purr-fect Posies Thank You Card_Nupur Creatives 3

Heartfelt Creations Products: 
HCPC-3801 Simply Classic Stamp Set
HCPC-3855 Floral Fashionista Cling Stamp Set
HCD1-7159 Simply Classic Die
HCD1-7179 Butterfly Kisses Decorative Die
HCD1-7202 Album Tags and Accents Die
HCD1-7215 Floral Fashionista Die
HCD1-7248 Regal Frame & Accents Die
HCDP1-2102 Purr-fect Posies Paper Collection 
HCPP3-452 12 x 12 Cardstock Pack of 25 - White
HCPP1-438-1 Paper Pack of 10 - Black
HCPP1-475 Deluxe Flower Shaping Paper - Pack of 50
RACP985 Ranger Archival Ink Pad - Cactus Flower
RACP494 Ranger Archival Ink Pad - Majestic Violet
RACP482 Ranger Archival Ink Pad - Olive
RACP436 Ranger Archival Ink Pad - Leaf Green
352854 Metal Tip for Adhesive Bottles
159723 Designer Dries Clear Adhesive
HCS1-458-1 Bright Pearl Stamens-Small
HCFB1-471 3D Petite Florals Shaping Mold 
HCDA2-450 Stack and Store Daubers-Pack of 30
HCST1-401 Deluxe Flower Shaping Kit
411231 5pc. Acrylic Block Set
359848 Spellbinders Tool N' One
D120601 Darice Adhesive Foam Strips


Other Products:
Seedless Preserve and Dusty Concord Distress inks, MS scoreboard, pink, purple, yellow and light blue glitter and pearls.

Instructions : Score a 6 1/4" x 8 1/2" piece of white cardstock at 4 1/4" to make a 6 1/4" x 4 1/4" cardbase Take the largest die from Regal Frame & Accents Die and cut the card base so that the cutting edge of one of the long sides is slightly outside the scored edge to create a hinge of the card base. Die cut a piece of patterned paper form Purr-fect Posies Paper Collection with the same die and adhere it to the card base.

Die cut a piece of white cardstock using the decorative dies from the same set and ink it lightly using Seedless Preserve Distress ink. Adhere this piece on the card base using Darice Adhesive Foam Strips.

Die cut a piece of white cardstock and a piece of patterned paper from the above collection using the dies from Album Tags and Accents Die. Adhere them together. Glue the pink, purple, yellow and light blue glitter on the flowers behind the cat. Then adhere the final piece on the card front  using Darice Adhesive Foam Strips.

Die cut 3 pieces of black cardstock and 1 piece of white cardstock using the thank you die from Butterfly Kisses Decorative Die. Ink the white die cut using Dusty Concord Distress ink. Adhere all the 4 die cuts together keeping the purple die cut on top and adhere the final piece on the card front as shown.

Stamp the leaves from Simply Classic Stamp Set on Deluxe Flower Shaping Paper using Olive Archival Ink and ink it using Leaf Green Archival Ink. Die cut the leaves using matching die from Simply Classic Die. Shape them using Deluxe Flower Shaping Kit.. Stamp the flowers from Floral Fashionista Cling Stamp Set using Cactus Flower and Majestic Violet Archival Inks and ink them using the same colors. Die cut them using matching die from Floral Fashionista Die. Shape them using 3D Petite Florals Shaping Mold  and Deluxe Flower Shaping Kit. Add the pollens from Bright Pearl Stamens to the flower centers. Arrange and adhere the flowers and leaves as shown on the card. Add some pearls to the die cuts for finishing touch.


Hope you like it...

Thank you for visiting today... :)
Nupur
Disclosure : Compensated affiliate links used when possible  at NO additional cost to you.. Thank you!