
Hello Friends and welcome to Heartfelt New Release Week
Today we are launching a gorgeous collection all of you have been waiting for
The Wild Rose Collection!
This collection has 2 floral stamp and die set along with the 3D molds and this has 7 sizes of flowers and the 3D molds make it so quick and east to shape the flowers... a must have for every crafter who likes to make handmade flowers. There is also a basket die set in this collection which can be used to make lots of different kinds and shapes of baskets and decorative accents. And the paper pack is simply beautiful.
This set has so much potential!
I had a lot of fun creating with this collection. For today I have created a sparkly shaker card with this collection.
All the supply list and the instructions for this card can be found at the end of this post.
Heartfelt Creations Products:
HCPC-3906 Small Wild Rose Cling Stamp Set
HCPC-3907 Large Wild Rose Cling Stamp Set
HCD1-7282 Eyelet Royale Die
HCD1-7289 Small Wild Rose Die
HCD1-7290 Large Wild Rose Die
HCDP1-2113 Wild Rose Paper Collection
GBKK811B1 Clear Cardstock 8.5 x 11
HCPP1-438-2 Paper Pack of 10 - White
HCPP1-475 Deluxe Flower Shaping Paper - Pack of 50
RACP436 Ranger Archival Ink Pad - Leaf Green
RACP005 Ranger Archival Ink Pad - Sunflower
RACP482 Ranger Archival Ink Pad - Olive
RACP524 Ranger Archival Ink Pad - Vibrant Fuchsia
HCFB1-486 Small 3D Wild Rose Shaping Mold
HCFB1-487 Large 3D Wild Rose Shaping Mold
HCST1-401 Deluxe Flower Shaping Kit
HCDA2-450 Stack and Store Daubers-Pack of 30
359848 Spellbinders Tool N' One
411231 5pc. Acrylic Block Set
ANC852 Bright Ideas Prills - Go ManGo
HCS1-457-2 Pastel Pearl Stamens-Medium
NU667 Nuvo Crystal Drops - Red Berry
NU650 Nuvo Crystal Drops - Ebony Black
352854 Metal Tip for Adhesive Bottles
159723 Designer Dries Clear Adhesive
D120601 Darice Adhesive Foam Strips
Other Products:
Mustard Seed and Wild Honey Distress inks, Twinklets Diamond dust, Holographic glitter, pearls and rhinestones.
Instructions:
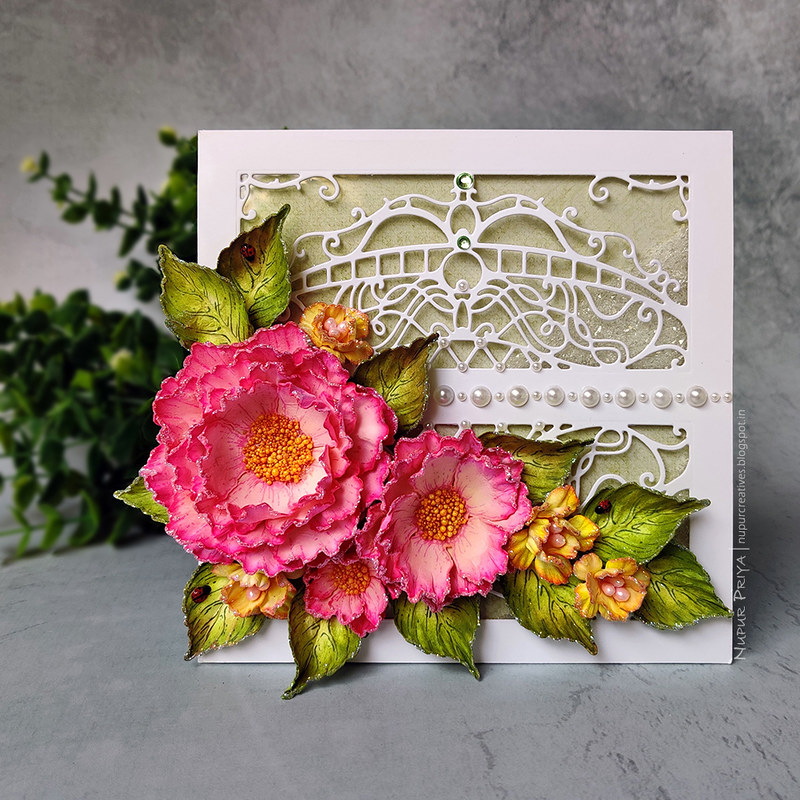
Adhere a 5 3/4" x 5 3/4" piece of pattern paper from Wild Rose Paper Collection on a 6" x 6" piece of white card base.
Take a 6" x 6" white cardstock and die cut it twice using the die from Eyelet Royale Die to make 2 windows as shown. Adhere a piece of Clear Cardstock behind the cardstock. Use Darice Adhesive Foam Strips to make 2 dams behind the 2 windows that we created taking care that there is no gap. Pour a little Twinklets Diamond dust on the card base in 2 places which will be in the middle of the windows and adhere the window panel securely to make the shaker window.
Stamp the flowers from Small Wild Rose Cling Stamp Set and Large Wild Rose Cling Stamp Set using Sunflower and Vibrant Fuchsia Archival Ink. Die cut them using the matching dies from Small Wild Rose Die and Large Wild Rose Die. Color the pink flowers with Vibrant Fuchsia Archival Ink and Mustard Seed distress ink. Color the yellow flowers with Mustard Seed and Wild Honey Distress inks.
Stamp the leaves from Large Wild Rose Cling Stamp Set several times on a sheet of Deluxe Flower Shaping Paper with Olive Archival Ink and die cut them using matching die from Large Wild Rose Die. Ink them using Leaf Green, Sunflower and Vibrant Fuchsia Archival Inks.
Shape all the flowers and leaves using Small 3D Wild Rose Shaping Mold, Large 3D Wild Rose Shaping Mold and Deluxe Flower Shaping Kit. Apply a little Designer Dries Clear Adhesive to the edges of flower petals and leaves and sprinkle holographic glitter to add sparkle. Add Go ManGo Prills to the pink flower centers and Pastel Pearl Stamens to the yellow flower centers. Arrange and adhere them as shown. Add few tiny ladybugs made with Ebony Black and Red Berry Nuvo Crystal Drops to the floral arrangement. Add few pearls and rhinestones to the card for finishing touch.
Hope you like it...
HCPC-3906 Small Wild Rose Cling Stamp Set
HCPC-3907 Large Wild Rose Cling Stamp Set
HCD1-7282 Eyelet Royale Die
HCD1-7289 Small Wild Rose Die
HCD1-7290 Large Wild Rose Die
HCDP1-2113 Wild Rose Paper Collection
GBKK811B1 Clear Cardstock 8.5 x 11
HCPP1-438-2 Paper Pack of 10 - White
HCPP1-475 Deluxe Flower Shaping Paper - Pack of 50
RACP436 Ranger Archival Ink Pad - Leaf Green
RACP005 Ranger Archival Ink Pad - Sunflower
RACP482 Ranger Archival Ink Pad - Olive
RACP524 Ranger Archival Ink Pad - Vibrant Fuchsia
HCFB1-486 Small 3D Wild Rose Shaping Mold
HCFB1-487 Large 3D Wild Rose Shaping Mold
HCST1-401 Deluxe Flower Shaping Kit
HCDA2-450 Stack and Store Daubers-Pack of 30
359848 Spellbinders Tool N' One
411231 5pc. Acrylic Block Set
ANC852 Bright Ideas Prills - Go ManGo
HCS1-457-2 Pastel Pearl Stamens-Medium
NU667 Nuvo Crystal Drops - Red Berry
NU650 Nuvo Crystal Drops - Ebony Black
352854 Metal Tip for Adhesive Bottles
159723 Designer Dries Clear Adhesive
D120601 Darice Adhesive Foam Strips
Other Products:
Mustard Seed and Wild Honey Distress inks, Twinklets Diamond dust, Holographic glitter, pearls and rhinestones.
Instructions:
Adhere a 5 3/4" x 5 3/4" piece of pattern paper from Wild Rose Paper Collection on a 6" x 6" piece of white card base.
Take a 6" x 6" white cardstock and die cut it twice using the die from Eyelet Royale Die to make 2 windows as shown. Adhere a piece of Clear Cardstock behind the cardstock. Use Darice Adhesive Foam Strips to make 2 dams behind the 2 windows that we created taking care that there is no gap. Pour a little Twinklets Diamond dust on the card base in 2 places which will be in the middle of the windows and adhere the window panel securely to make the shaker window.
Stamp the flowers from Small Wild Rose Cling Stamp Set and Large Wild Rose Cling Stamp Set using Sunflower and Vibrant Fuchsia Archival Ink. Die cut them using the matching dies from Small Wild Rose Die and Large Wild Rose Die. Color the pink flowers with Vibrant Fuchsia Archival Ink and Mustard Seed distress ink. Color the yellow flowers with Mustard Seed and Wild Honey Distress inks.
Stamp the leaves from Large Wild Rose Cling Stamp Set several times on a sheet of Deluxe Flower Shaping Paper with Olive Archival Ink and die cut them using matching die from Large Wild Rose Die. Ink them using Leaf Green, Sunflower and Vibrant Fuchsia Archival Inks.
Shape all the flowers and leaves using Small 3D Wild Rose Shaping Mold, Large 3D Wild Rose Shaping Mold and Deluxe Flower Shaping Kit. Apply a little Designer Dries Clear Adhesive to the edges of flower petals and leaves and sprinkle holographic glitter to add sparkle. Add Go ManGo Prills to the pink flower centers and Pastel Pearl Stamens to the yellow flower centers. Arrange and adhere them as shown. Add few tiny ladybugs made with Ebony Black and Red Berry Nuvo Crystal Drops to the floral arrangement. Add few pearls and rhinestones to the card for finishing touch.
Hope you like it...
Thank you for visiting today... :)


