Wednesday 27 December 2017

Praying for You

Hello friends & welcome to Heartfelt Wednesday...
I have made a card for today's inspiration...
Read till the end for the list of products used & instructions for this card...

20171220_152027

20171220_152110


Heartfelt Creations Products: 
HCPC-3765 Soar on Eagle's Wings Cling Stamp Set
HCPC-3808 Fanciful Carnation Cling Stamp Set
HCD1-7146 Festive Holiday Die
HCD1-7166 Fanciful Carnation Die

Other Products:
Gansai Tambi watercolors, Black Archival ink, Koi Waterbrush, Ebosser, Pick me Up, watercolor cardstock & pearls .

Project Instruction: 
Take a 4 1/4" x 5 1/2" white cardbase & color all the edges with pearl color from the Gansai Tambi watercolors using Koi Waterbrush. Take a piece of 4" x 5 1/4" white cardstock and adhere it on the card base Designer Dries Clear Adhesive.


Die cut a piece of white cardstock using the die from  Festive Holiday Die & color it with same pearl color and adhere it to the left side of the card front. Stamp sentiment from Soar on Eagle's Wings Cling Stamp Set using Black Archival ink on a strip of white cardstock and cut it into banner shape. cut another banner from white cardstockcolor it with same pearl color and adhere both together. 

Stamp the carnation image from Fanciful Carnation Cling Stamp Set on a piece of watercolor cardstock using Black Archival ink. Color it in using Gansai Tambi watercolors & Koi Waterbrush. Die cut it using matching die from Fanciful Carnation Die. Glue both the image die cut & the sentiment banner on the card as shown. Add some pearls & rhinestones to decorate the box using Pick me Up.

Hope you like this card ...

Thank you for visiting today... :)

Nupur
Disclosure : Compensated affiliate links used when possible  at NO additional cost to you.. Thank you! 

Wednesday 20 December 2017

Words Of Comfort


Hello friends & welcome to Heartfelt Wednesday...
I have made a card using the stamps from Black Friday Collection for today's inspiration...

Read till the end for the list of products used & instructions for this card...

20170916_155005

Heartfelt Creations Products: 
HCPC-3815 Words Of Comfort Stamp Set
HCD1-7118 Delicate Border Basics Die
HCD1-7119 Classic Border Basics Die
HCPP2-451 8.5 x 11 Cardstock Pack of 25 - White
247027 Fantastix Blending Tool
HCDA2-450 Stack and Store Daubers-Pack of 30
D110305 Stamp Mat Pad
359848 Spellbinders Tool N' One
31510 Funnel Tray
173842 Scor-Pal Measuring & Scoring Board
368771 Scor-Tool
411231 5pc. Acrylic Block Set
352854 Metal Tip for Adhesive Bottles
PIN6 Glue Tip Pins
159723 Designer Dries Clear Adhesive
D120601 Darice Adhesive Foam Strips
DDOTS Double Dots 100pc. -3D Foam Circles

Other Products : 
Blueprint Sketch & Milled Lavender Distress inks. Black Archival ink, Spellbinders Hierloom Oval die, Diesire Embossalicious Embossing folder Regency Swirls, Pick me UpPearls & Rhinestones.

Instructions :
Take a 5" x 7" white cardbase & ink the bottom with Blueprint Sketch & Milled Lavender Distress inks. Take 2 pieces of 5" x 7" white cardstock  & die cut the bottom using the dies from Delicate Border Basics Die & Classic Border Basics Die. Emboss the smaller piece using Diesire Embossalicious Regency Swirls Embossing folder. Adhere both on the card base.

Die cut a piece of white cardstock using Spellbinders Hierloom Oval die. ink the lacy edges with Blueprint Sketch & Milled Lavender Distress inks using Stack and Store Daubers. Adhere on the card front with Foam Strips. Stamp the sentiment from Words Of Comfort Stamp Set using Black Archival ink. Color in the stamped sentiment with Blueprint Sketch Distress ink using Fantastix Blending Tool. Adhere on the die cut using 3D Foam Circles. Decorate the card using pearls & blue rhinestones.


Hope you like this card...
Thank you for visiting today... :)
Nupur
Disclosure : Compensated affiliate links used when possible  at NO additional cost to you.. Thank you! 

Wednesday 13 December 2017

Camelia Carnation Collection

Hello friends & welcome to Heartfelt Wednesday...
Today we are releasing a beautiful new collection

Camelia Carnation Collection

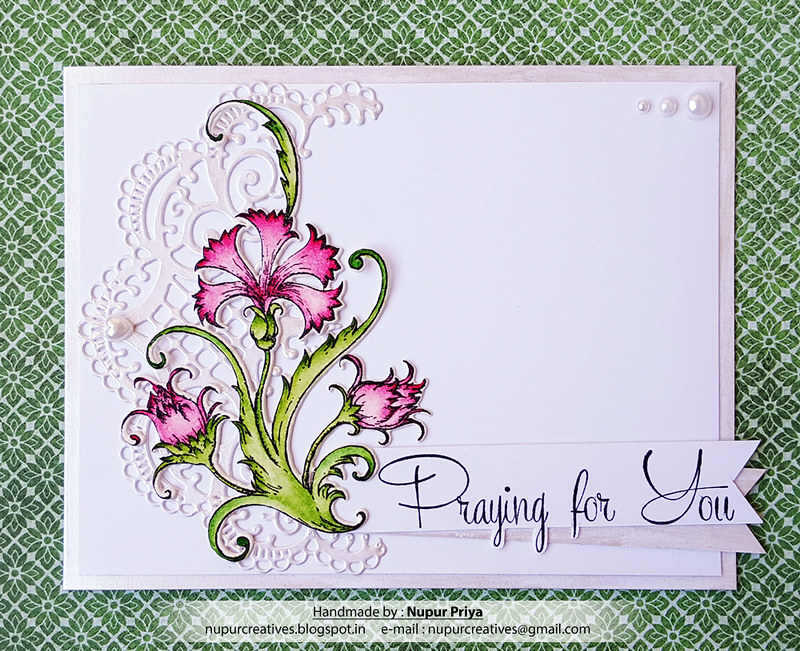
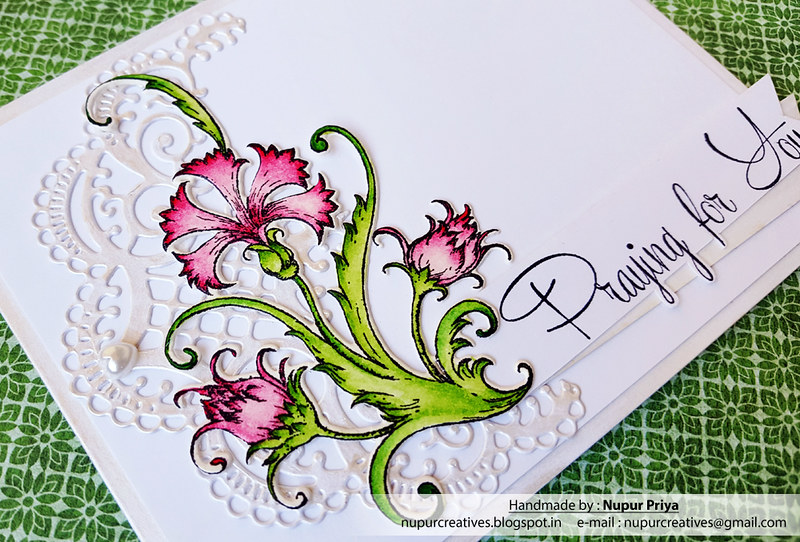
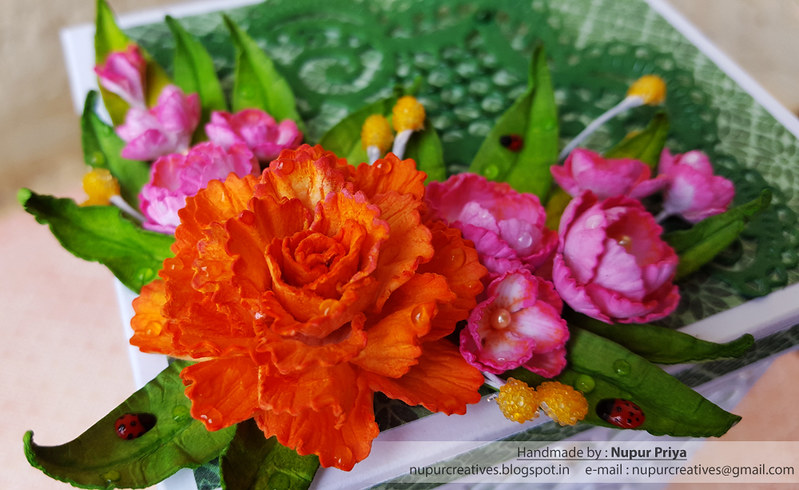
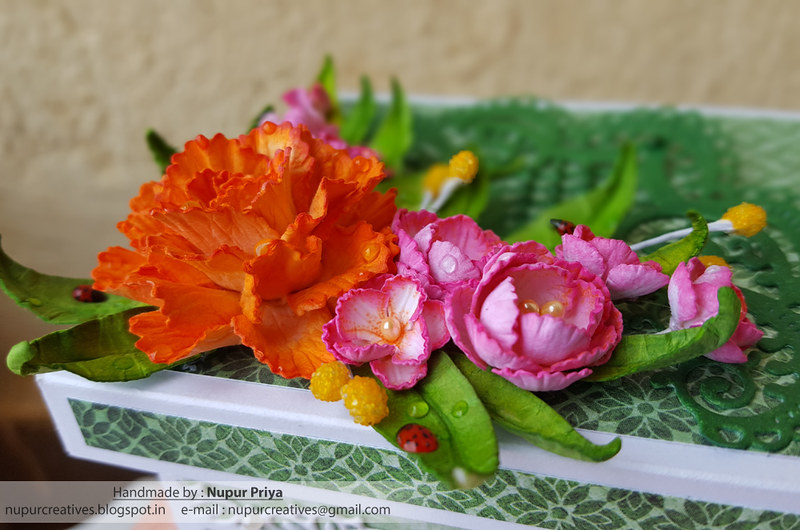
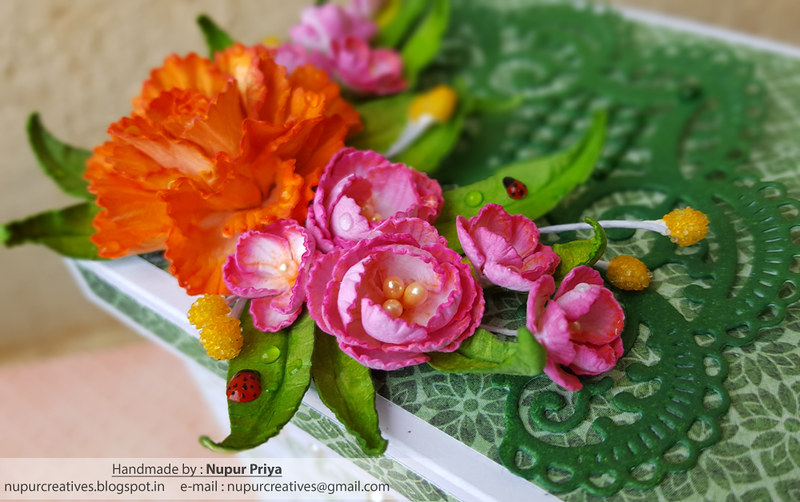
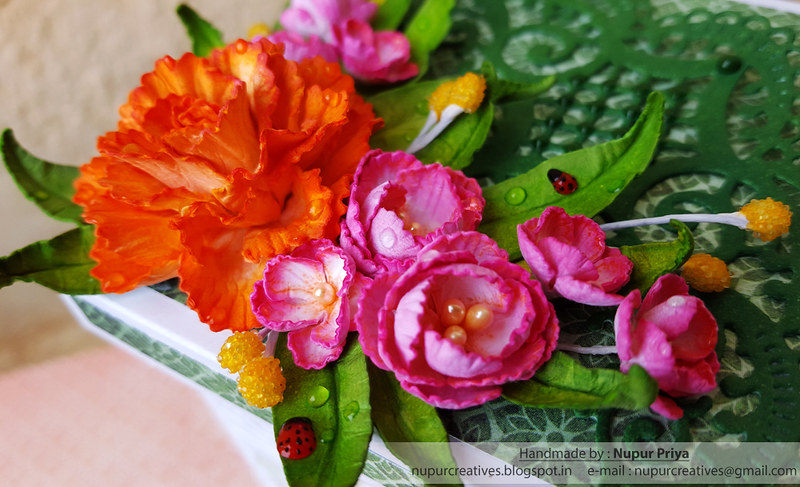
Beautifully ruffled in delicate layers and commonly gifted to express love, fascination, and distinction, the carnation flower is certainly recognizable and a floral garden and arrangement favorite. Thought to be one of the oldest cultivated flowers in the world, the carnation is traditionally associated with the Mother’s Day holiday, but is also known to be a wonderful choice for birthdays, weddings and just because occasions. With an outstanding reputation as a cut flower, and an amazing array of colors and sizes, it is no wonder that the carnation flower remains so popular today! Heartfelt Creations invites you to celebrate the beauty and gentle humbleness of the carnation with the Camelia Carnation Collection! With a color palette of fiery reds, pastel pinks, sunset orange tones, and lush hues of greens, the gorgeous paper collection brings with it a bold but feminine feel. Filled with attractive carnations clusters, exquisite flower gardens, and decorative lace like details, this pretty paper collection is sure to become a perennial favorite. Two cling stamp sets and coordinating dies come together to create enamoring and realistic carnation blossoms with delicately illustrated details and varying sized petals ideal for assembling full sized carnation flowers to charming mini versions, while a third cling stamp set lends itself perfectly to layering and creating dimensional carnation clusters. So join with us as we celebrate and give recognition to the traditional, but somewhat overlooked and under praised carnation flower!

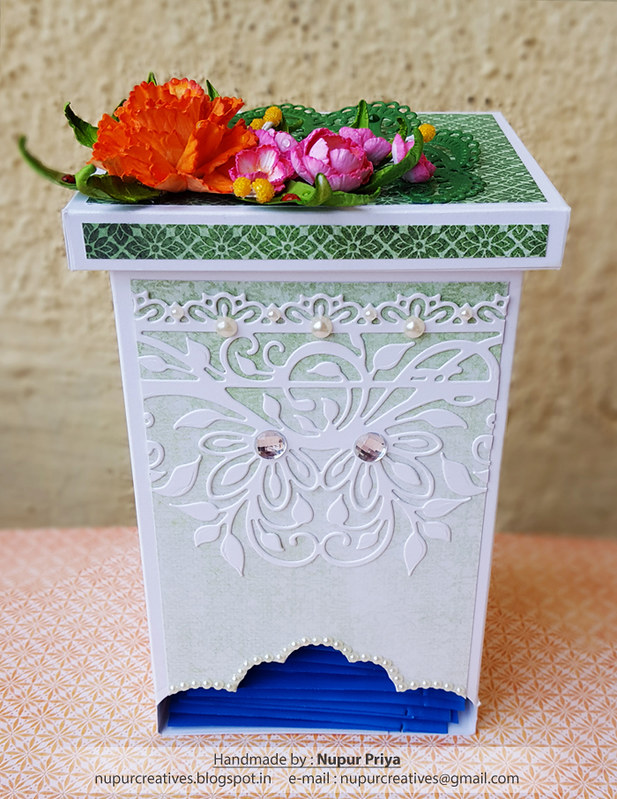
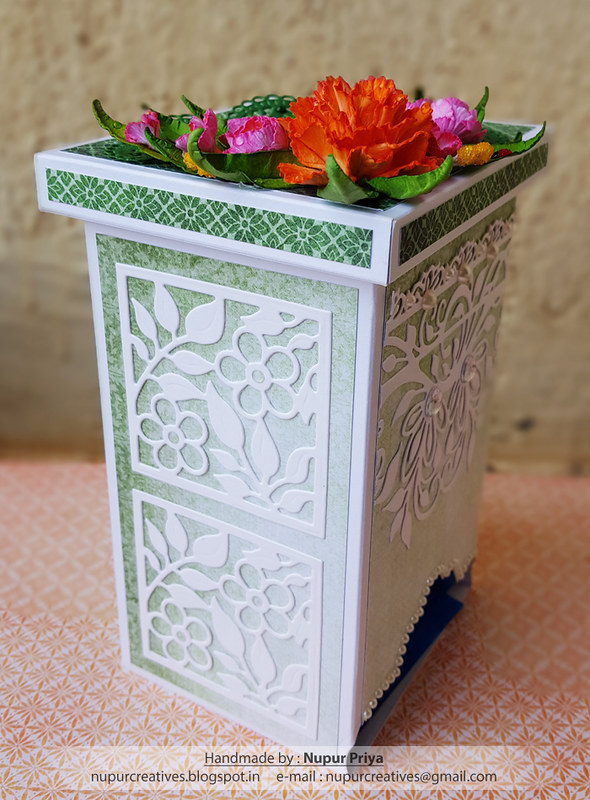
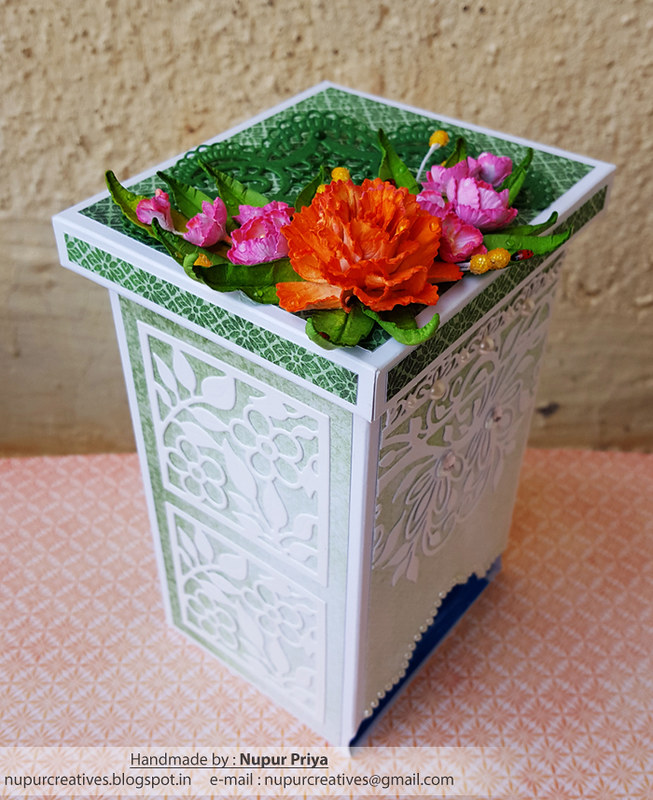
I have made a Teabag Dispenser using this collection for today's inspiration...
Read till the end for the list of products used & the tutorial...
20171206_135705

20171206_135254

20171206_135810

20171206_135426

20171206_135543

20171206_134206_001

20171206_133328

20171206_133409

20171206_133514


Heartfelt Creations Products: 
HCPC-3807 Large Camelia Carnation Cling Stamp Set
HCD1-7164 Small Camelia Carnation Die
HCD1-7165 Large Camelia Carnation Die
HCDP1-285 Camelia Carnation Paper Collection
HCFB1-464 3D Floral Basics Shaping Mold
HCS1-457-1 Pastel Pearl Stamens-Small
HCS1-458-3 Bright Bead Stamens-Medium
HCPP3-452 12 x 12 Cardstock Pack of 25 - White
NU663 Nuvo Crystal Drops - Woodland Green
NU650 Nuvo Crystal Drops - Ebony Black
NU667 Nuvo Crystal Drops - Red Berry
HCST2-406 Flower Shaping Essentials
STP1-421 Stylus Handle
STP1-420 Molding Mat
HCST1-401 Deluxe Flower Shaping Kit
HCDA2-450 Stack and Store Daubers-Pack of 30
173842 Scor-Pal Measuring & Scoring Board
D110305 Stamp Mat Pad
359848 Spellbinders Tool N' One
31510 Funnel Tray
368771 Scor-Tool
411231 5pc. Acrylic Block Set
352854 Metal Tip for Adhesive Bottles
PIN6 Glue Tip Pins
159723 Designer Dries Clear Adhesive

Other Products:
Picked Raspberry, Carved Pumpkin, Mowed Lawn, Crushed Olive & Pine Needles Distress Inks, Lilly Pad & Cheese Puff Ranger Dye ink pad, Ebosser, Pick me UpMorning Dew Nuvo Crystal Drops, pearls & rhinestones.

Project Instruction: 
Take 2 pieces of 7 1/2" x 8 1/2" white cardstock. Score both at 1/2", 3 1/2" & 7". Rotate 90 degree & score at 5 1/2". Die cut one of the 3 1/2" panel just above the horizontal score line using a border die from Ornate Borders and Pockets Die to make the window for dispensing teabags. Fold the score lines & glue both the pieces to form the box. Decorate the box using Camelia Carnation Paper Collection & white cardstock die cuts made using Sweetheart Borders Die & Gift Of Love Box Die.

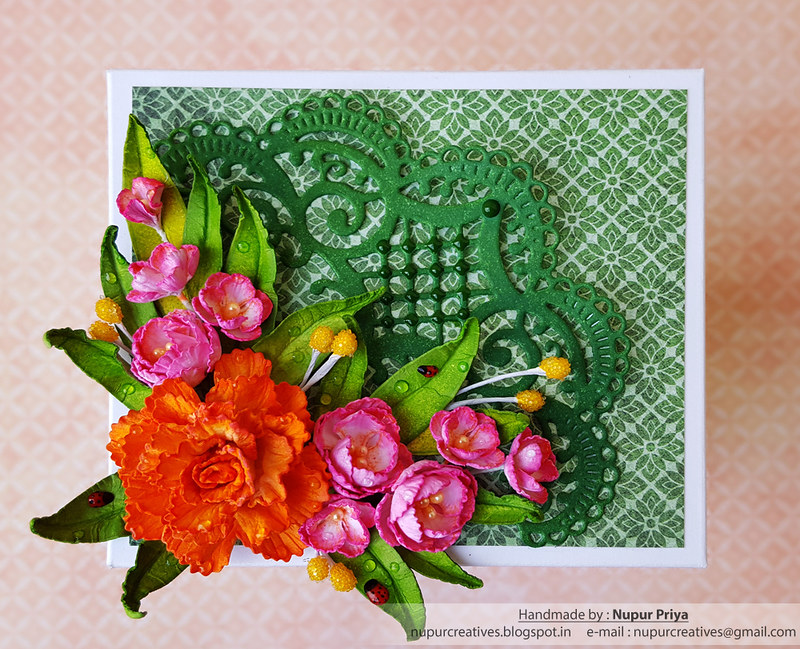
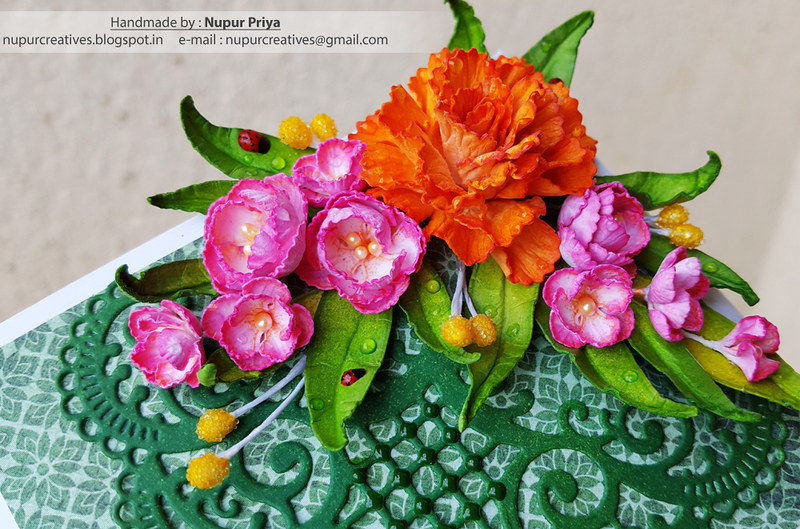
To make the box lid take 2 pieces of white cardstock measuring 9 1/2" x 4 1/2" & 4 1/2" x 4". Score the larger piece at 1/2", 4 1/2", 5" & 9". Rotate & score at 1/2" & 4". Fold the cardstock & glue it to form a closed box. Score the smaller cardstock  1/2" from all sides., fold and glue the corner tabs to create the open box. Adhere the base of the box to the previous box to create the lid. Decorate the lid using pattern papers from Camelia Carnation Paper Collection. Die cut white cardstock using Festive Holiday Die & ink with Pine Needles distress ink. Adhere it to the top of the lid as shown. decorate it with Woodland Green Nuvo Crystal Drops.

Stamp the flowers & leaves from Small Camelia Carnation Cling Stamp Set & Large Camelia Carnation Cling Stamp Set using Lilly Pad & Cheese Puff Ranger Dye ink pad. Die cut them using matching dies from Small Camelia Carnation Die & Small Camelia Carnation Die. Color the large flowers with Carved Pumpkin distress ink,  small flowers with Picked Raspberry Distress ink & the leaves with Mowed Lawn, Crushed Olive & Pine Needles distress inks using Stack and Store Daubers. Shape them using 3D Floral Basics Shaping Mold & Deluxe Flower Shaping Kit. Glue the yellow pollens from Pastel Pearl Stamens to the pink flower centers. Arrange & adhere the flowers & leaves on the lid as shown. Add some yellow pollens from Bright Bead Stamens to the flower arrangement.  Add few drops of Morning Dew Nuvo Crystal Drops to the flowers & leaves to create dew drops. Make the ladybugs on the leaves using Ebony Black & Red Berry Nuvo Crystal Drops. Add some pearls & rhinestones to decorate the box using Pick me Up.


Hope you like this ...

Thank you for visiting today... :)
Nupur
Disclosure : Compensated affiliate links used when possible  at NO additional cost to you.. Thank you! 

Wednesday 6 December 2017

Black white and red love card

Hello friends & welcome to Heartfelt Wednesday...
I have made a card using the Heartfelt Love Collection for today's inspiration...
Read till the end for the list of products used & instructions for this card...
20170906_161934

20170906_161948


20170906_161957_001


Heartfelt Creations Products: 
HCPC-3803 Banners Of Love Stamp Set
HCPC-3804 Heartfelt Love Sentiments Stamp Set
HCPC-3805 Forever Love Background Stamp Set
HCD1-7160 Banners Of Love Die
HCD1-7161 Sweetheart Borders Die
HCD1-7162 Eyelet Hearts Die
HCPP3-452 12 x 12 Cardstock Pack of 25 - White
HCPP1-438-1 Paper Pack of 10 - Black
HCDA2-450 Stack and Store Daubers-Pack of 30
173842 Scor-Pal Measuring & Scoring Board
368771 Scor-Tool
D110305 Stamp Mat Pad
411231 5pc. Acrylic Block Set
NU650 Nuvo Crystal Drops - Ebony Black
159723 Designer Dries Clear Adhesive
352854 Metal Tip for Adhesive Bottles
D120601 Darice Adhesive Foam Strips
DDOTS Double Dots 100pc. -3D Foam Circles

Other Products:
Fired Brick & Aged Mahogany Distress ink, Black Archival Ink, Mini MISTI, Ebosser, Cuttlebug Anna Griffin Embossing Folder Poppy, Pick me Up , Red Satin Ribbon & black rhinestones.


Project Instruction: 

Emboss a piece of 4 3/4" x 6 3/4" white cardstock using Cuttlebug Anna Griffin Poppy Embossing Folder. Adhere it to a 5" x 7" black cardbase. 


Take a piece of 4" x 6 1/4" red cardstock & die cut one of the long edges using Sweetheart Borders Die. Emboss the rest of the cardstock using the same embossing folder. Ink it using Stack and Store Daubers, Fired Brick & Aged Mahogany Distress inks. Adhere it to the cardbase aligning it to the right side as shown using Darice Adhesive Foam Strips.

Stamp the Forever Love Background Stamp on a 4" x 5 1/4" white cardstock using Black Archival ink & adhere it on a slightly larger black cardstock. Wrap a red satin ribbon around the bottom of this cardstock. Adhere this to the card base as shown using Darice Adhesive Foam Strips.

Die cut 2 pieces of red cardstock using Eyelet Hearts Die. Stamp the sentiment from Heartfelt Love Sentiments Stamp Set using Aged Mahogany Distress ink several times on the smaller heart. Adhere them together & then on the card base on the ribbon using using Double Dots 3D Foam Circles. 

Stamp the banner & sentiment from Banners Of Love Stamp Set & Heartfelt Love Sentiments Stamp Set on a piece of white cardstock using Mini MISTI. Die cut the stamped banner using matching die from Banners Of Love Die. Adhere it on the heart using Designer Dries Clear Adhesive. 

 Add some black rhinestones on the ribbon using Pick me Up & Ebony Black Nuvo Crystal Drops to the die cuts for finishing touch.


Hope you like this card...

Thank you for visiting today... :)
Nupur
Disclosure : Compensated affiliate links used when possible  at NO additional cost to you.. Thank you!