Showing posts with label Watercoloring. Show all posts

Wednesday, 28 April 2021

So Grateful

Hello friends and welcome to my blog.
Today I am sharing a watercolored card with stenciled background and Magnolia buds image.
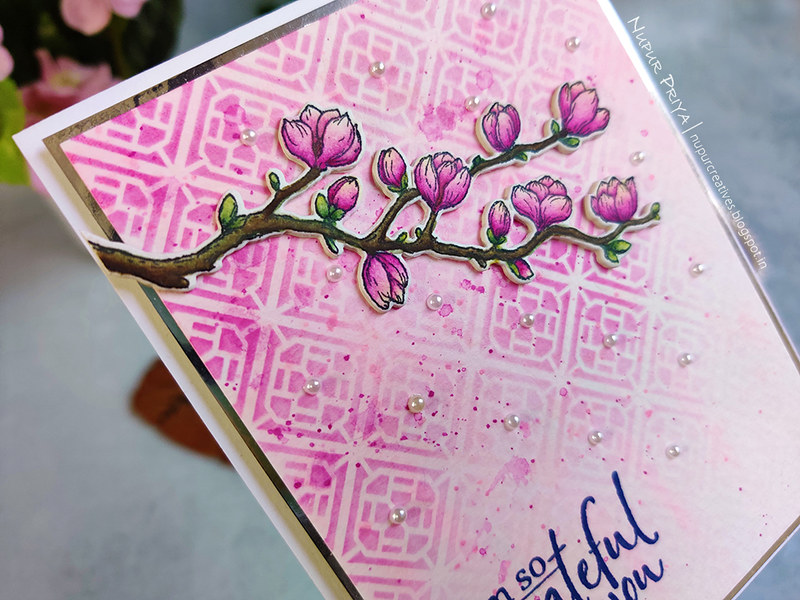
So Grateful for You_Nupur Priya_01 
So Grateful for You_Nupur Priya_02

Heartfelt Creations Products:

Other Products:
Picked Raspberry Distress ink, Altenew Watercolors,  Mudra Asian Tile Pattern Stencil, Brustro Watercolor cardstock, Brustro Green gold brushes, oval makeup brushes, double sided foam adhesive and pearls.

Instructions:
Take a 4" x 5 1/4" piece of watercolor cardstock and loosely paint it with Pink Diamond and Purple Wine colors from Altenew watercolor palette, let it dry and splatter some of these colors on top. Once it dries apply Picked Raspberry Distress ink on it using  Mudra Asian Tile Pattern Stencil and big oval makeup brush using varied pressure and ink to get a air brushed look. Trim down this panel slightly and adhere it on a 4" x 5 1/4" piece of Luxe Silver Cardstock.

Stamp the sentiment from For My Friend Sentiments Cling Stamp Set on the bottom left corner using Paris Dusk Memento Dye Ink. Adhere this panel on a 4 1/4" x 5 1/2" white card base using double sided foam adhesive.

Stamp the image from Sweet Magnolia Buds Cling Stamp Set on a piece of watercolor cardstock with Jet Black Archival Ink and die cut using the matching die from Sweet Magnolia Buds Die. Cut 3 more pieces of white cardstock using the same die and adhere them behind the stamped piece. Color the image with Altenew Watercolors and adhere it on the card front as shown. Add some pearls to the background for finishing touch.


Hope you like it...
Thank you for visiting today... :)
Nupur
Disclosure : Compensated affiliate links used when possible  at NO additional cost to you.. Thank you! 

Wednesday, 14 April 2021

Sweet Magnolia Card

Hello everyone and welcome to my blog
Have you seen the beautiful new collection by Heartfelt Creations

Sweet Magnolia Collection

I love this collection and I have made a beautiful floral card using this collection....
Andddddd I also have a Video Tutorial for these flowers below and a Discount Code for Heartfelt Creations store... Whoohooo
Plus I have a video too for these beautiful Magnolias...
So read till the end!
Sweet Magnolia Card_Nupur Priya_01

Sweet Magnolia Card_Nupur Priya_02


Heartfelt Creations Products:
HCD1-7247 Regal Pocket Accents Die

Other Products:
 Sizzix Tim Holtz Bricked Embossing Folder, Altenew Watercolors, Brustro Watercolor cardstock, Brustro Green gold brushes, double sided foam adhesive and pearls.

Instructions:
Card Base: Cut a 4 1/4" x 5 1/2" piece of pattern paper from Sweet Magnolia Paper Collection and adhere it on a same sized white card front. Die cut 2 pieces of white cardstock using the die from  Regal Pocket Accents Die and adhere them on the card front as shown using double sided foam adhesive. Emboss a 2 3/4" x 5 1/2" piece of white cardstock using Sizzix Tim Holtz Bricked Embossing Folder. Adhere it on a slightly wider piece of white cardstock and add thin strips of Luxe Silver Cardstock on both sides of the embossed piece. Adhere this piece on the card front as shown using double sided foam adhesive.

Magnolia Flowers: Stamp the flowers from Sweet Magnolia Blooms Cling Stamp Set on Deluxe Flower Shaping Paper with Vibrant Fuchsia Archival Ink. Ink the petals with the same ink and die cut them using the matching dies from Sweet Magnolia Blooms Die.

Magnolia Leaves: Stamp the leaves from Sweet Magnolia Blooms Cling Stamp Set on Deluxe Flower Shaping Paper with Leaf Green Archival Ink. Ink the leaves with the same ink and die cut them using the matching dies from Sweet Magnolia Blooms Die.

Shape the flowers and leaves using 3D Magnolia Shaping Mold and Deluxe Flower Shaping Kit. Add few cream stamens from Rock Candy Stamens to the flower centers. Arrange and adhere all the flowers and leaves on the card front as shown. Apply a little Designer Dries Clear Adhesive on the flowers and leaves using Hydra Sponges, sprinkle Crystal Ultrafine Transparent Glitter and tap off the excess.

Stamp the image from Sweet Magnolia Buds Cling Stamp Set on a piece of watercolor cardstock with Jet Black Archival Ink and die cut using the matching die from Sweet Magnolia Buds Die. Color the image with Altenew Watercolors. Snip this piece into smaller pieces and tuck them behind the flower arrangement as shown. Add few ladybugs made with Ebony Black and Red Berry Nuvo Crystal Drops to the flower arrangement and some pearls to the die cuts for finishing touch.


----- DISCOUNT CODE ALERT -----

Click below to avail a discount of $20 off your first order of $40+ from Heartfelt Creations website. You can thank me later :) http://fbuy.me/v/nupur_38


Hope you like it...
Thank you for visiting today... :)
Nupur
Disclosure : Compensated affiliate links used when possible  at NO additional cost to you.. Thank you! 

Wednesday, 10 March 2021

Daffodil Frame Card

Hello and welcome to my blog,
Today is the release day of a brand new collection

Spring Garden Collection

it is a beautiful floral collection with not jut one but 2 flowers Hyacinth and Daffodils with matching molds.
And here is the card that I made with this collection for today's inspiration. You will be seeing a lot of these pretty flowers on my cards now :)
Daffodil Frame_Nupur Priya_01       Daffodil Frame_Nupur Priya_02
Heartfelt Creations Products: 
SUAH05 5pc. Acrylic Block Set
352854 Metal Tip for Adhesive Bottles
159723 Designer Dries Clear Adhesive

Other products:
Altenew watercolors, Brustro Cold Pressed Watercolor Cardstock, Brustro Green gold brushesdouble sided foam tape and pearls.


Instructions:
Cut a piece of 4" x 5 1/4" pattern paper from Spring Garden Paper Collection and adhere it on a 4 1/4" x 5 1/2" white cardbase. Stamp the image from Delightful Daffodil & Butterfly Cling Stamp Set
on a piece of scrap paper and then on watercolor cardstock using Jet Black Archival Ink. Color in the image with Altenew watercolors and die cut using the matching die from Delightful Daffodil & Butterfly Die.

 Die cut a piece of white cardstock and  Luxe Silver Cardstock using the dies from Eyelet Rectangle & Basics Die to make 2 frames. Adhere them together. Die cut a piece of white cardstock using the die from Adorn It Pocket Accents Die and cut it in half. Adhere it behind the frame as shown using double sided foam tape. Adhere the colored image on this die cut as shown. Cut a piece of 3 1/4" 4 1/4"  pattern paper from same paper collection and adhere it on a same sized white cardstock. Adhere this behind the frame using double sided foam tape. Adhere this frame slightly offset to the right on the card front as shown.

Stamp the flowers from Fragrant Hyacinth Cling Stamp Set on a piece of Deluxe Flower Shaping Paper using Vibrant Fuchsia and Cactus Flower Archival Inks. Ink them with same inks and die cut using matching die from Fragrant Hyacinth Die. Shape them using 3D Hyacinth Shaping Mold and  Deluxe Flower Shaping Kit. Add few white stamens from Assorted Pearl Stamens to the flower centers.

Stamp the leaves from Cottage Tree 'scapes Cling Stamp Set on a piece of Deluxe Flower Shaping Paper using Leaf Green Archival Ink. Ink it with same ink and die cut using matching die from Cottage Tree 'scapes Die. Shape it using  Deluxe Flower Shaping Kit.

Arrange and adhere all the flowers and leaves on the card as shown. Use Apple Green Nuvo Crystal Drops to make the stamens on the colored image of daffodils. Add few pearls to add finishing touch.

Hope you like it...
Thank you for visiting today... :)
Nupur
Disclosure : Compensated affiliate links used when possible  at NO additional cost to you.. Thank you! 

Wednesday, 24 February 2021

Watercolor Daffodil Card

Hello friends and welcome to my blog
Today I am sharing a card made with watercolored Daffodil on a die cut and simple watercolor background.

Loved coloring this beautiful Daffodil image from the new collection. Using the 2nd generation stamping with Jet Black Archival ink gives it an almost no line coloring effect but still shows the detail lines. If you love the no-line coloring but struggle to get the depth and details then give this technique a try.

I love the look of layered die cuts but I don't like too busy backgrounds on my card so I also have a trick for that! Use vellum behind the die cuts so that the background looks a little less crowded.

As usual the full supply list and instructions for this card are below.
Waercolored Daffodil Card_Nupur Priya_01

Waercolored Daffodil Card_Nupur Priya_03

Instructions:
Take a 4" x 5 1/4" piece of watercolor cardstock and paint some horizontal grey stripes. Round the left corners of this cardstock using the DMC corner rounder punch. Round the corner of  a 4 1/4" x 5 1/2" white cardbase using the larger corner rounder side of same punch and Adhere the watercolor panel on it using double sided foam tape.

Die cut a piece of black cardstock using the die from Sweetheart Borders Die and adhere it on the card front as shown. Trim away the hanging portion of the die cut. Die cut a piece of white cardstock and a piece of vellum using the dies from Heart of Joy Decorative Die. Layer and adhere them together. Adhere this piece on the black die cut as shown using double sided foam tape.

Ink the image from Delightful Daffodil & Hyacinth Cling Stamp Set with Jet Black Archival Ink and stamp it on a piece of scrap paper and then immediately stamp on a piece of watercolor cardstock to get a lighter 2nd generation stamping. Color in the image using Altenew watercolors. Die cut the image using the matching die from Delightful Daffodil & Hyacinth Die. Adhere this on the card front as shown using double sided foam tape. Make the Daffodil stamens using Apple Green Nuvo Crystal Drops GlossAdhere the rhinestones to add finishing touch.

Hope you like it...
Thank you for visiting today... :)
Nupur
Disclosure : Compensated affiliate links used when possible  at NO additional cost to you.. Thank you!