
Hello and welcome to my blog!
Today is The day for a brand new launch by Heartfelt Creations:
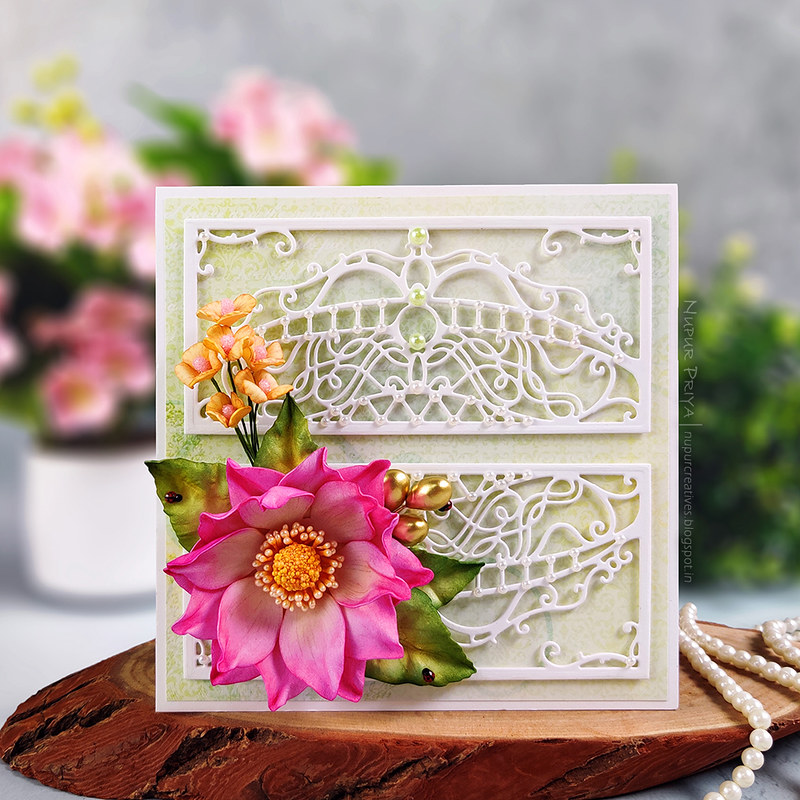
It is a gorgeous collection and I had so much fun making this card... Love how the flower turned out... so life like and gorgeous!
This card the 1st card of a set of 3 cards I made with Art Foam Paper. I will reveal the 2nd card from the set tomorrow so stay tuned!
I have also altered the stamen to make the flower center for my Dahlia... isn't it looking beautiful!
As always the supply list and instructions for this card can be found below the photographs


Heartfelt Creations Products:
HCPC-3928 Dazzling Dahlia Cling Stamp Set
HCD1-7323 Dazzling Dahlia Die
HCPC-3929 Dahlia and Leaves Cling Stamp Set
HCD1-7324 Dahlia and Leaves Die
HCFB1-494 3D Dahlia Shaping Mold
Other Products:
Dark Green Chalk Pastel, clothes iron, pearls, double sided foam tape and hot glue gun
Instructions:
Cut a piece of 5 3/4" x 5 3/4" pattern paper from Calla Lily Paper Collection and adhere it on a 6" x 6" white card base made with Deluxe Flower Shaping Paper. Die cut 4 pieces of white cardstock using the dies from Eyelet Royale Die. Adhere 2 - 2 pieces together. Adhere 3 layers of thin strips of white cardstock behind each edge of the die cut to add dimension and height to both the die cuts. Adhere the final pieces to the card front as shown.
Stamp the smaller flower from Dazzling Dahlia Cling Stamp Set on Art Foam Paper using Plum Archival Ink and die cut them using matching die from Dazzling Dahlia Die. Color them using Vibrant Fuchsia and Sunflower Archival Ink. Heat the petals with clothes iron and pinch them with fingers. Then shape them using the largest ball tool from Deluxe Flower Shaping Kit. To make the flower center Take a yellow pollen from Assorted Rose Hip Stamens, cover it with Designer Dries Clear Adhesive and sprinkle Go ManGo Prills. Let it dry and then adhere Small Pastel Pearl Stamens all around it. Add this to the Dahlia in the center.
Stamp the leaves from Dahlia and Leaves Cling Stamp Set on on Art Foam Paper using Fern Green Archival Ink and die cut them using matching dies from Dahlia and Leaves Die. Color them using Fern Green and Sunflower Archival Ink. Heat the leaves with clothes iron and quickly press on the leaf shape on 3D Dahlia Shaping Mold to shape the leaves. Apply a little Dark Green Chalk Pastel to the edges.
Stamp the smallest flowers from Oakberry Lane Blossoms Cling Stamp Set on Art Foam Paper using Monarch Orange Archival Ink and die cut them using matching die from Oakberry Lane Blossoms Die. Color them using Sunflower Archival Ink. Heat the flower with clothes iron shape them using Deluxe Flower Shaping Kit. Add a pink Pastel Bead Stamens to the flowers. ink the stem of the pollens using Fern Green Archival Ink.
Arrange and adhere all the flowers and leaves on the card front as shown. Add few ladybugs made with Ebony Black and Red Berry Nuvo Crystal Drops, few gold stamens from Assorted Rose Hip Stamens and pearls to add finishing touch.
Hope you like it...
Thank you for visiting today... :)
This comment has been removed by the author.
ReplyDeleteOh my word, your flowers are absolutely gorgeous Nupur!!!
ReplyDelete