
Hello and welcome to my blog...
Today I am sharing a quick and easy shaped card with lots of glitter.
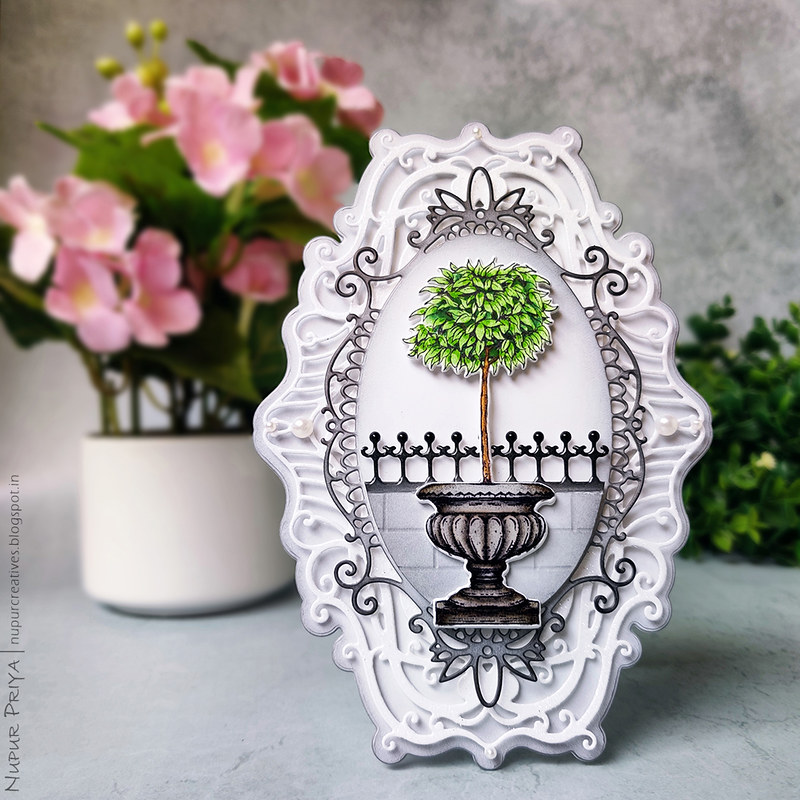
I have been using this technique to use glitter on my cards that is very subtle and adds an exquisite touch to the cards. I also enjoy using glossy effect on my cards and here I have used it on the fence.
By the way the fence is made of a decorative frame die that was launched last week and the brick impression was made with scoreboard. This is a great way to get more out of the supplies that we already have on hand!
As usual all the supplies used and the instructions for this card can be found at below the pictures.

Heartfelt Creations Products:
HCPC-3909 French Cottage 'scapes Cling Stamp Set
HCD1-7293 French Cottage 'scapes Die
HCD2-7307 Royal Elegance Frames Die
HCD2-7308 Majestic Swirl Frames Die
HCD2-7309 Elaborate Oval Frames Die
HCPP1-438-2 Paper Pack of 10 - White
RACP468 Ranger Archival Ink Pad - Jet Black
Zig Clean Color Real Brush Markers
HCDA2-450 Stack and Store Daubers-Pack of 30
359848 Spellbinders Tool N' One
411231 5pc. Acrylic Block Set
NU650 Nuvo Crystal Drops - Ebony Black
352854 Metal Tip for Adhesive Bottles
159723 Designer Dries Clear Adhesive
3D1844 3-D Crystal Lacquer
D120601 Darice Adhesive Foam Strips
Instructions:
Take a 5" x 7" white card base and die cut it using the largest die from Elaborate Oval Frames Die so the folded edge is slightly inside the die cutting edge. Die cut a piece of white cardstock using the same die and ink it lightly with Hickory Smoke Distress inks. Adhere it to the card base.
Stamp the image from French Cottage 'scapes Cling Stamp Seton a piece of white cardstock with Jet Black Archival Ink and color it with Zig Clean Color Real Brush Markers. Die cut this piece and 4 more pieces of white cardstock using the matching die from French Cottage 'scapes Die. Adhere all the pieces together to make a thicked piece and adhere it on the card front as shown using Darice Adhesive Foam Strips. Apply Ebony Black Nuvo Crystal Drops on the round tip of the fence. Once it is dry apply 3-D Crystal Lacquer on remaining the top edge of the fence and on the vase. Add few pearls to the die cuts for the finishing touch.
Hope you like it...
Today I am sharing a quick and easy shaped card with lots of glitter.
I have been using this technique to use glitter on my cards that is very subtle and adds an exquisite touch to the cards. I also enjoy using glossy effect on my cards and here I have used it on the fence.
By the way the fence is made of a decorative frame die that was launched last week and the brick impression was made with scoreboard. This is a great way to get more out of the supplies that we already have on hand!
As usual all the supplies used and the instructions for this card can be found at below the pictures.
Heartfelt Creations Products:
HCPC-3909 French Cottage 'scapes Cling Stamp Set
HCD1-7293 French Cottage 'scapes Die
HCD2-7307 Royal Elegance Frames Die
HCD2-7308 Majestic Swirl Frames Die
HCD2-7309 Elaborate Oval Frames Die
HCPP1-438-2 Paper Pack of 10 - White
RACP468 Ranger Archival Ink Pad - Jet Black
Zig Clean Color Real Brush Markers
HCDA2-450 Stack and Store Daubers-Pack of 30
359848 Spellbinders Tool N' One
411231 5pc. Acrylic Block Set
NU650 Nuvo Crystal Drops - Ebony Black
352854 Metal Tip for Adhesive Bottles
159723 Designer Dries Clear Adhesive
3D1844 3-D Crystal Lacquer
D120601 Darice Adhesive Foam Strips
Other Products:
Hickory Smoke and Black Soot Distress inks, MS Scoreboard, transparent Glitter and pearls.Instructions:
Take a 5" x 7" white card base and die cut it using the largest die from Elaborate Oval Frames Die so the folded edge is slightly inside the die cutting edge. Die cut a piece of white cardstock using the same die and ink it lightly with Hickory Smoke Distress inks. Adhere it to the card base.
Die cut a piece of white cardstock using the 2nd largest die from the same set and apply a layer of Designer Dries Clear Adhesive using Hydra Sponges and sprinkle transparent glitter. Burnish the glitter using your fingers once the glue is dry and use a soft fluffy makeup brush to dust off the extra glitter. Adhere this die cut on the card base using Darice Adhesive Foam Strips.
Die cut a piece of white cardstock using the 3rd largest die from Royal Elegance Frames Die and ink it up with Hickory Smoke and Black Soot Distress inks. Adhere this die cut on the previous die cut using Darice Adhesive Foam Strips.
Die cut a piece of white cardstock using the 3rd largest die from Majestic Swirl Frames Die. Trace the inner frame of the oval die that we used in the earlier step on this die cut and cut it to make the fence behind the vase. Use the score board to score and create a brick wall pattern as shown. Ink it up with Hickory Smoke and Black Soot Distress inks. Adhere this die cut on the previous die cut using Darice Adhesive Foam Strips.
Stamp the image from French Cottage 'scapes Cling Stamp Seton a piece of white cardstock with Jet Black Archival Ink and color it with Zig Clean Color Real Brush Markers. Die cut this piece and 4 more pieces of white cardstock using the matching die from French Cottage 'scapes Die. Adhere all the pieces together to make a thicked piece and adhere it on the card front as shown using Darice Adhesive Foam Strips. Apply Ebony Black Nuvo Crystal Drops on the round tip of the fence. Once it is dry apply 3-D Crystal Lacquer on remaining the top edge of the fence and on the vase. Add few pearls to the die cuts for the finishing touch.
Hope you like it...
Thank you for visiting today... :)

Beautiful card, love the colors
ReplyDelete