Showing posts with label coloring. Show all posts

Wednesday, 17 March 2021

Hyacinth Frame Card

Hello and welcome to my blog
Today I am sharing another card made with the negative die cut pieces technique that I shared here
This time I have made a frame for my Hyacinth with those pieces.
Scroll down for more details and instructions.Hyacinth Frame_Nupur Priya_01 
Hyacinth Frame_Nupur Priya_02
Heartfelt Creations Products:
HCPC-3947 Fragrant Hyacinth Cling Stamp Set
HCD1-7345 Fragrant Hyacinth Die
HCFB1-497 3D Hyacinth Shaping Mold
HCD2-7337 Teardrop Lattice Gateway Die

Instructions:
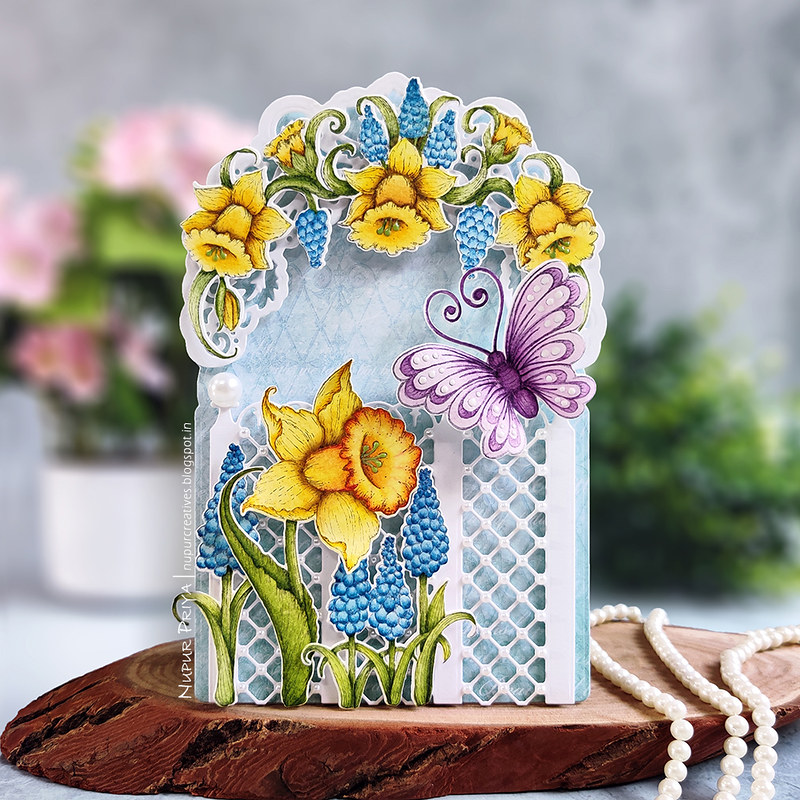
Die cut 2 pieces of white cardstock using the dies from Eyelet Royale Die. Trim the frame and adhere them on a 4 1/4" x 5 1/2" white cardbase as shown.

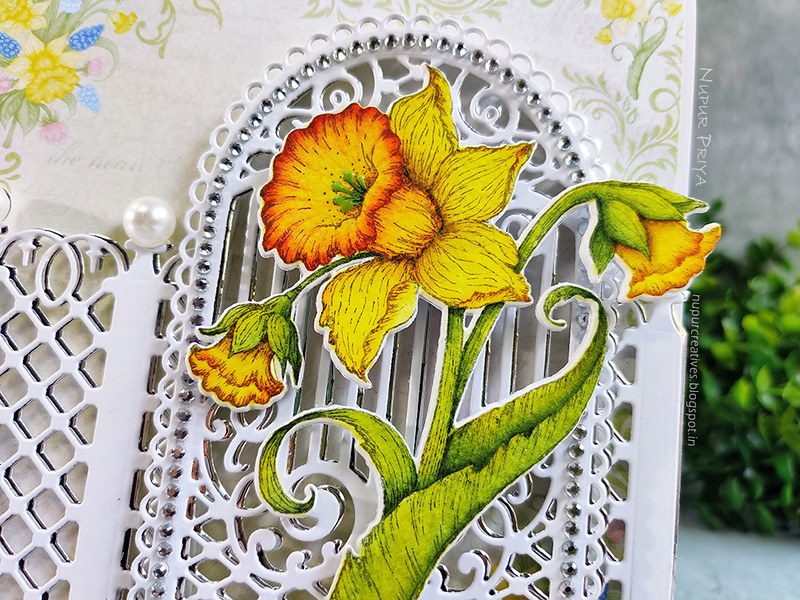
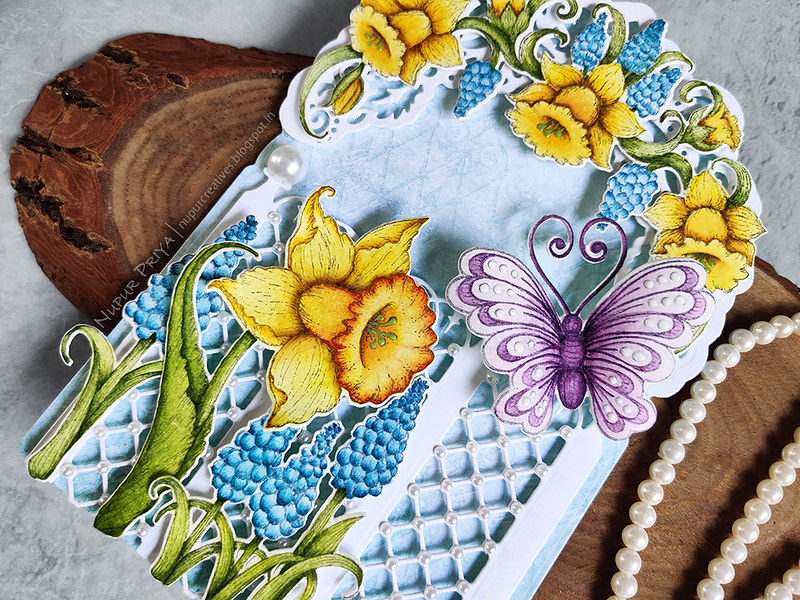
Stamp the hyacinth image from Fragrant Hyacinth Cling Stamp Set on a piece of watercolor cardstock and die cut using the matching die from Fragrant Hyacinth Die. Color in the image using Altenew watercolors. Adhere this on the card front.

Die cut a piece of white cardstock using the dies from  Eyelet Rectangle & Basics Die to make a thin 3" x 4" frame. Adhere the negative die cut pieces of Luxe Gold Cardstock left after cutting Teardrop Lattice Gateway Die on this white frame as shown to create a gold frame. Adhere this frame on the card front using double sided foam tape to frame the Hyacinth.

Stamp the flowers from Fragrant Hyacinth Cling Stamp Set on a piece of Deluxe Flower Shaping Paper using Vibrant Fuchsia and Cactus Flower Archival Inks. Ink them with same inks and die cut using matching die from Fragrant Hyacinth Die. Shape them using 3D Hyacinth Shaping Mold and  Deluxe Flower Shaping Kit. 

Arrange and adhere all the flowers on the Hyacinth as shown. Add a drop of Ivory Seashell Nuvo Crystal Drops to the flower centers. Add few pearls to the die cuts to add finishing touch.


Hope you like it...
Thank you for visiting today... :)
Nupur
Disclosure : Compensated affiliate links used when possible  at NO additional cost to you.. Thank you! 

Wednesday, 24 February 2021

Watercolor Daffodil Card

Hello friends and welcome to my blog
Today I am sharing a card made with watercolored Daffodil on a die cut and simple watercolor background.

Loved coloring this beautiful Daffodil image from the new collection. Using the 2nd generation stamping with Jet Black Archival ink gives it an almost no line coloring effect but still shows the detail lines. If you love the no-line coloring but struggle to get the depth and details then give this technique a try.

I love the look of layered die cuts but I don't like too busy backgrounds on my card so I also have a trick for that! Use vellum behind the die cuts so that the background looks a little less crowded.

As usual the full supply list and instructions for this card are below.
Waercolored Daffodil Card_Nupur Priya_01

Waercolored Daffodil Card_Nupur Priya_03

Instructions:
Take a 4" x 5 1/4" piece of watercolor cardstock and paint some horizontal grey stripes. Round the left corners of this cardstock using the DMC corner rounder punch. Round the corner of  a 4 1/4" x 5 1/2" white cardbase using the larger corner rounder side of same punch and Adhere the watercolor panel on it using double sided foam tape.

Die cut a piece of black cardstock using the die from Sweetheart Borders Die and adhere it on the card front as shown. Trim away the hanging portion of the die cut. Die cut a piece of white cardstock and a piece of vellum using the dies from Heart of Joy Decorative Die. Layer and adhere them together. Adhere this piece on the black die cut as shown using double sided foam tape.

Ink the image from Delightful Daffodil & Hyacinth Cling Stamp Set with Jet Black Archival Ink and stamp it on a piece of scrap paper and then immediately stamp on a piece of watercolor cardstock to get a lighter 2nd generation stamping. Color in the image using Altenew watercolors. Die cut the image using the matching die from Delightful Daffodil & Hyacinth Die. Adhere this on the card front as shown using double sided foam tape. Make the Daffodil stamens using Apple Green Nuvo Crystal Drops GlossAdhere the rhinestones to add finishing touch.

Hope you like it...
Thank you for visiting today... :)
Nupur
Disclosure : Compensated affiliate links used when possible  at NO additional cost to you.. Thank you! 

Wednesday, 17 February 2021

Delightful Daffodil Window

Hello and welcome to my blog
I am back with another inspiration Wednesday for Heartfelt Creations  and today I am sharing another card made with the 2 latest collections Decorative Gateway and Delightful Daffodil Collection.
As usual the supply list and instructions are down below the photographs.
Delightful Daffodils Window Card_Nupur Priya_01

Delightful Daffodils Window Card_Nupur Priya_02

Delightful Daffodils Window Card_Nupur Priya_03
Heartfelt Creations Products:

Other Products:
Altenew watercolors, Brustro watercolor cardstock, Brustro Green gold brushes, double sided foam tape, silver rhinestones and big pearls.

Instructions:
Cut a piece of 5 3/4" x 5 3/4" pattern paper from Delightful Daffodil Paper Collection and adhere it on a 6" x 6" white card base. Die cut a piece of white and a piece of Luxe Silver Cardstock using the dies from Eyelet Frame Gateway Die, Lattice Flourish Gateway Die and Teardrop Lattice Gateway Die. Adhere the silver die cuts behind the white die cuts slightly offset. Cut the fence die cut in 3 parts and adhere 2 pieces on left and right edge and the gateway die cut in the remaining gap between the 2 die cuts. Use double sided foam tape to adhere all the die cuts.

Ink the image from Delightful Daffodil & Hyacinth Cling Stamp Set with Jet Black Archival Ink and stamp it on a piece of scrap paper and then immediately stamp on a piece of watercolor cardstock to get a lighter 2nd generation stamping. Color in the image using Altenew watercolors. Die cut the image and 3 more pieces of white cardstock using the matching die from Delightful Daffodil & Hyacinth Die. Adhere all the die cuts together to form a thicker piece and adhere this on the card front as shown using double sided foam tape. Make the Daffodil stamens using Apple Green Nuvo Crystal Drops GlossAdhere the pearls and rhinestones to add finishing touch.


Hope you like it...
Thank you for visiting today... :)
Nupur
Disclosure : Compensated affiliate links used when possible  at NO additional cost to you.. Thank you! 

Wednesday, 10 February 2021

Delightful Daffodil Gateway Card

Hello friends and welcome to my blog
Today is the 2nd Wednesday of the month and that means Heartfelt Creations is releasing a brand new collection:

Delightful Daffodil Collection

This is a gorgeous collection with beautiful floral images and I have paired it with Decorative Gateway Dies to create my card for today!
You can find the full supply list and instructions for this card below the photographs.
Delightful Daffodil _Nupur Priya_01

Delightful Daffodil _Nupur Priya_02

Delightful Daffodil _Nupur Priya_03

Heartfelt Creations Products:
Take a 5" x 7" top folding white cardbase and die cut it using the largest die from Lattice Flourish Gateway Die so that the fold line is below the edge of the die. Die cut a piece of white cardstock and a piece of pattern paper from Delightful Daffodil Paper Collection using the same die. Adhere them on the die cut cardbase. Die cut a piece of white cardstock using the dies from the same die set and adhere them on the card front as shown using double sided foam adhesive.

Ink the images from  Delightful Daffodil & Butterfly Cling Stamp SetDelightful Daffodil & Hyacinth Cling Stamp Set and Delightful Daffodil Spray Cling Stamp Set with Jet Black Archival Ink and stamp it on a piece of scrap paper and then immediately stamp on a piece of watercolor cardstock to get a lighter 2nd generation stamping. Color in the image using Altenew watercolors. Die cut the image using the matching dies from Delightful Daffodil & Butterfly Die, Delightful Daffodil & Hyacinth Die and Delightful Daffodil Spray Die. Curve the wings of the butterfly using the brush handle. Adhere these on the card front as shown using double sided foam tape. Make the Daffodil stamens using Apple Green Nuvo Crystal Drops Gloss. Add Gloss White Nuvo Crystal Drops to the wings of the butterfly. Adhere pearls to the die cut to add finishing touch.


Hope you like it...
Thank you for visiting today... :)
Nupur
Disclosure : Compensated affiliate links used when possible  at NO additional cost to you.. Thank you! 

Monday, 30 November 2020

Tri-fold Swan card

Hello and welcome to my blog
Have you seen the latest Black Friday Release by Heartfelt Creations
It is so Gorgeous!!!!
And today I am sharing a Tri-Fold card made with this set.
You can find the supply list and instructions for the card below the photographs
Trifold Swan Card_01

Trifold Swan Card_02

Trifold Swan Card_03

Heartfelt Creations Products:

Other Products:
Altenew watercolors, Brustro green gold brushes, Brustro hot pressed watercolor cardstock, rhinestones and double sided foam tape

Die cut 3 pieces of pattern paper from Calla Lily Paper Collection using the largest die from  Scalloped Flourish Gateway Die and adhere them on the 3 sides of 5" x 7" Gateway Fold Card - White. 
Die cut more pieces of pattern paper from same paper collection using the dies from Elegant Swirl Gateway Die and Lattice Swirl Gateway Die. Adhere slightly smaller pieces of white cardstock behind the die cuts that will be used on the card front and adhere them on the cardbase using double sided foam tape. Adhere the remaining die cuts on the following sided as shown using Designer Dries Clear Adhesive.

Stamp the image from Swan Lake Cling Stamp Set using Jet Black  Archival Ink on a piece of scrap paper and then immediately stamp on watercolor cardstock to get second generation stamping or grey stamping. Color in the images using Altenew watercolors and Brustro green gold brushes. Die cut the images using the matching dies from Swan Lake Die. Die cut 1 more piece of cardstock using the same dies and adhere them behind the colored pieces. Adhere and arrange all the 3 pieces on the card front as shown. Embellish the frame with rhinestones as shown to add finishing touch. 


Hope you like it...
Thank you for visiting today... :)
Nupur
Disclosure : Compensated affiliate links used when possible  at NO additional cost to you.. Thank you!