Friday, 10 February 2017

Mirror Image Event + Giveaway


Hello friends & welcome to Mirror Image Event...

Every day in the month of February, the design team members from My Sweet Petunia, The Ton and So Suzy Stamps will create a card using the Mirror Image Stamp. There will be blog posts, videos and a ton of instructions on how we all use the Mirror Image Stamp.

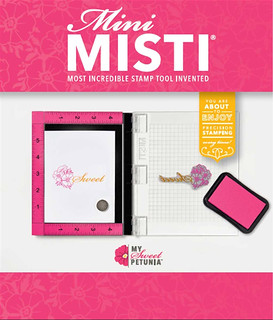
The Mirror Image Stamp is a great stamping tool that works with the MISTI to create reflections and reverse images.

We will have the entire list with links to everyone’s post on the So Suzy Stamps blog so you can come back and see the inspiration on a daily basis. We will also be sharing the cards on Facebook and Instagram, just in case you miss a blog post.

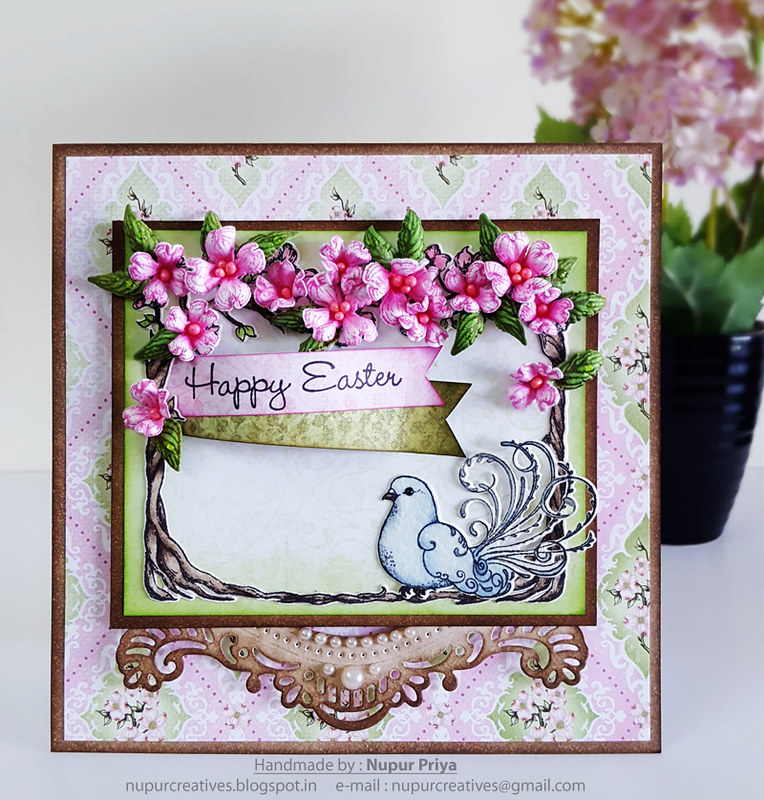
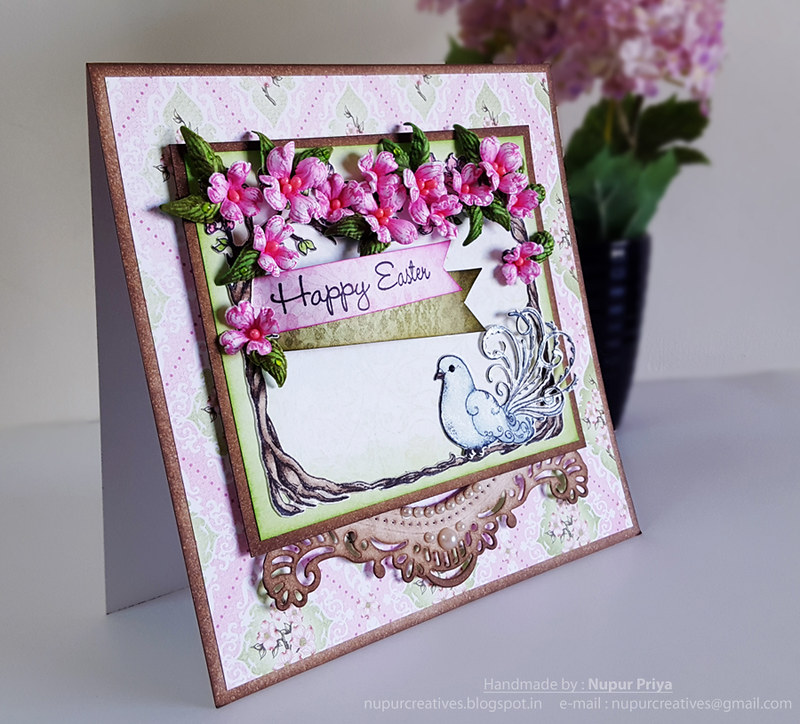
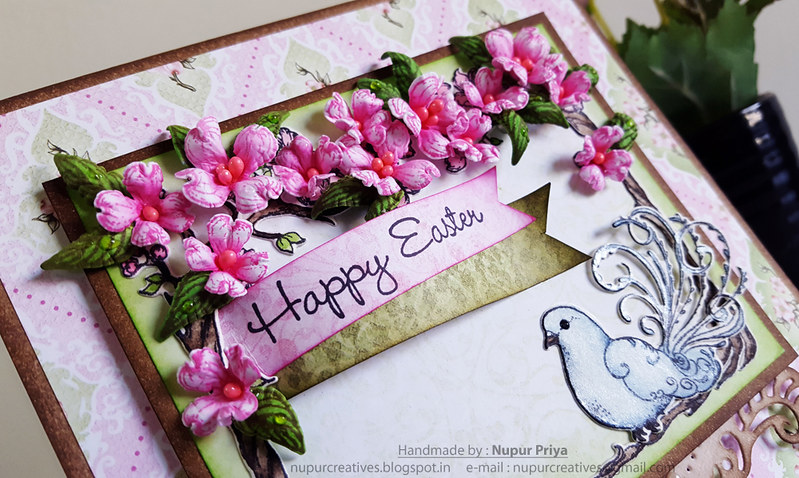
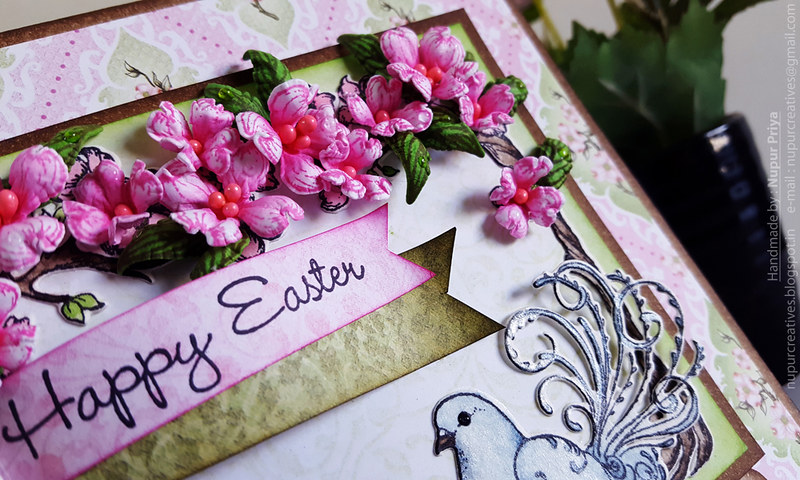
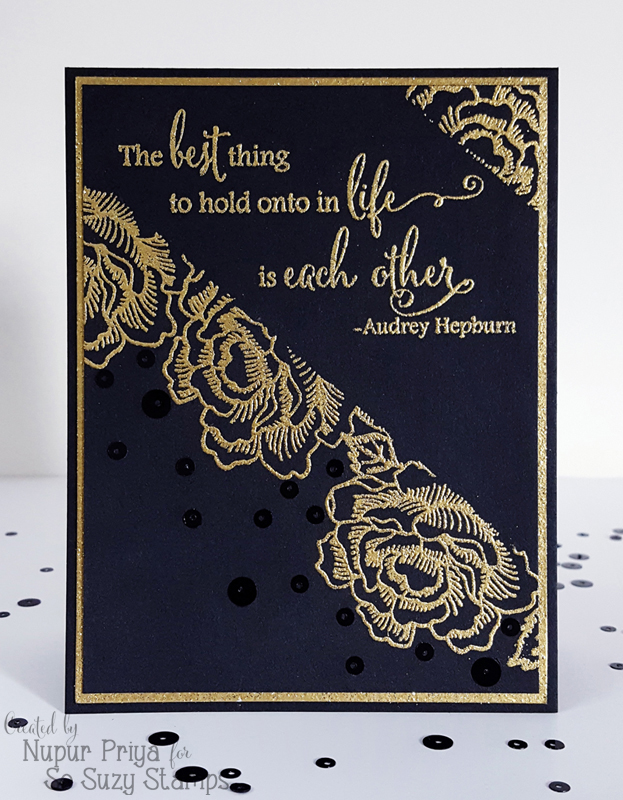
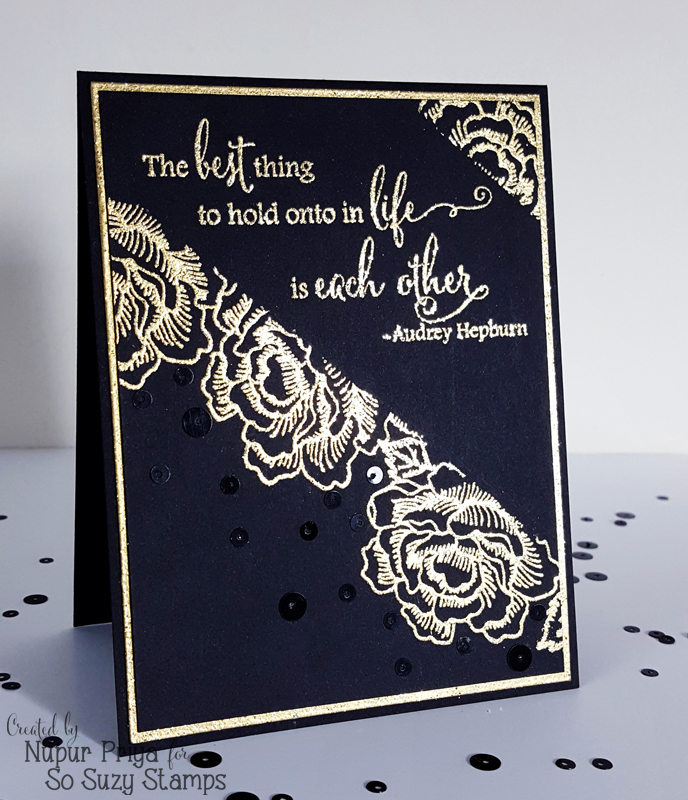
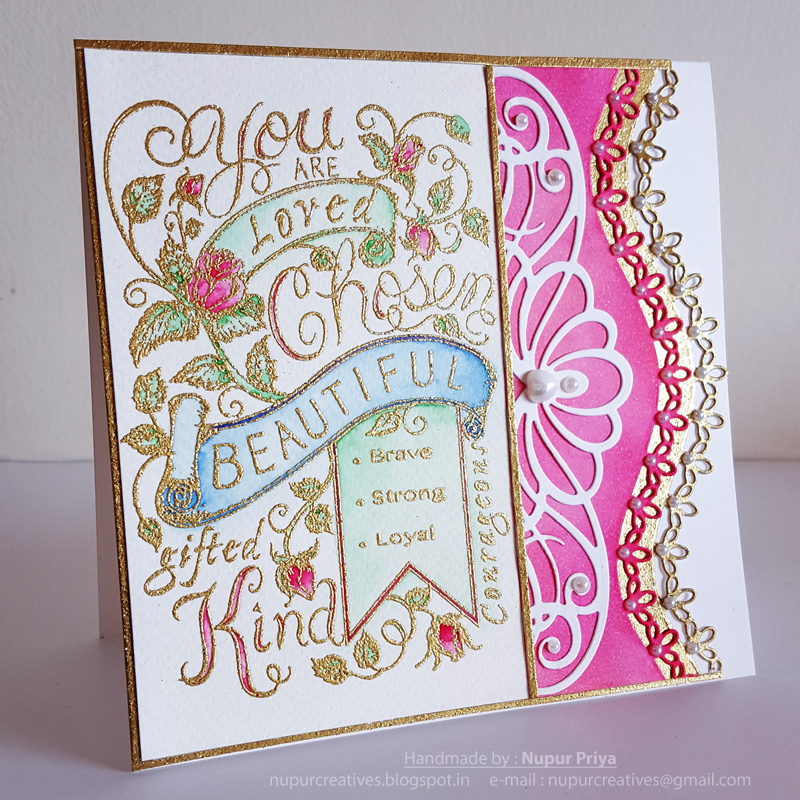
Now moving on to the card I made for Mirror Image Event 
20170210_173234
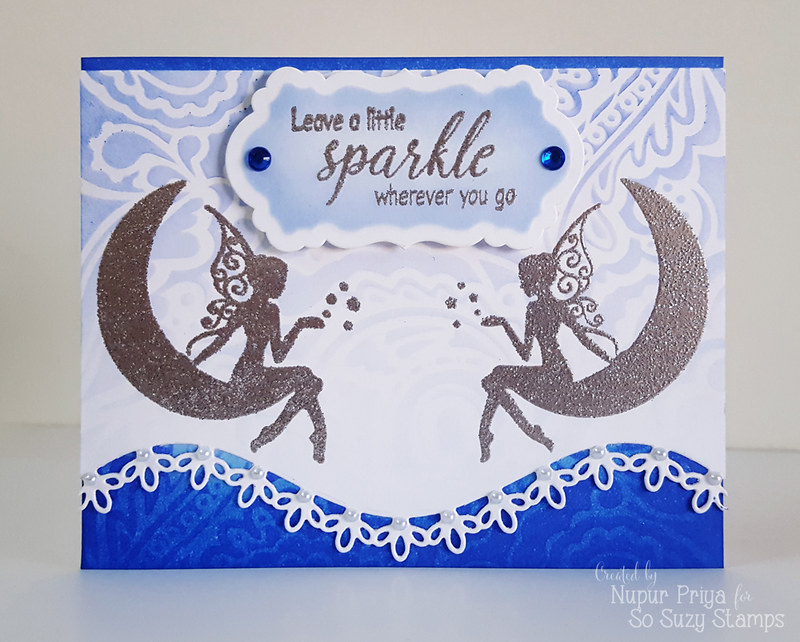
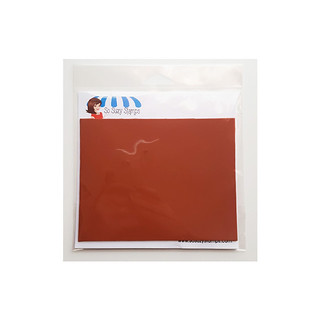
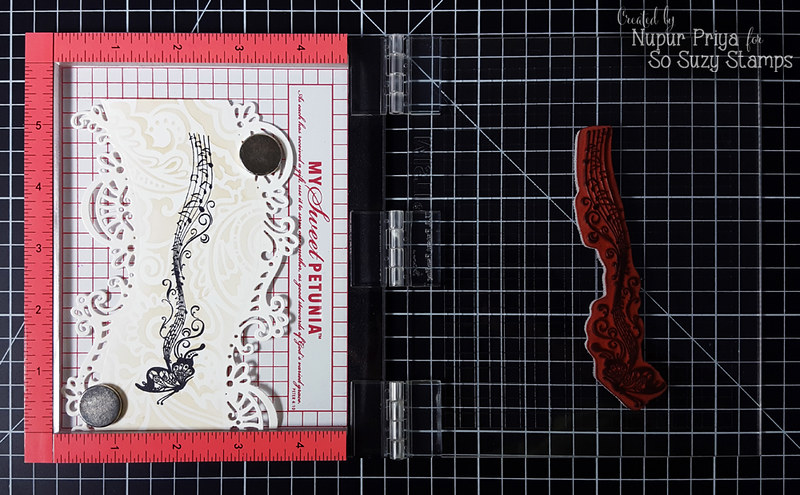
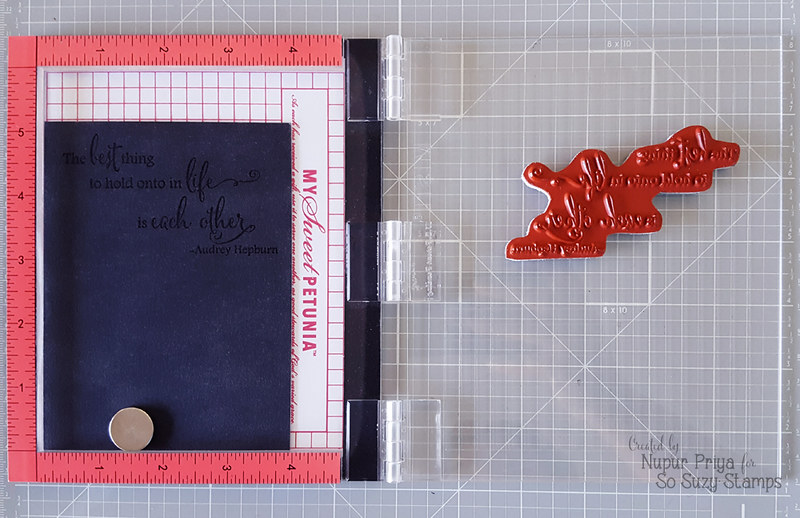
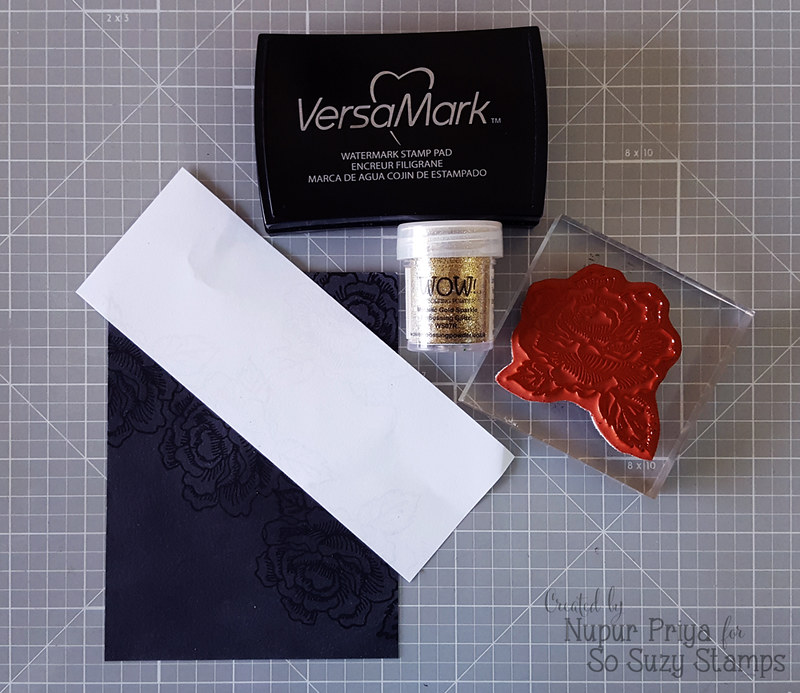
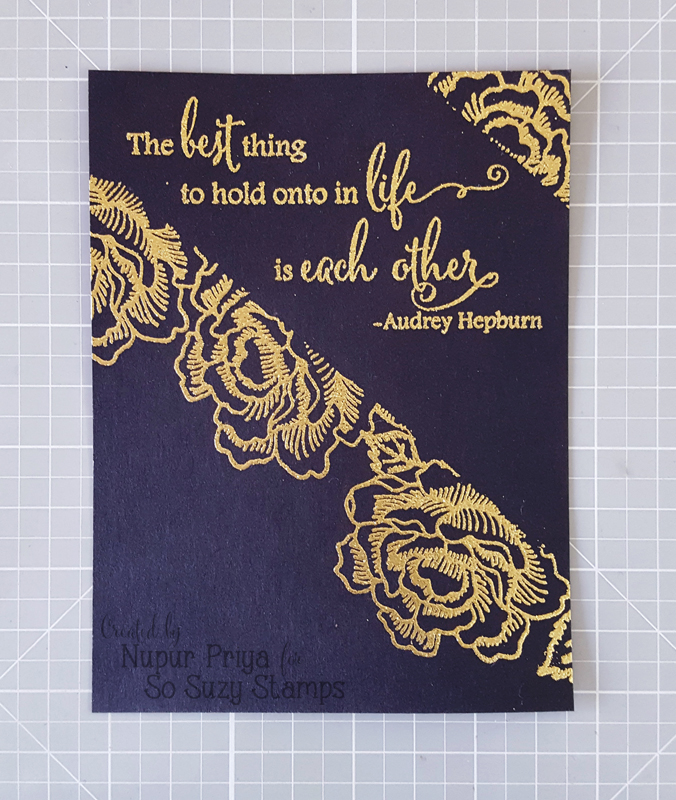
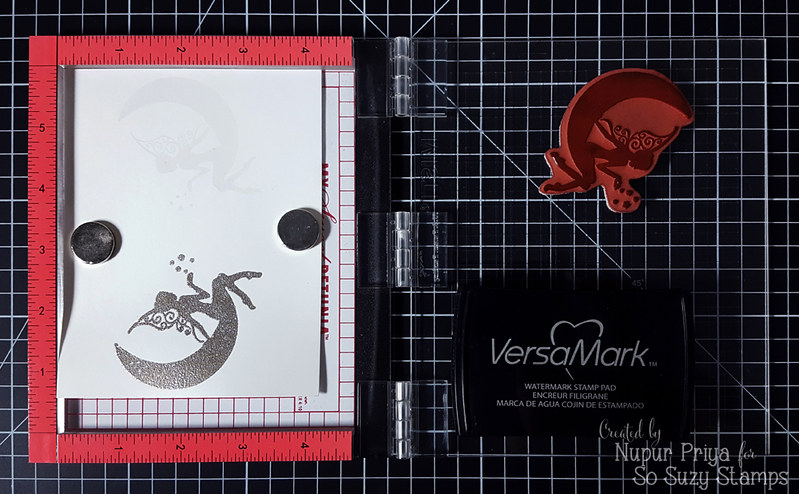
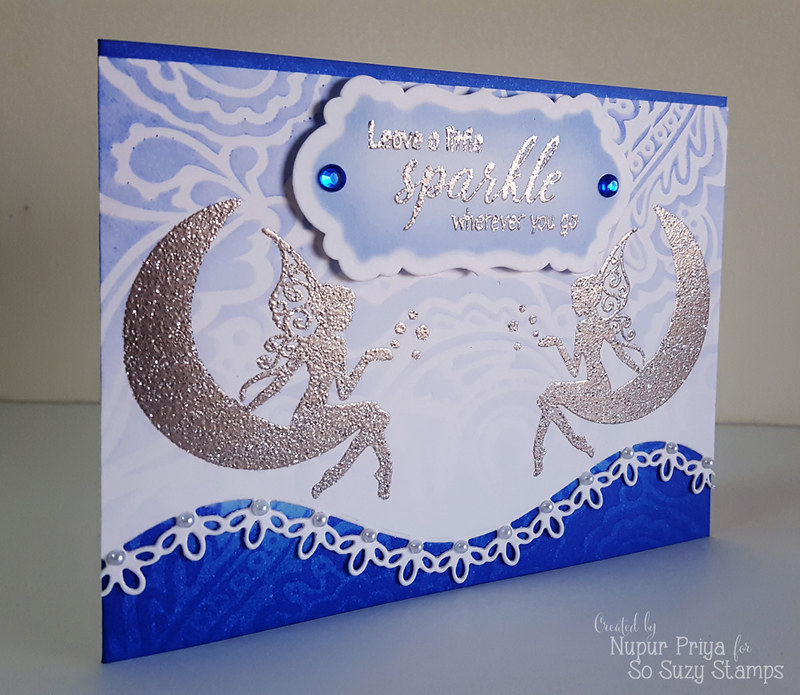
I started with using my Mini MISTI & stamped Moonlight Fairy stamp on  Mirror Image Stamp using versamark ink 2-3 times so that I get a good impression. Then I took my cardstock & put it face down on the Mirror Image Stamp & burnished it nicely using my fingers.
20170208_211357
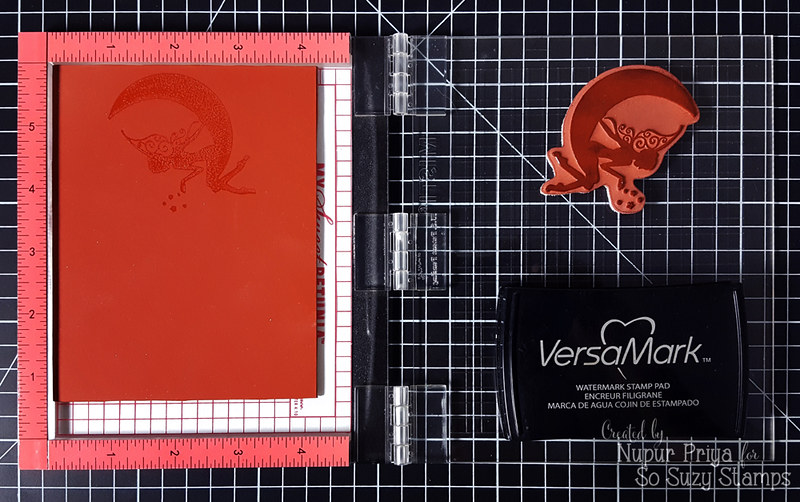
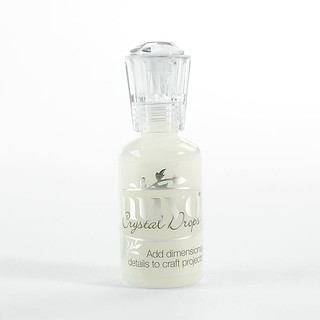
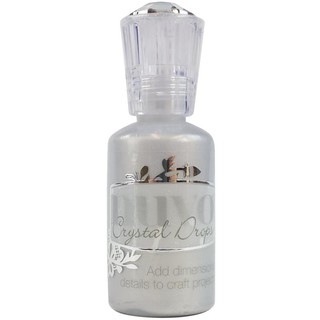
Next I used WOW metallic platinum glitter embossing powder to heat emboss my image.
20170208_211828
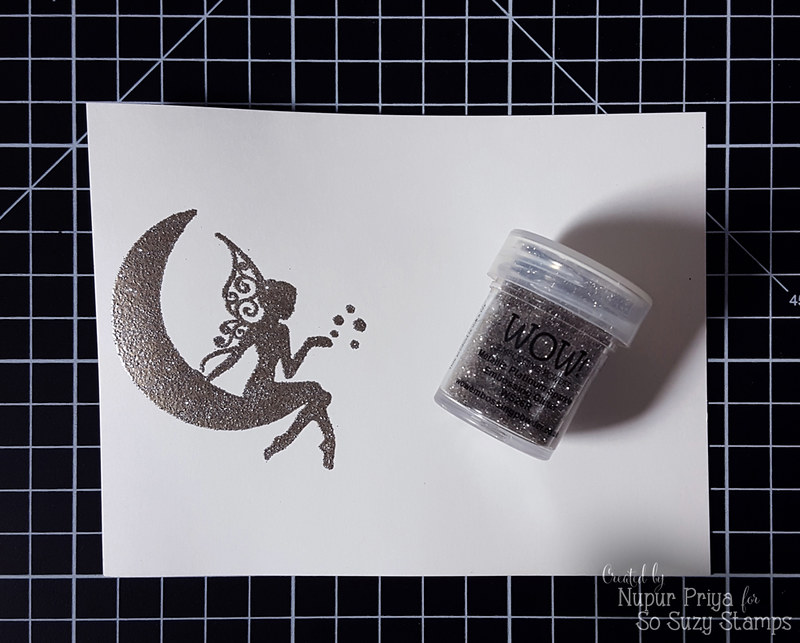
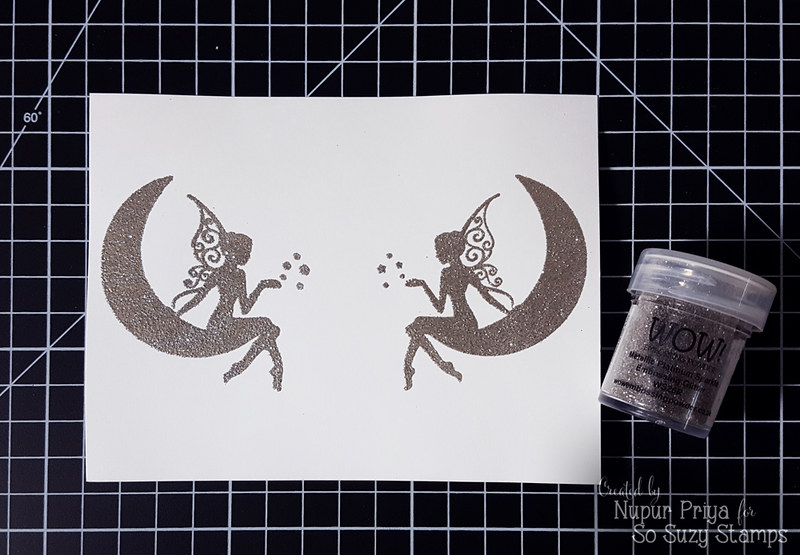
The next step was to stamp the Moonlight Fairy stamp on  the cardstock directly using versamark ink & my Mini MISTI.
20170208_212023
 I again used WOW metallic platinum glitter embossing powder to heat emboss my image.
20170208_212341
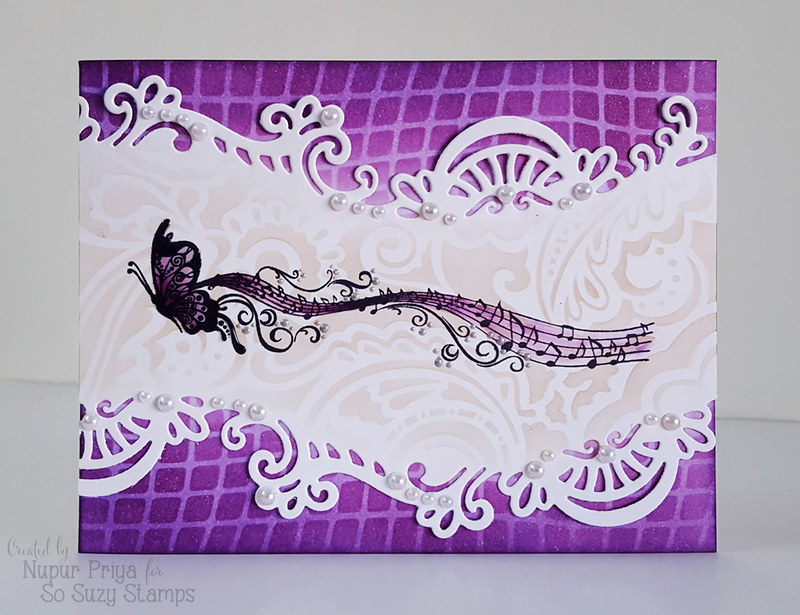
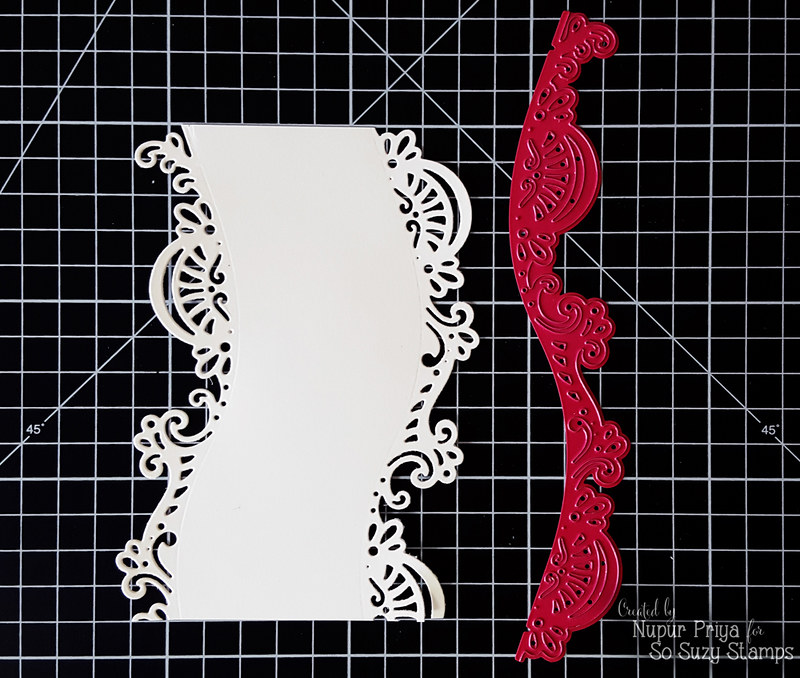
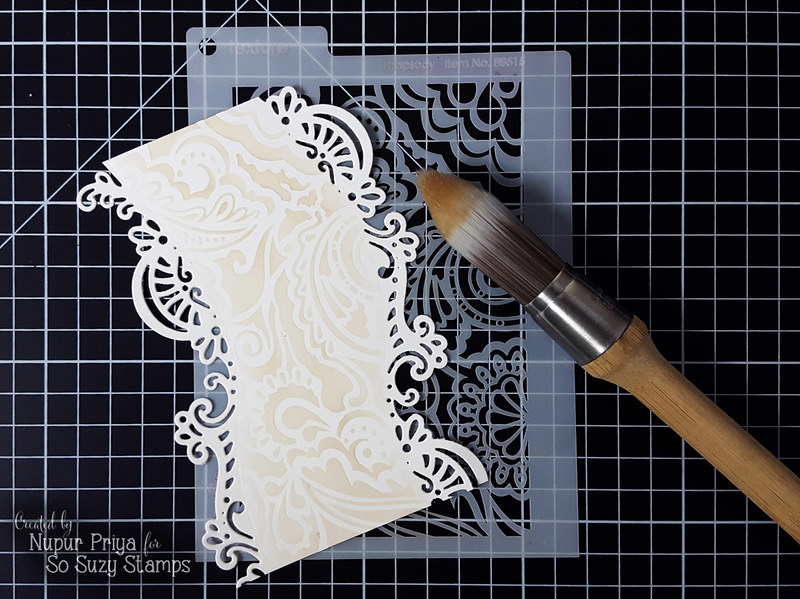
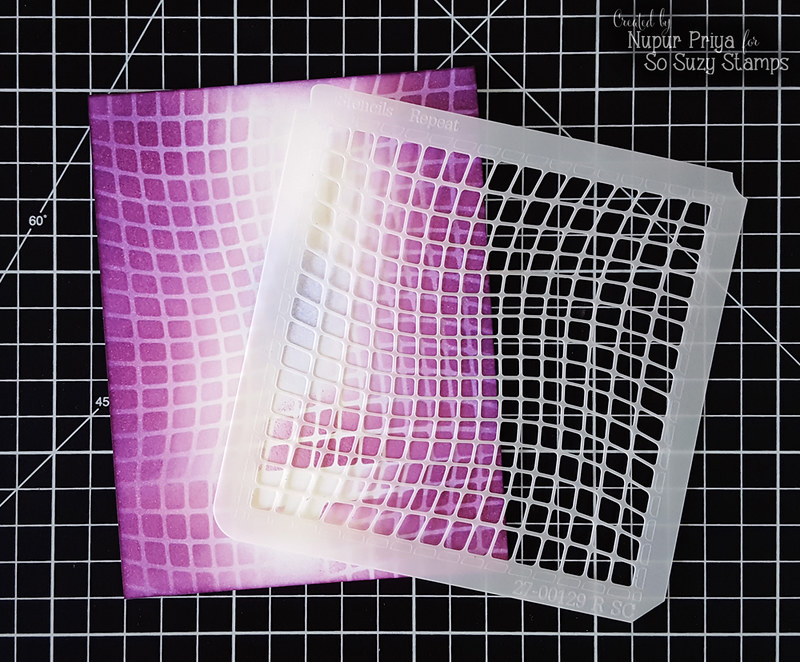
I die cut the bottom portion of the stamped cardstock using a border die & then I inked up the card panels using a decorative stencil, blue distress inks & Clarity Brush.
20170208_215338
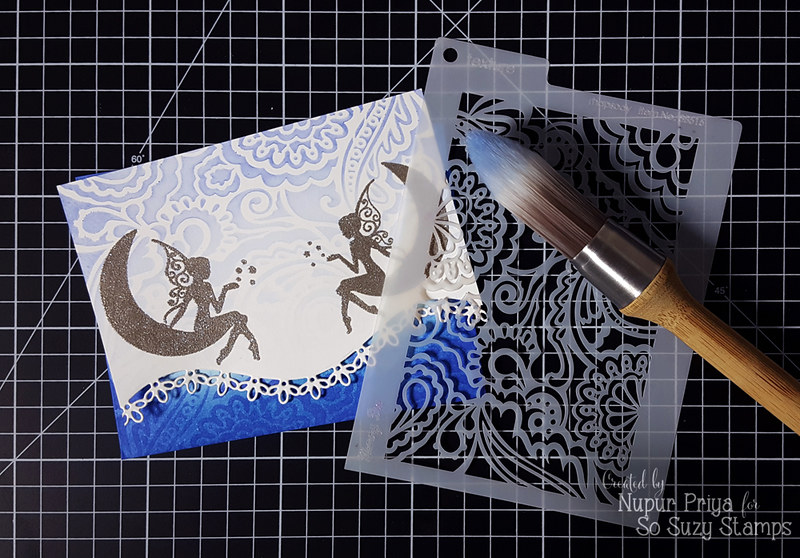
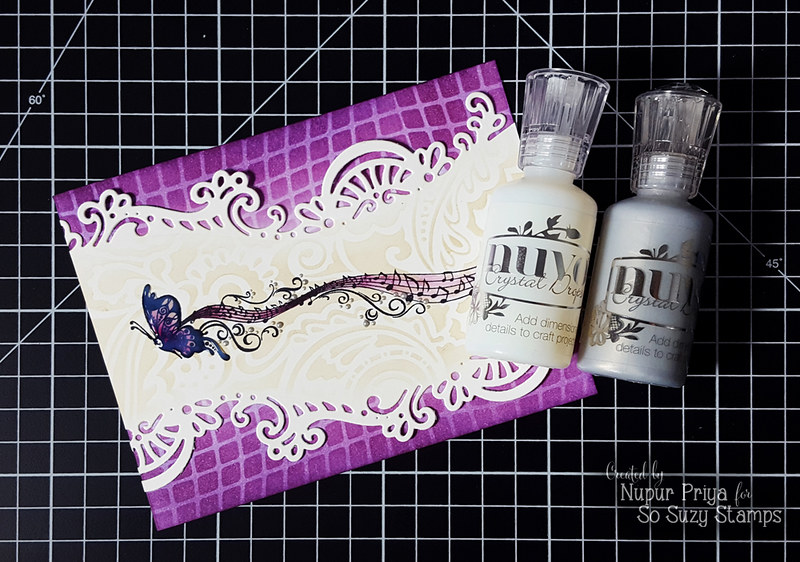
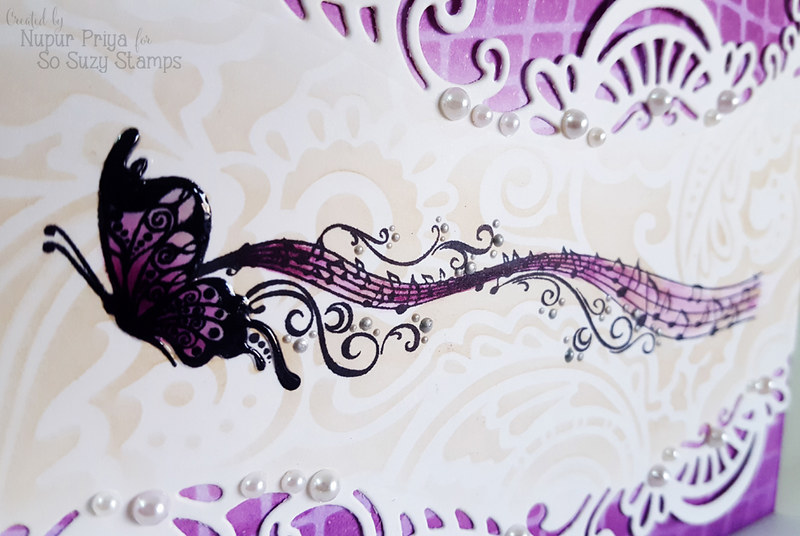
The  Leave a Little Sparkle stamp was heat embossed on a die cut & inked piece of card stock & adhered to the card front.
20170210_173240
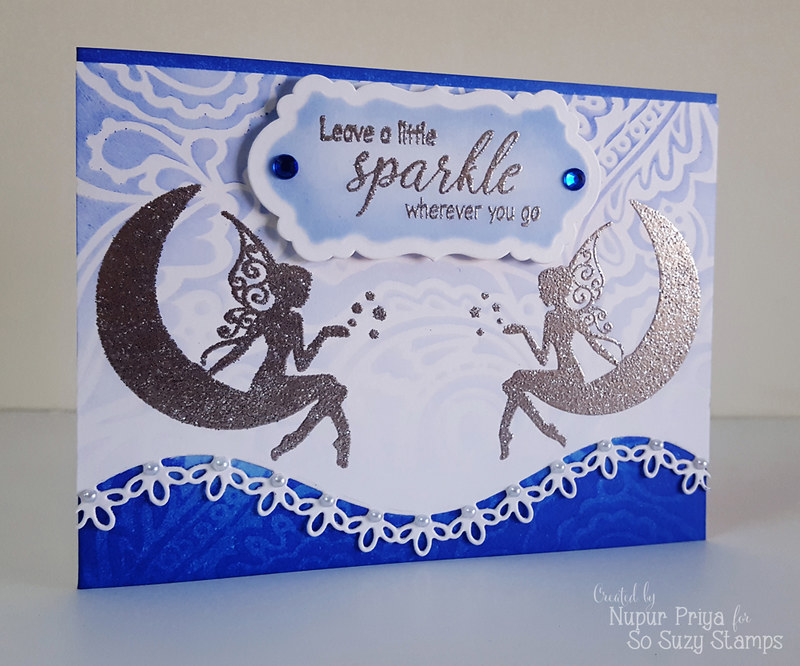
The final step was to embellish the card using rhinestones & pearls...
20170210_173258

GIVEAWAY:

We have lots of prizes too!  We have prizes from My Sweet Petunia, The TonSo Suzy Stamps and Simply Charming Everyday.

3 – MISTI’s in your choice of Original or Mini
4 – $25 Gift Certificates to The Ton
4 – $25 Gift Certificates to So Suzy Stamps 
1 – Memory MISTI Tote
2 – Regular MISTI Covers
2 – Mini MISTI Covers
2 – Bunkie Bags
All you need to do, is comment on everyone’s post throughout the month.  We will be announcing the winners on February 28th.


Hope you like my card...
Thank you for visiting today....


Nupur

Thursday, 9 February 2017

Butterfly Music

Hello friends & welcome to So Suzy Stamps inspiration post
I have a card for today made with Butterfly Music stamp. Scroll down for the tutorial...
20170209_172457_001
I started with die cutting a piece of white cardstock with a lacy border die.
20170125_165505
Then I inked it using my stencil, Gathered Twigs distress ink & Clarity Brushes
20170125_185624
Then I used my  used Mini MISTI to  stamp Butterfly Music stamp on this cardstock
20170125_185830
Then for the background I used istencil-27-00129, Shaded Lilac & Seedless Preserve distress inks & Clarity Brushes to ink top & bottom of my card base. These stencils are so easy to line-up for repeated inking.
20170208_172316
Once the background was ready I glued down the die cut piece in the center. I also colored the Butterfly Music image with Seedless Preserve distress ink & my waterbrush. Then I covered the butterfly with Morning Dew Nuvo Crystal Drops & added few drops of Metallic Silver Nuvo Crystal Drops to the trail.
20170208_201625
The last step was to embellish the card using some pearls...
20170209_172533

20170209_172551
Hope you like my card...
Thank you for visiting today....

Supplies Used:
Butterfly Music
Butterfly Music
istencil-27-00129
27-00129_R_SC__01276.1461690748

tombow_mono_multi_liquid_glue_52190__38338.1436795055.1280.1280
Mini_Misti_Contest__21512.1458416339.1280.1280
MISTI_Laser_2T__91668.1447080066.1280.1280
Nupur

Wednesday, 8 February 2017

Flowering Dogwood Collection

Hello friends & welcome to Heartfelt Wednesday...

Before I go any further I have to ask one favor from you all...

Its time to select a new team at Heartfelt Creations so that means  some of the current Design Team Members will continue & some will have to leave... And they need your vote to decide who gets to stay on for the next term... So, if you like my work & would like me to continue from another year then please vote for me by clicking on the link below :

Vote for your favorite design team members: 

http://hcgo.co/DesignTeamVote2017

P.S. : You have to vote for atleast 5 members for your vote to count

Thank you so much !!!

Now moving on...
Today we are debuting a gorgeous new collection :

Flowering Dogwood Collection

Heartfelt Creations invites you to usher in the spring season with the new Flowering Dogwood Collection!  Immerse yourself in this newest springtime assembling of designer papers, divinely detailed cling stamps and coordinating dies steeped with beautiful meanings and symbolism perfect for the Easter Season!  The dogwood tree is surrounded by a mesmerizing legend within the Christian faith…once the size of a mighty oak tree it was chosen to be used to construct the cross on which Jesus was to be crucified.  The tree became unhappy with its purpose and would never again grow large enough to ever build another cross.  Its branches would become narrow and crooked and no longer suitable for construction.  The delicate dogwood flower itself is a wonderful symbol of the Easter season…four petals that resemble the shape of a cross, the center laid as a crown of thorns, at the tip of each petal an indent resembling nail punctures, and a reddish hue around those indents resembling the blood of Jesus.  Soft and pastel in coloring, this newest paper collection reveals beautiful springtime shades of pinks, peaches, and greens which set stunning backdrops for scripted lettering and graceful swirls, while darker hints of blues and blacks bring out the gorgeous detail and coloring of the showy dogwood florals.  Bountiful blossom filled branches, peaceful white doves and hillside chapels are just a few of the beautiful illustrations found within the cling stamp sets!  Assemble the perfect dimensional dogwood flower using the varying sized petals within the Flowering Dogwood Cling Stamps Set and die cut using the coordinating dies.  The ideal collection to send out springtime and Easter wishes to friends and family!

I have made a Easter card with this collection...
20170128_163657

20170128_163951

20170128_163902

20170128_164313

20170128_163857

20170128_163846
INSTRUCTIONS :

Heartfelt Creations Products Used:

HCPC-3773 Flowering Dogwood Cling Stamp Set
HCPC-3774 Flowering Dogwood Branches Cling Stamp Set
HCPC-3775 Flowering Dogwood & Doves Cling Stamp Set
HCPC-3776 Dogwood Chapel Cling Stamp Set
HCD1-7118 Delicate Border Basics Die
HCD1-7129 Flowering Dogwood Die
HCD1-7130 Flowering Dogwood Branches Die
HCD1-7131 Flowering Dogwood & Doves Die
HCDP1-275 Flowering Dogwood Paper Collection
HCST1-401 Deluxe Flower Shaping Kit

Other Products:

Picked Raspberry, Forest Moss, Mowed Lawn & Gathered Twigs Distress Inks, Black Achival ink, Gansai Tambi Watercolor set, Koi Waterbrush, Ebosser, Martha Stewart scoreboard, white & watercolor cardstock, Nuvo Morning Dew crystal Drops, pollens, pearls & adhesive.

Project Instruction:
Take a 6" x 6" card base & 4 3/4" x 4" white cardstock & ink the edges with Gathered Twigs Distress ink. Adhere a 5 3/4" x 5 3/4" pattern paper from Flowering Dogwood Paper Collection on the inked card base & 4 1/2" x 3 3/4" pattern paper on the inked cardstock. Die cut a piece of white cardstock with Delicate Border Basics Die, ink with Gathered Twigs Distress ink and adhere to the 4 3/4" x 4" inked cardstock as shown.

Stamp the dogwood frame from Flowering Dogwood Branches Cling Stamp Set & the dove from Flowering Dogwood & Doves Cling Stamp Set with Black Achival ink on a piece of watercolor cardstock. Die cut them using matching dies from Flowering Dogwood Branches Die & Flowering Dogwood & Doves Die. Color them using Gansai Tambi Watercolor set & Koi Waterbrush.

Stamps & flowers & leaves from Flowering Dogwood Cling Stamp Set using Picked Raspberry & Forest Moss Distress Inks. Ink the flowers with  Picked Raspberry Distress ink & the leaves with Forest Moss Distress Ink. Shape them using Deluxe Flower Shaping Kit.

Stamp the sentiment from Dogwood Chapel Cling Stamp Set with Black Achival ink on pattern papers from Flowering Dogwood Paper Collection, cut into banner shape, ink with Picked Raspberry & Forest Moss Distress Inks. Arrange & adhere everything on the card base as shown. Embellish the card with some white pearls. Add drops of Nuvo Morning Dew crystal Drops to the flowers arrangement & dove eyes.


Hope you like this card...
Thank you for visiting today... :)

Nupur

Friday, 3 February 2017

Gift Basket with Perfect Affair

Hello friends,
My latest inspiration for Papericious is up on the Papericious blog & today I am sharing a cute basket made with Perfect Affair paper pack...
This is a gorgeous paper pack with gorgeous floral images, hearts, swirls....And the color combination is just perfect...

20170203_103347
This is a simple & easy gift basket but the results are beautiful... I embellished it using Swirl Mesh Lace, satin ribbon, some pearls & rhinestones... & love how it turned out...
20170203_103425


If you would like a pictorial on how I created this let me know in the comments...
Thank you for visiting today :)
nupur

Wednesday, 1 February 2017

Black & Gold

Hello friends & welcome to So Suzy Stamps inspiration post...
The theme for today is :


Someone Special + Masking Technique


I have made a black & gold card for today with masking & heat embossing technique.
I have used Rose Bloom & Audrey Hepburn stamps for this card. Scroll down for the tutorial...

20170130_175944
I started with stamping my  Audrey Hepburn sentiment on a 4" x 5 1/4" black cardstock with versamark ink using my Mini MISTI to position it correctly. Then I heat embossed it using WOW Metallic Gold Sparkle embossing powder.
20170130_164401
Then I used a piece of white copy paper to mask it off & create the border using Rose Bloom stamp.
20170130_170153
It was also stamped with versamark ink & heat embossed using WOW Metallic Gold Sparkle embossing powder.
20170130_170752
Then I decided to make a mat for this stamped panel to add a border all around & frame it...
I took a slightly larger piece of white cardstock & used  versamark ink & heat embossed using same embossing powder to keep all the gold same on my card...
20170130_171339
The final step was to glue all the layers together & add some black sequins...
20170130_180030

20170130_180116

Hope you like my card...
Thank you for visiting today....

Supplies used:

Rose Bloom

Rose_Bloom__74445.1481931802
Audrey Hepburn

Nupur

You are Loved

Hello friends & welcome to Heartfelt Wednesday...
Today I have made a gold & glittery inspirational  card for today...
Love the way the glittery gold embossing catches the light...
It is difficult to catch on camera but in real life it is so gorgeous!
20170129_092901

20170129_092758

INSTRUCTIONS:

Heartfelt Creations Products Used:
HCPC-3757 Blushing Rose Background Cling Stamp Set
HCD1-779 Regal Borders and Pockets Die
HCD1-7118 Delicate Border Basics Die

Other Products:
Abandoned Coral & Picked Raspberry Distress Inks, Versamark  ink, WOW Metallic Gold Sparkle Embossing Powder, Ranger-Heat-it Tool, Gansai Tambi Watercolor set, Koi Waterbrush, Ebosser, Martha Stewart scoreboard, white & watercolor cardstock, pearls & adhesive.

Project Instruction:
Stamp the Blushing Rose Background Cling Stamp Set with Versamark Ink on a piece of watercolor cardstock & heat emboss it using WOW Metallic Gold Sparkle Embossing Powder & Ranger-Heat-it Tool. Trim this piece to 5 3/4" x 3 1/2". Color it using Gansai Tambi Watercolor set & Koi Waterbrush.

Heat emboss a piece of 5 3/4" x 2 1/2" white cardstock using Versamark Ink, WOW Metallic Gold Sparkle Embossing Powder & Ranger-Heat-it Tool. Cut 4 slivers from this piece & adhere them to all four sides of the stamped & colored piece of cardstock. Die cut the remaining piece of this gold cardstock with Delicate Border Basics Die. Die cut one more piece of white cardstock with the same die, ink it with Abandoned Coral & Picked Raspberry Distress Inks & adhere it on the glod border we just cut. Cut a piece of white cardstock with Regal Borders and Pockets Die & adhere it on the pink die cut piece. Adhere this final piece along with the stamped piece of cardstock on a 6" x 6" white card base as shown. Embellish the card with some white pearls.


Hope you like this explosion box...
Thank you for visiting today... :)

Nupur