Wednesday, 17 March 2021

Hyacinth Frame Card

Hello and welcome to my blog
Today I am sharing another card made with the negative die cut pieces technique that I shared here
This time I have made a frame for my Hyacinth with those pieces.
Scroll down for more details and instructions.Hyacinth Frame_Nupur Priya_01 
Hyacinth Frame_Nupur Priya_02
Heartfelt Creations Products:
HCPC-3947 Fragrant Hyacinth Cling Stamp Set
HCD1-7345 Fragrant Hyacinth Die
HCFB1-497 3D Hyacinth Shaping Mold
HCD2-7337 Teardrop Lattice Gateway Die

Instructions:
Die cut 2 pieces of white cardstock using the dies from Eyelet Royale Die. Trim the frame and adhere them on a 4 1/4" x 5 1/2" white cardbase as shown.

Stamp the hyacinth image from Fragrant Hyacinth Cling Stamp Set on a piece of watercolor cardstock and die cut using the matching die from Fragrant Hyacinth Die. Color in the image using Altenew watercolors. Adhere this on the card front.

Die cut a piece of white cardstock using the dies from  Eyelet Rectangle & Basics Die to make a thin 3" x 4" frame. Adhere the negative die cut pieces of Luxe Gold Cardstock left after cutting Teardrop Lattice Gateway Die on this white frame as shown to create a gold frame. Adhere this frame on the card front using double sided foam tape to frame the Hyacinth.

Stamp the flowers from Fragrant Hyacinth Cling Stamp Set on a piece of Deluxe Flower Shaping Paper using Vibrant Fuchsia and Cactus Flower Archival Inks. Ink them with same inks and die cut using matching die from Fragrant Hyacinth Die. Shape them using 3D Hyacinth Shaping Mold and  Deluxe Flower Shaping Kit. 

Arrange and adhere all the flowers on the Hyacinth as shown. Add a drop of Ivory Seashell Nuvo Crystal Drops to the flower centers. Add few pearls to the die cuts to add finishing touch.


Hope you like it...
Thank you for visiting today... :)
Nupur
Disclosure : Compensated affiliate links used when possible  at NO additional cost to you.. Thank you! 

Wednesday, 10 March 2021

Daffodil Frame Card

Hello and welcome to my blog,
Today is the release day of a brand new collection

Spring Garden Collection

it is a beautiful floral collection with not jut one but 2 flowers Hyacinth and Daffodils with matching molds.
And here is the card that I made with this collection for today's inspiration. You will be seeing a lot of these pretty flowers on my cards now :)
Daffodil Frame_Nupur Priya_01       Daffodil Frame_Nupur Priya_02
Heartfelt Creations Products: 
SUAH05 5pc. Acrylic Block Set
352854 Metal Tip for Adhesive Bottles
159723 Designer Dries Clear Adhesive

Other products:
Altenew watercolors, Brustro Cold Pressed Watercolor Cardstock, Brustro Green gold brushesdouble sided foam tape and pearls.


Instructions:
Cut a piece of 4" x 5 1/4" pattern paper from Spring Garden Paper Collection and adhere it on a 4 1/4" x 5 1/2" white cardbase. Stamp the image from Delightful Daffodil & Butterfly Cling Stamp Set
on a piece of scrap paper and then on watercolor cardstock using Jet Black Archival Ink. Color in the image with Altenew watercolors and die cut using the matching die from Delightful Daffodil & Butterfly Die.

 Die cut a piece of white cardstock and  Luxe Silver Cardstock using the dies from Eyelet Rectangle & Basics Die to make 2 frames. Adhere them together. Die cut a piece of white cardstock using the die from Adorn It Pocket Accents Die and cut it in half. Adhere it behind the frame as shown using double sided foam tape. Adhere the colored image on this die cut as shown. Cut a piece of 3 1/4" 4 1/4"  pattern paper from same paper collection and adhere it on a same sized white cardstock. Adhere this behind the frame using double sided foam tape. Adhere this frame slightly offset to the right on the card front as shown.

Stamp the flowers from Fragrant Hyacinth Cling Stamp Set on a piece of Deluxe Flower Shaping Paper using Vibrant Fuchsia and Cactus Flower Archival Inks. Ink them with same inks and die cut using matching die from Fragrant Hyacinth Die. Shape them using 3D Hyacinth Shaping Mold and  Deluxe Flower Shaping Kit. Add few white stamens from Assorted Pearl Stamens to the flower centers.

Stamp the leaves from Cottage Tree 'scapes Cling Stamp Set on a piece of Deluxe Flower Shaping Paper using Leaf Green Archival Ink. Ink it with same ink and die cut using matching die from Cottage Tree 'scapes Die. Shape it using  Deluxe Flower Shaping Kit.

Arrange and adhere all the flowers and leaves on the card as shown. Use Apple Green Nuvo Crystal Drops to make the stamens on the colored image of daffodils. Add few pearls to add finishing touch.

Hope you like it...
Thank you for visiting today... :)
Nupur
Disclosure : Compensated affiliate links used when possible  at NO additional cost to you.. Thank you! 

Saturday, 6 March 2021

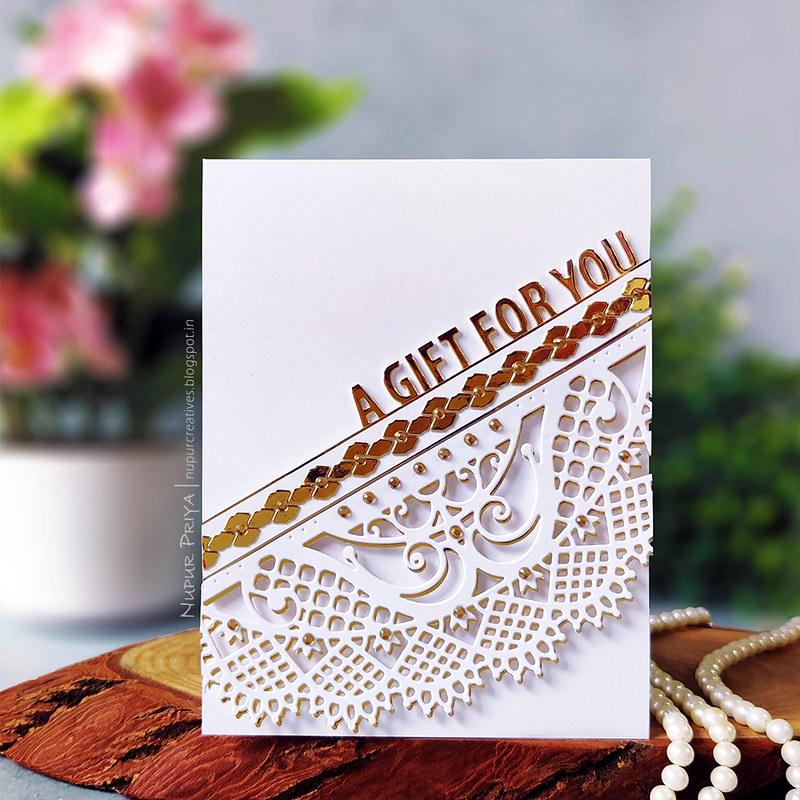
White & Gold Card

Hello friends and welcome to my blog
Today I am sharing a little trick to stretch your dies. I love finding new ways to use my dies. Sometimes the negative pieces of the die cuts can be used to create new and unique designs
The golden border on this card was made with left over die cuts from cards that I made for Christmas. (The die was the same that I used on the previous card that I posted here but in gold)
 While I was cleaning the gold die cut this particular shape caught my eye and I started fiddling with it... arranging and rearranging them to make few designs and I used this border design for today's card. (I have used these pieces on another card that I will be posting in the coming weeks so stay tuned for that) The sentiment is also a part of another die cut. 
Have you tried using the leftover pieces of die cuts to create some new unusual designs? Tell me in the comments down below. Scroll down for more details
White and gold card_Nupur Priya_01

White and gold card_Nupur Priya_02
Heartfelt Creations Products: 

Other products:
Double sided foam tape and 
gold rhinestones.

Instructions:
Die cut a piece of Luxe Gold Cardstock and 2 pieces of white cardstock using the die from Ornamental Tags Die. Cut out the sentiment part from all the die cuts and then trim off the top part so that the letters are joined only at the bottom. Stack and adhere them together.

Adhere the negative die cut pieces of Luxe Gold Cardstock left after cutting Teardrop Lattice Gateway Die on a strip of white cardstock to create a slim border as shown. Adhere this border on a slightly wider piece of Luxe Gold Cardstock.

Die cut a piece of white cardstock and a piece of Luxe Gold Cardstock using the die from Adorn It Pocket Accents Die. Adhere the white die cut on gold die cut, offsetting them a little. 

Arrange and adhere all the 3 final pieces on a 4 1/4" x 5 1/2" white card base as shown using double sided foam tape wherever necessary. Trim off the excess hanging off the edges using a pair of scissors. Adhere gold rhinestones to the die cuts to add finishing touch.

Hope you like it...
Thank you for visiting today... :)
Nupur
Disclosure : Compensated affiliate links used when possible  at NO additional cost to you.. Thank you!