Hello and welcome to my blog
As promised I am back with another card made with the new Tender Moments Collection
And this time I have a cute birthday card made with the cute critters from this collection along with the cupcakes Sugarspun Collection, banner and fence from Happy Camper Collection and the butterflies from Woodsy Wonderland Collection. ( Find all the supplies listed below along with the instruction)
By combining elements from different collections I was able to create a cute card with a collage of tiny scenes.
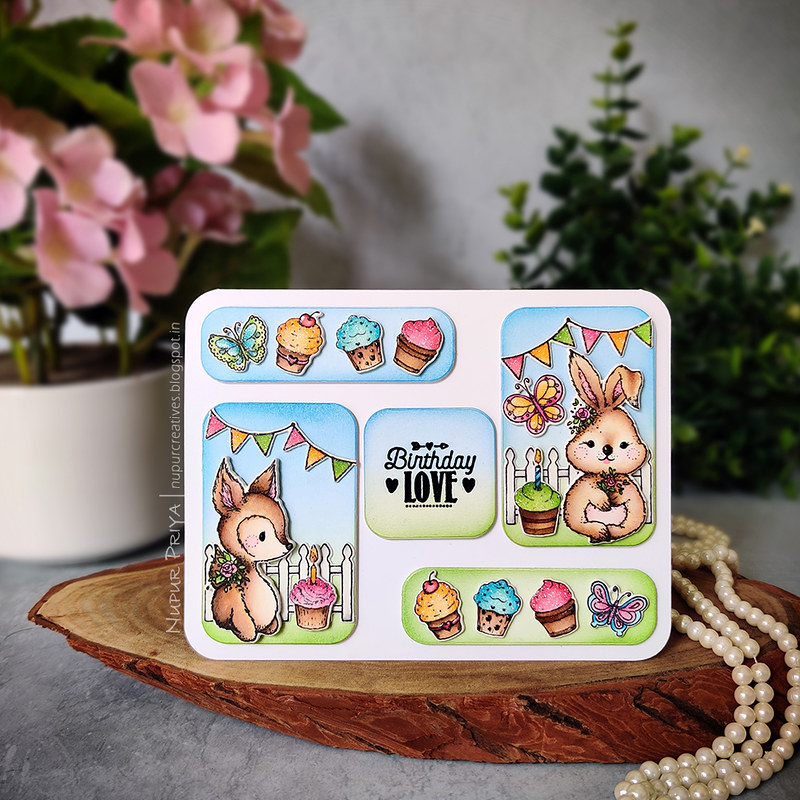


I love to add tiny details like gloss, glitter and dimension to my cards and I feel like they add such a special touch! Can you spot these details? These details look even better in real life!


Heartfelt Creations Products:
HCPC-3767 Woodsy Wonderland Cling Stamp Set
HCPC-3873 Sweet Shoppe Cling Stamp Set
HCPC-3843 Special Birthday Sentiments Cling Stamp Set
HCPC-3880 Elements of Home Cling Stamp Set
HCPC-3916 Baby's Friends Cling Stamp Set
HCD2-749 Cut Mat Create 1A Die
HCD2-752 Cut Mat Create 2B Die
HCD1-7123 Woodsy Wonderland Die
HCD1-7236 Sweet Shoppe Treats Die
HCD1-7244 Elements of Home Die
HCD1-7301 Baby's Friends Die
HCPP1-438-2 Paper Pack of 10 - White
RACP468 Ranger Archival Ink Pad - Jet Black
Zig Clean Color Real Brush Markers
RAHT Heat It Craft Tool
411231 5pc. Acrylic Block Set
NU650 Nuvo Crystal Drops - Ebony Black
Other Products:
Mowed Lawn, Worn Lipstick, Salty Ocean, Vintage Photo, Walnut Stain and Black Soot Distress inks, Versafine Onyx Black ink, Ranger black embossing powder, watercolor cardstock, paint brush, oval makeup brush and Sakura Gelly roll white gel pen.
Instructions:
Cardbase : Die cut 5 pieces of white cardstock using the dies from Cut Mat Create 1A Die and Cut Mat Create 2B Die. Stamp the sentiment from Special Birthday Sentiments Cling Stamp Set on the square die cut with Versafine Onyx Black ink and heat emboss using Ranger black embossing powder and Heat It Craft Tool. Ink all the die cut pieces with Mowed Lawn and Salty Ocean distress inks as shown. Adhere them on a piece of 4 1/4" x 5 1/2" white cardbase as shown.
Colored Images : Stamp the images from Baby's Friends Cling Stamp Set, Woodsy Wonderland Cling Stamp Set, Sweet Shoppe Cling Stamp Set and Elements of Home Cling Stamp Set on watercolor cardstock and die cut with matching dies from Baby's Friends Die, Woodsy Wonderland Die, Sweet Shoppe Treats Die and Elements of Home Die. Die cut few more pieces for all the die cuts from white cardstock using the same dies, stack and adhere all the similar die cuts together to make thicker pieces of varying thickness. Here I have used single piece for fence, 2 pieces for banner and 4 pieces for rest on the images.
Color all the images using Mowed Lawn, Worn Lipstick, Salty Ocean, Vintage Photo, Walnut Stain and Black Soot Distress inks and Zig Clean Color Real Brush Markers. Apply a layer of Designer Dries Clear Adhesive to the cup cake frosting, flames, parts of butterfly and the banner. Sprinkle transparent glitter on the glue and let it dry. Once dry burnish the glitter with fingertips. Arrange and adhere all the pieces on the card front as shown. add tiny drops of Ebony Black Nuvo Crystal Drops to the eyes and 3-D Crystal Lacquer to the nose of the bunny and fawn to add finishing touch.
Hope you like this card and try something similar...
And also don't forget to come back tomorrow for more inspiration with this collection... I have a card with the cutest elephant, koala and raccoon for tomorrow!
Hope you like it...
As promised I am back with another card made with the new Tender Moments Collection
And this time I have a cute birthday card made with the cute critters from this collection along with the cupcakes Sugarspun Collection, banner and fence from Happy Camper Collection and the butterflies from Woodsy Wonderland Collection. ( Find all the supplies listed below along with the instruction)
By combining elements from different collections I was able to create a cute card with a collage of tiny scenes.
I love to add tiny details like gloss, glitter and dimension to my cards and I feel like they add such a special touch! Can you spot these details? These details look even better in real life!
Heartfelt Creations Products:
HCPC-3767 Woodsy Wonderland Cling Stamp Set
HCPC-3873 Sweet Shoppe Cling Stamp Set
HCPC-3843 Special Birthday Sentiments Cling Stamp Set
HCPC-3880 Elements of Home Cling Stamp Set
HCPC-3916 Baby's Friends Cling Stamp Set
HCD2-749 Cut Mat Create 1A Die
HCD2-752 Cut Mat Create 2B Die
HCD1-7123 Woodsy Wonderland Die
HCD1-7236 Sweet Shoppe Treats Die
HCD1-7244 Elements of Home Die
HCD1-7301 Baby's Friends Die
HCPP1-438-2 Paper Pack of 10 - White
RACP468 Ranger Archival Ink Pad - Jet Black
Zig Clean Color Real Brush Markers
RAHT Heat It Craft Tool
411231 5pc. Acrylic Block Set
NU650 Nuvo Crystal Drops - Ebony Black
Mowed Lawn, Worn Lipstick, Salty Ocean, Vintage Photo, Walnut Stain and Black Soot Distress inks, Versafine Onyx Black ink, Ranger black embossing powder, watercolor cardstock, paint brush, oval makeup brush and Sakura Gelly roll white gel pen.
Instructions:
Cardbase : Die cut 5 pieces of white cardstock using the dies from Cut Mat Create 1A Die and Cut Mat Create 2B Die. Stamp the sentiment from Special Birthday Sentiments Cling Stamp Set on the square die cut with Versafine Onyx Black ink and heat emboss using Ranger black embossing powder and Heat It Craft Tool. Ink all the die cut pieces with Mowed Lawn and Salty Ocean distress inks as shown. Adhere them on a piece of 4 1/4" x 5 1/2" white cardbase as shown.
Colored Images : Stamp the images from Baby's Friends Cling Stamp Set, Woodsy Wonderland Cling Stamp Set, Sweet Shoppe Cling Stamp Set and Elements of Home Cling Stamp Set on watercolor cardstock and die cut with matching dies from Baby's Friends Die, Woodsy Wonderland Die, Sweet Shoppe Treats Die and Elements of Home Die. Die cut few more pieces for all the die cuts from white cardstock using the same dies, stack and adhere all the similar die cuts together to make thicker pieces of varying thickness. Here I have used single piece for fence, 2 pieces for banner and 4 pieces for rest on the images.
Color all the images using Mowed Lawn, Worn Lipstick, Salty Ocean, Vintage Photo, Walnut Stain and Black Soot Distress inks and Zig Clean Color Real Brush Markers. Apply a layer of Designer Dries Clear Adhesive to the cup cake frosting, flames, parts of butterfly and the banner. Sprinkle transparent glitter on the glue and let it dry. Once dry burnish the glitter with fingertips. Arrange and adhere all the pieces on the card front as shown. add tiny drops of Ebony Black Nuvo Crystal Drops to the eyes and 3-D Crystal Lacquer to the nose of the bunny and fawn to add finishing touch.
Hope you like this card and try something similar...
And also don't forget to come back tomorrow for more inspiration with this collection... I have a card with the cutest elephant, koala and raccoon for tomorrow!
Hope you like it...
Thank you for visiting today... :)